本文基于UBNT EdgeRouter ER-X路由器,在不额外增加硬件的情况下,实现DDNS,搭建frps内网穿透服务。
Teamviewer开始收费了,向日葵之类用起来又不顺手,试来试去还是Windows远程桌面最好用。Windows远程桌面基于Windows底层数据通信,画质清晰操作还流畅,显示分辨率能够自适应,用过的都说好。
但是,办公室电脑在内网,并不能从外部访问。远程桌面端口映射出去也不符合网络管理的安全原则。因此决定搭建frps服务,实现内网端口穿透。没有公网IP的同学可以在阿里云、腾讯云上找个VPS搭建。家里有公网IP有UBNT的同学就可以看我这篇文章开搞。
一、获取公网IP、配置DDNS
首先与电信亲切交谈,获得公网IPv4地址(只要努力一般都能搞得到)。
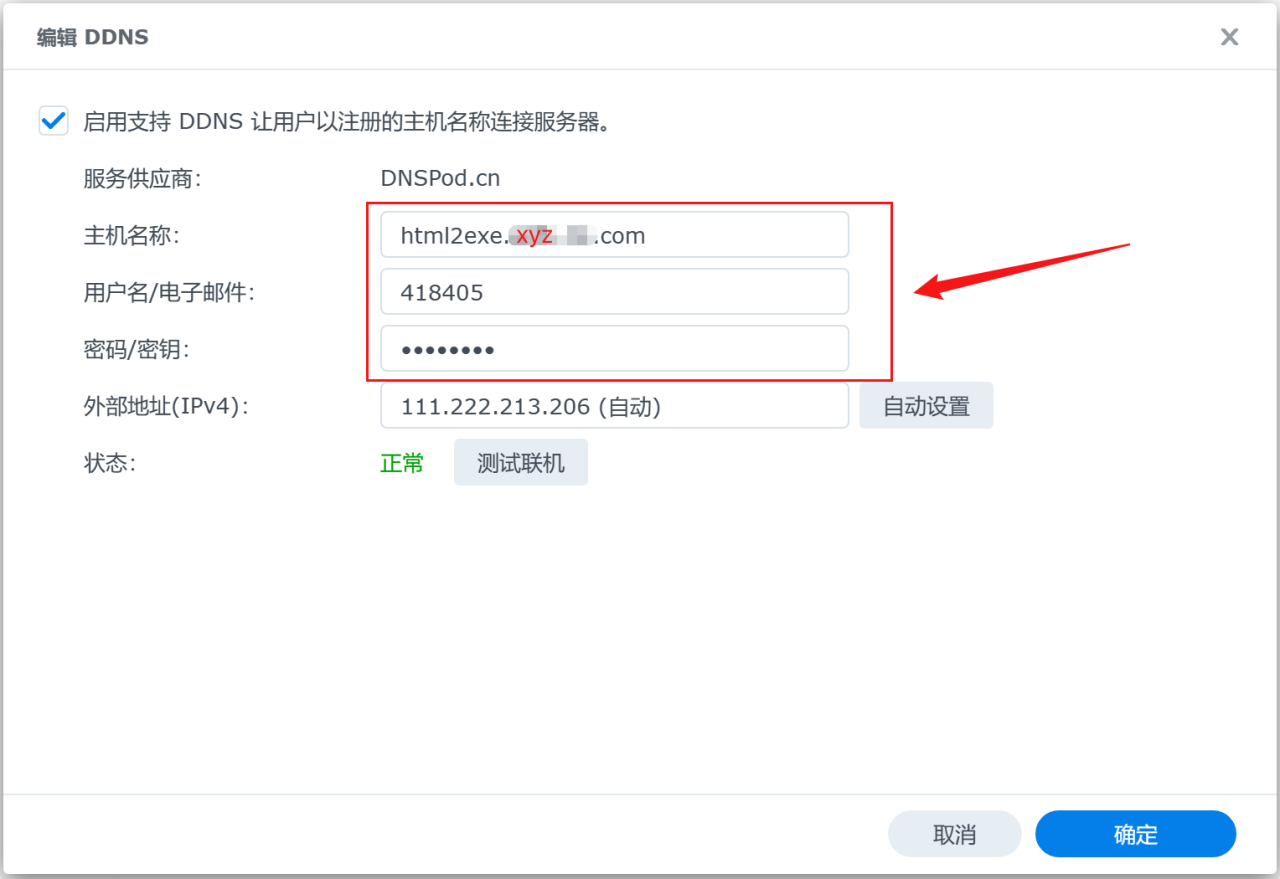
由于公网IP是动态变化的,因此需要配置DDNS,申请一个免费的动态域名,推荐使用pubyun:http://www.pubyun.com/ 我一直在用,免费白嫖了好几年了,稳定可靠基本没出过什么问题。(动态域名随便起个名字就行,如果对名字不满意,可以购买低价静态域名,配置CNAME解析到pubyun域名)
登陆ER-X控制台,逐行输入
configure set service dns dynamic interface pppoe0 service custom-pubyun host-name yourdomain.f3322.net set service dns dynamic interface pppoe0 service custom-pubyun login youraccount set service dns dynamic interface pppoe0 service custom-pubyun options ssl=no set service dns dynamic interface pppoe0 service custom-pubyun password yourpassword set service dns dynamic interface pppoe0 service custom-pubyun protocol dyndns2 set service dns dynamic interface pppoe0 service custom-pubyun server www.pubyun.com commit saveconfigure set service dns dynamic interface pppoe0 service custom-pubyun host-name yourdomain.f3322.net set service dns dynamic interface pppoe0 service custom-pubyun login youraccount set service dns dynamic interface pppoe0 service custom-pubyun options ssl=no set service dns dynamic interface pppoe0 service custom-pubyun password yourpassword set service dns dynamic interface pppoe0 service custom-pubyun protocol dyndns2 set service dns dynamic interface pppoe0 service custom-pubyun server www.pubyun.com commit saveconfigure set service dns dynamic interface pppoe0 service custom-pubyun host-name yourdomain.f3322.net set service dns dynamic interface pppoe0 service custom-pubyun login youraccount set service dns dynamic interface pppoe0 service custom-pubyun options ssl=no set service dns dynamic interface pppoe0 service custom-pubyun password yourpassword set service dns dynamic interface pppoe0 service custom-pubyun protocol dyndns2 set service dns dynamic interface pppoe0 service custom-pubyun server www.pubyun.com commit save
其中 yourdomain.f3322.net 为动态域名,youraccount为pubyun账户名,yourpassword为pubyun密码。
你可以输入以下命令,验证DDNS是否已正常工作:
ubnt@EdgeRouter:~$ show dns dynamic status interface : pppoe0 ip address : 113.22.33.45 host-name : yourdomain.f3322.net last update : Wed Aug 11 14:00:51 2020 update-status: goodubnt@EdgeRouter:~$ show dns dynamic status interface : pppoe0 ip address : 113.22.33.45 host-name : yourdomain.f3322.net last update : Wed Aug 11 14:00:51 2020 update-status: goodubnt@EdgeRouter:~$ show dns dynamic status interface : pppoe0 ip address : 113.22.33.45 host-name : yourdomain.f3322.net last update : Wed Aug 11 14:00:51 2020 update-status: good
看到 update-status: good 动态域名已更新。
此时,在任意一台连接互联网的Windows系统上,打开cmd 执行:
C:\Users\Administrator> nslookup yourdomain.f3322.net 服务器: UnKnown Address: 192.168.1.1 非权威应答: 名称: yourdomain.f3322.net Address: 113.22.33.45C:\Users\Administrator> nslookup yourdomain.f3322.net 服务器: UnKnown Address: 192.168.1.1 非权威应答: 名称: yourdomain.f3322.net Address: 113.22.33.45C:\Users\Administrator> nslookup yourdomain.f3322.net 服务器: UnKnown Address: 192.168.1.1 非权威应答: 名称: yourdomain.f3322.net Address: 113.22.33.45
看到Address为路由器公网IP,证明DDNS正常工作。如果你在ER-X防火墙上允许ICMP,理论上能够从外网ping通yourdomain.f3322.net。(ER-X防火墙的配置请自行查资料)
二、在 EdgeOS 上配置运行frps
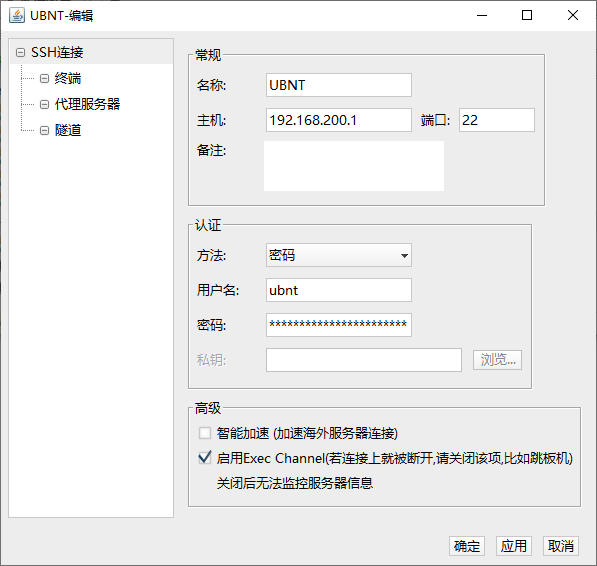
通过SSH连接到ER-X,软件不限,用着顺手就行,用户名和密码与web登陆端一致:
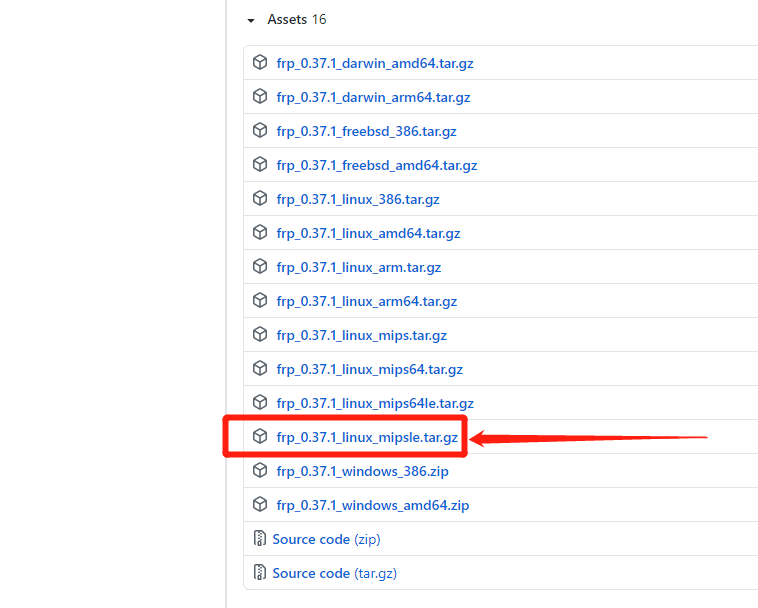
从GitHub上下载frp:https://github.com/fatedier/frp/releases/ 上不去的话翻一下,其它渠道也可以。
注意从releases中,下载最新版本的 linux_mipsle版
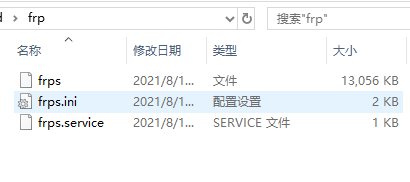
解压后,仅保留以下几个文件:
修改frps.ini的内容为:
# [common] is integral section [common] bind_addr = 0.0.0.0 bind_port = 7000 authentication_method = token token = ABC123456 # 设置一个密码,frpc的密码要和这里一致# [common] is integral section [common] bind_addr = 0.0.0.0 bind_port = 7000 authentication_method = token token = ABC123456 # 设置一个密码,frpc的密码要和这里一致# [common] is integral section [common] bind_addr = 0.0.0.0 bind_port = 7000 authentication_method = token token = ABC123456 # 设置一个密码,frpc的密码要和这里一致
修改frps.service内容为:
[Unit] Description=Frp Server Service After=network.target [Service] Type=simple User=nobody Restart=on-failure RestartSec=5s ExecStart=/home/ubnt/frp/frps -c /home/ubnt/frp/frps.ini LimitNOFILE=1048576 [Install] WantedBy=multi-user.target[Unit] Description=Frp Server Service After=network.target [Service] Type=simple User=nobody Restart=on-failure RestartSec=5s ExecStart=/home/ubnt/frp/frps -c /home/ubnt/frp/frps.ini LimitNOFILE=1048576 [Install] WantedBy=multi-user.target[Unit] Description=Frp Server Service After=network.target [Service] Type=simple User=nobody Restart=on-failure RestartSec=5s ExecStart=/home/ubnt/frp/frps -c /home/ubnt/frp/frps.ini LimitNOFILE=1048576 [Install] WantedBy=multi-user.target
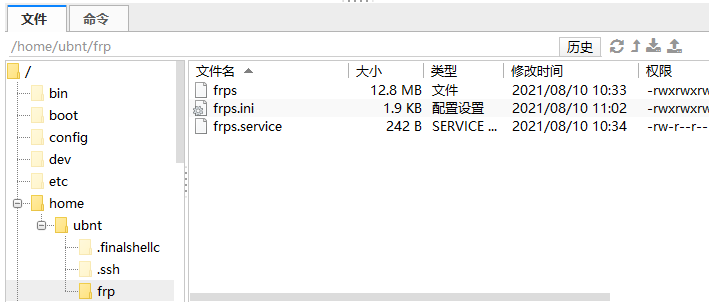
上传frp文件夹到ER-X的 /home/ubnt 目录下,注意检查路径和文件名,与frps.service的ExecStart对应:
执行以下命令:
0.进入frp目录 cd /home/ubnt/frp 1.复制 frps.service 到 /lib/systemd/system/ sudo cp frps.service /lib/systemd/system/ 2.赋予权限 sudo chmod 777 frps sudo chmod 777 frps.ini 3.启动frps服务 sudo systemctl start frps 4.配置开机启动 sudo systemctl enable frps0.进入frp目录 cd /home/ubnt/frp 1.复制 frps.service 到 /lib/systemd/system/ sudo cp frps.service /lib/systemd/system/ 2.赋予权限 sudo chmod 777 frps sudo chmod 777 frps.ini 3.启动frps服务 sudo systemctl start frps 4.配置开机启动 sudo systemctl enable frps0.进入frp目录 cd /home/ubnt/frp 1.复制 frps.service 到 /lib/systemd/system/ sudo cp frps.service /lib/systemd/system/ 2.赋予权限 sudo chmod 777 frps sudo chmod 777 frps.ini 3.启动frps服务 sudo systemctl start frps 4.配置开机启动 sudo systemctl enable frps
此时,执行sudo systemctl status frps 显示运行状态:

其它可能用到的命令:
停止服务 systemctl stop frps 重启服务 systemctl restart frps 禁用开机启动 systemctl disable frps停止服务 systemctl stop frps 重启服务 systemctl restart frps 禁用开机启动 systemctl disable frps停止服务 systemctl stop frps 重启服务 systemctl restart frps 禁用开机启动 systemctl disable frps
三、配置防火墙,开放7000端口和你希望代理的端口
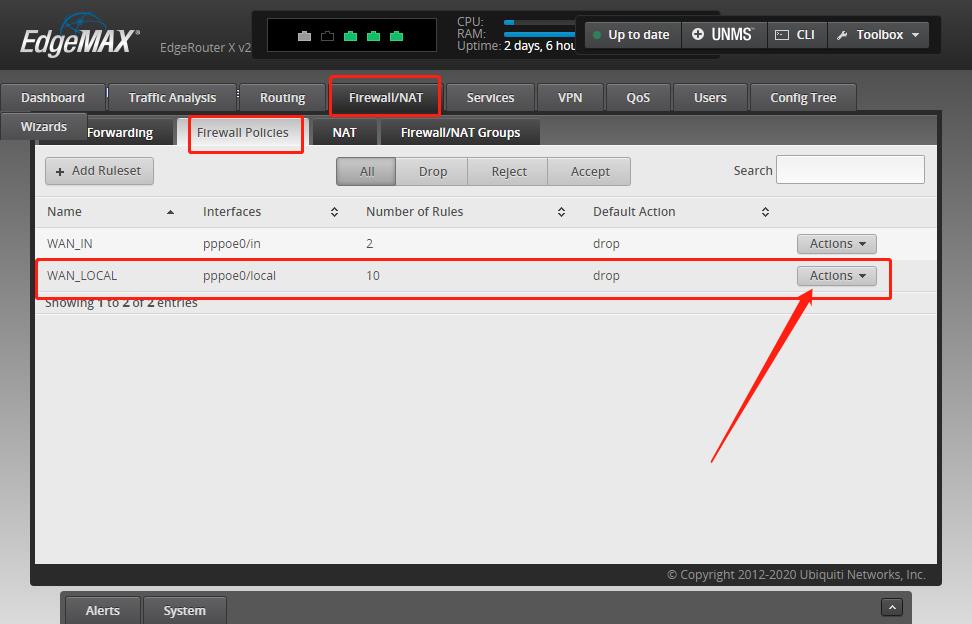
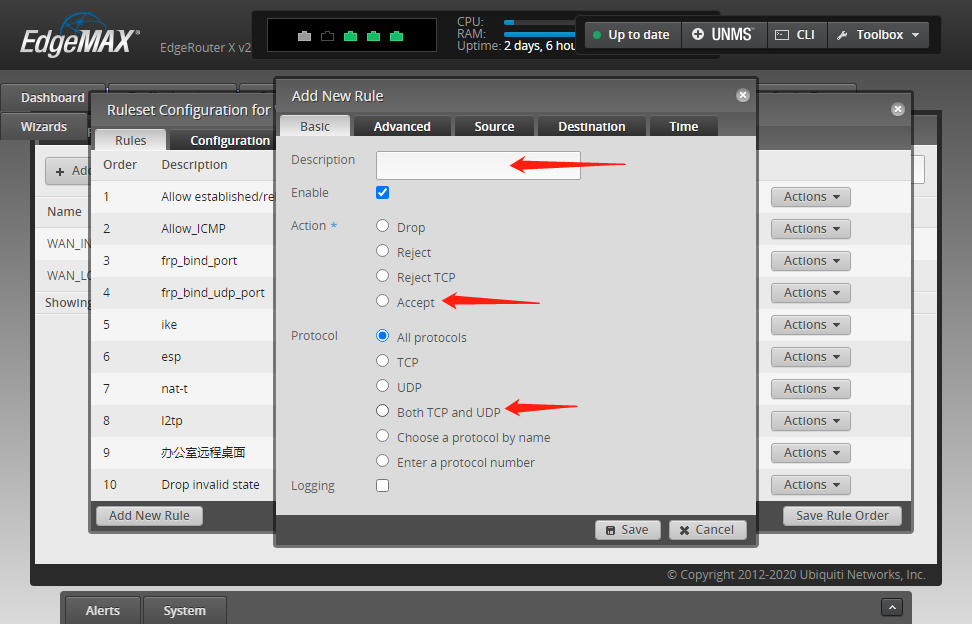
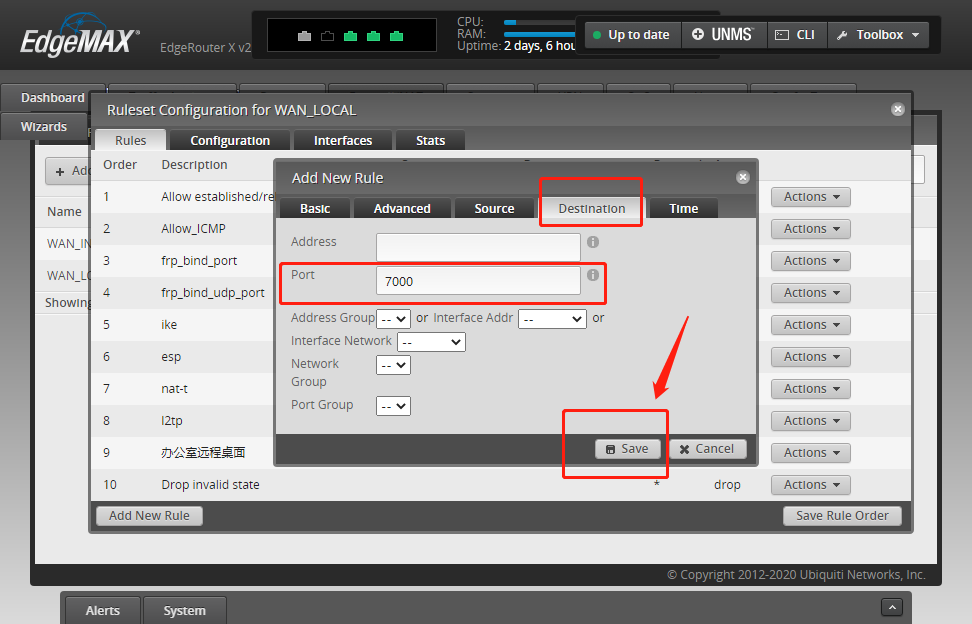
设置好新规则后,注意将Drop invalid state拖动到最下面,别忘了开放你需要映射的端口。防火墙配置请参考UBNT官方论坛。
四、办公室电脑上配置frpc
这部分就不详细解释了,网上内容非常多,简单放一下我的配置文件:
[common] server_addr = yourdomain.f3322.net server_port = 7000 token = ABC123456 [RDP_TCP] type = tcp local_ip = 127.0.0.1 local_port = 3389 remote_port = 53389 use_compression = true use_encryption = true[common] server_addr = yourdomain.f3322.net server_port = 7000 token = ABC123456 [RDP_TCP] type = tcp local_ip = 127.0.0.1 local_port = 3389 remote_port = 53389 use_compression = true use_encryption = true[common] server_addr = yourdomain.f3322.net server_port = 7000 token = ABC123456 [RDP_TCP] type = tcp local_ip = 127.0.0.1 local_port = 3389 remote_port = 53389 use_compression = true use_encryption = true
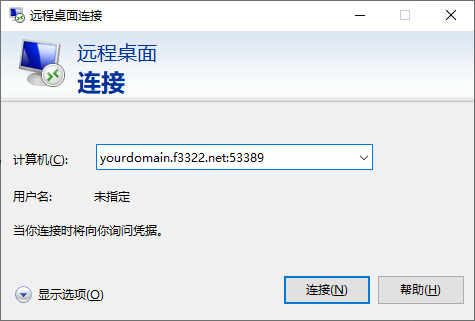
为了安全起见,remote_port配置成了53389,防弱口令扫描攻击。 ER-X防火墙上也应该允许53389端口。
建议使用winsw将frpc配置成Windows的服务,实现开机启动。参考:https://www.axay.cn/36.html
五、从此之后就可以在任何地方愉快的使用远程桌面了
完
原文链接:https://blog.csdn.net/TonnyBrown/article/details/119645426?ops_request_misc=%257B%2522request%255Fid%2522%253A%2522168466843816800211597765%2522%252C%2522scm%2522%253A%252220140713.130102334.pc%255Fblog.%2522%257D&request_id=168466843816800211597765&biz_id=0&utm_medium=distribute.pc_search_result.none-task-blog-2~blog~first_rank_ecpm_v1~times_rank-13-119645426-null-null.blog_rank_default&utm_term=NAS%E3%80%81%E7%BE%A4%E6%99%96%E3%80%81%E9%98%BF%E9%87%8C%E4%BA%91%E3%80%81%E5%9F%9F%E5%90%8D%E8%A7%A3%E6%9E%90%E3%80%81%E5%86%85%E7%BD%91%E7%A9%BF%E9%80%8F%E3%80%81ipv6%E3%80%81ddns%E3%80%81%E8%BD%BB%E9%87%8F%E7%BA%A7%E4%BA%91%E6%9C%8D%E5%8A%A1%E5%99%A8%E3%80%81%E9%93%81%E5%A8%81%E9%A9%AC%E3%80%81%E5%A8%81%E8%81%94%E9%80%9A%E3%80%81DSM%E3%80%81DSM6.0%E3%80%81%E7%BE%A4%E6%99%96nas%E3%80%81%E4%BA%91%E6%9C%8D%E5%8A%A1%E5%99%A8%E3%80%81%E8%9C%97%E7%89%9B%E6%98%9F%E9%99%85%E3%80%81%E9%BB%91%E7%BE%A4%E6%99%96%E3%80%81docker%E3%80%81%E5%AE%B9%E5%99%A8%E9%95%9C%E5%83%8F%E3%80%81%E5%9F%9F%E5%90%8D%E6%B3%A8%E5%86%8C%E3%80%81%E5%AE%9D%E5%A1%94%E3%80%81%E5%8F%8D%E5%90%91%E4%BB%A3%E7%90%86%E3%80%81nginx%E3%80%81frp%E3%80%81%E5%8A%A8%E6%80%81%E5%9F%9F%E5%90%8D%E8%A7%A3%E6%9E%90


