安装docker-compose
前置准备
mkdir -p /root/nginx/html /root/nginx/log /root/nginx/conf /root/nginx/cert - html用来放置页面
- log是运行日志
- conf用来防止配置文件
- cert用来放置证书文件
准备一个 nginx.conf 上传到 /root/nginx/conf 文件夹 (这里我使用nginx默认配置文件)
user nginx; worker_processes 1; error_log /var/log/nginx/error.log warn; pid /var/run/nginx.pid; events { worker_connections 1024; } http { include /etc/nginx/mime.types; default_type application/octet-stream; log_format main '$remote_addr - $remote_user [$time_local] "$request" ' '$status $body_bytes_sent "$http_referer" ' '"$http_user_agent" "$http_x_forwarded_for"'; access_log /var/log/nginx/access.log main; sendfile on; #tcp_nopush on; keepalive_timeout 65; #gzip on; include /etc/nginx/conf.d/*.conf; }准备一个测试用html 上传到 /root/nginx/html 文件夹
<!DOCTYPE html> <html> <head> <meta charset="utf-8"> <title>docker-compose搭建nginx</title> </head> <body> <h1>docker-compose搭建nginx映射成功</h1> <p>666666666</p> </body> </html>编写docker-compose.yml文件
文件内增加的详细注释
version: '3' services: nginx: # 镜像名 如果需要指定版本 就把 latest 换成版本号 image: nginx:latest # 容器名 container_name: nginx-web # 重启策略 restart: always # 端口映射 ports: - 80:80 - 443:443 volumes: # 证书映射 - /root/nginx/cert:/etc/nginx/cert # 配置文件映射 - /root/nginx/conf/nginx.conf:/etc/nginx/nginx.conf # 页面目录 - /root/nginx/html:/usr/share/nginx/html # 日志目录 - /root/nginx/log:/var/log/nginx # 主机本机时间文件映射 与本机时间同步 - /etc/localtime:/etc/localtime:ro执行
在首次执行 尽量使用 这样可以看到报错
docker-compose --compatibility up- –compatibility 是兼容性命令
- up 是从拉取到构建到运行的全套指令
- -d 是后台运行
后续没有问题了之后 可以使用后台启动
docker-compose --compatibility up -d
如出现上方日志代表启动成功
访问 ip 测试

页面返回成功
配置https 与 反向代理
只需要将证书上传至 /root/nginx/cert 目录下
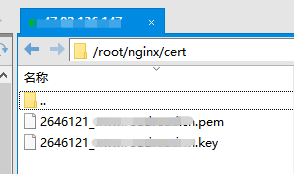
修改nginx.conf就可以了
关于 nginx 更多负载均衡配置 请看: Nginx服务器之负载均衡策略(6种)
user nginx; worker_processes 1; error_log /var/log/nginx/error.log warn; pid /var/run/nginx.pid; events { worker_connections 1024; } http { include /etc/nginx/mime.types; default_type application/octet-stream; log_format main '$remote_addr - $remote_user [$time_local] "$request" ' '$status $body_bytes_sent "$http_referer" ' '"$http_user_agent" "$http_x_forwarded_for"'; access_log /var/log/nginx/access.log main; sendfile on; #tcp_nopush on; keepalive_timeout 65; #gzip on; include /etc/nginx/conf.d/*.conf; client_max_body_size 100m; upstream tomcat { # 可以在此处添加多个 server 达到负载均衡配置 weight为权重 # max_fails=2 fail_timeout=30s 表明后端节点30秒内出现2次不可用情况,判定节点不可用 # 判定不可用后10秒内请求不会转发到此节点,直到30秒后重新检测节点健康情况 server XX.XX.XXX.XXX:8080 weight=10 max_fails=2 fail_timeout=30s; # 服务器1 ip地址 server XX.XX.XXX.XXX:8080 weight=10 max_fails=2 fail_timeout=30s; # 服务器2 ip地址 } server{ listen 80; charset utf-8; server_name www.XXXX.cn; # 需要代理的ip或域名 # 配置代理路径 location /projectName { # 项目名称 proxy_pass https://www.XXXX.cn; } # 对 / 路径转发 location = / { return 301 https://www.XXXX.cn; } } server{ listen 443 ssl; charset utf-8; server_name www.XXXX.cn; ssl on; ssl_certificate /etc/nginx/cert/2646121_www.XXXX.cn.pem; # https 证书 ssl_certificate_key /etc/nginx/cert/2646121_www.XXXX.cn.key; # https 证书 ssl_session_timeout 5m; ssl_ciphers ECDHE-RSA-AES128-GCM-SHA256:ECDHE:ECDH:AES:HIGH:!NULL:!aNULL:!MD5:!ADH:!RC4; ssl_protocols TLSv1 TLSv1.1 TLSv1.2; ssl_prefer_server_ciphers on; location /projectName { # 项目名称 proxy_pass http://tomcat; } location = / { return 302 /projectName; # 项目名称 } } }原文链接:https://blog.csdn.net/weixin_40461281/article/details/111281881
© 版权声明
声明📢本站内容均来自互联网,归原创作者所有,如有侵权必删除。
本站文章皆由CC-4.0协议发布,如无来源则为原创,转载请注明出处。
THE END


