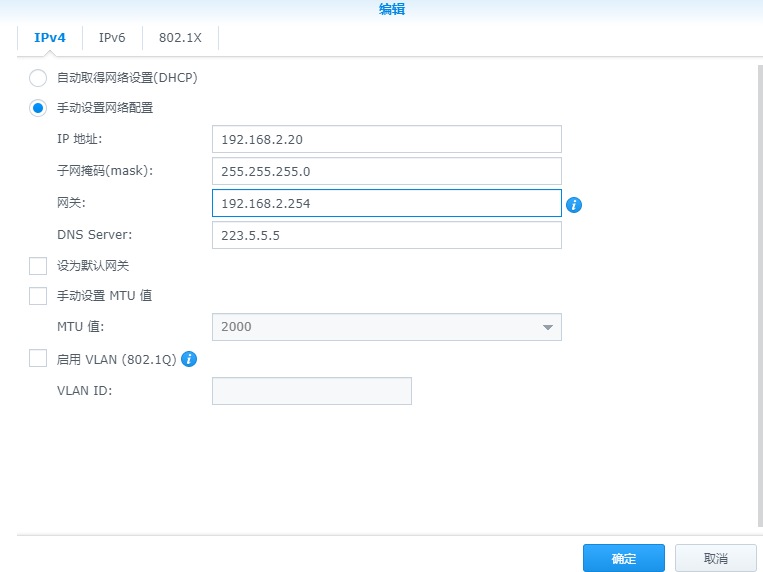
注意一点,如果没有主路由的情况下,需要在飞牛OS里安装docker openwrt做主路由,可以先给飞牛os设置静态ip,网关和DNS先设置你想要给openwrt的ip,然后回到操作电脑上这是同网段的静态ip,就可以网页打开飞牛OS操作界面
注意一点,飞牛OS上需要网络才能下载镜像文件,所以需要主路由先连接网络给飞牛下载好镜像文件,然后把主路由的改成桥接模式
在飞牛OS里打开SSH连接
然后使用 putty 等ssh终端工具连接上飞牛OS,登录后使用 sudo -i 切换到root用户,就可以使用命令操作
docker network create -d macvlan –subnet=192.168.8.0/24 –gateway=192.168.8.1 -o parent=eno1 openwrt
192.168.8.0,192.168.8.1: 这IP段需要根据个人需要设置
eno1: 这个nas主机的网络设备名称,可以看飞牛的网络设置,如图
openwrt:新建虚拟网络的名称
docker run –restart always –name openwrt -d –network openwrt –privileged zzsrv:openwrt /sbin/init
粗体的openwrt为上面所建虚拟网络的名称
这一步也可以在飞牛OS的docker管理器里面启动,注意填写的参数即可
从容器里进入openwrt容器详情里
点击 终端图标
连接/bin/bash后,在右边终端输入:
nano /etc/config/network
在config interface ‘lan’的配置项里面,修改成 option ipaddr 后面的ip成为你想要给OpenWRT配置的 lan ip
若是openwrt作为旁路由,还需要配置网关和dns的ip,作为主路由可以不配置下述内容
在config interface ‘lan’的配置项里面继续添加:
option gateway ‘192.168.x.xx’
option dns ‘192.168.x.xx’
这个里的ip可以配置成你的主路由ip
到这里openwrt的网络配置基本完成,可以重启openwrt的docker容器
也可以在 Compose 里配置启动OpenWRT脚本,脚本内容如下:
version: ‘3’
services:
openwrt:
image: zzsrv/openwrt:latest
container_name: openwrt
restart: always
privileged: true
volumes:
– /vol1/1000/docker/openwrt/etc/config/network:/etc/config/network
networks:
– openwrt
command: /sbin/init
networks:
openwrt:
external: true
volumes里,挂着了network的配置文件,内容如下,也可以不配置,根据下面教程配置
config interface ‘loopback’
option proto ‘static’
option ipaddr ‘127.0.0.1’
option netmask ‘255.0.0.0’
option device ‘lo’
config globals ‘globals’
option packet_steering ‘1’
config interface ‘lan’
option proto ‘static’
option netmask ‘255.255.255.0’
option ipaddr ‘192.168.8.1’
option device ‘br-lan’
config device
option name ‘br-lan’
option type ‘bridge’
list ports ‘eth0’
config interface ‘wan’
option proto ‘pppoe’
option device ‘@lan’
option ipv6 ‘0’
option username ‘拨号账号’
option password ‘拨号密码’
因为我的nas主机是单网卡的,所以openwrt只有一个lan口,那么如何配置PPPoE拨号呢,如下图(单网口作为lan和PPPoE拨号不能跑满网卡很正常):
设备选择“别名@lan”,就可以创建成功接口,然后设置拨号账号等,不多做赘述了
上述配置完成后,openwrt和飞牛os网络不互通的,虽然看起来在同一网段,但是macvlan模式有限制导致不互通(不过同网段下其他机器是可以网络互通的),所以需要在飞牛OS下新建一条macvlan来和openwrt互通
使用 putty 等ssh终端工具连接上飞牛OS,登录后使用 sudo -i 切换到root用户
然后输入 nano /etc/rc.lcoal ,文件内容如下:
#!/bin/sh -e
ip link set eno1 promisc on > /dev/null 2>&1
ip link add macvlan-proxy link eno1 type macvlan mode bridge
ip addr add 192.168.8.3 dev macvlan-proxy
ip link set macvlan-proxy up
ip route add 192.168.8.1 dev macvlan-proxy
route add default gw 192.168.8.1 macvlan-proxy
exit 0
ip link set eno1 promisc on > /dev/null 2>&1 : 开启网卡混淆模式,eno1 如上一样是网络设备名称
ip link add macvlan-proxy link eno1 type macvlan mode bridge: 新建名称为macvlan-proxy的网桥设备
ip addr add 192.168.8.3 dev macvlan-proxy:设置macvlan-proxy的IP
ip link set macvlan-proxy up: 启动macvlan-proxy
ip route add 192.168.8.1 dev macvlan-proxy: 给macvlan-proxy设置路由
route add default gw 192.168.8.1 macvlan-proxy:给macvlan-proxy设置网关
保存操作:CTRL+X ,然后 会提示 输入Y,然后回车保存文件
在终端输入如下命令后回车
systemctl enable rc-local
systemctl start rc-local.service
systemctl status rc-local.service
后续重启就完成了配置
原文链接:https://www.jianshu.com/p/57acfefa0005


