一、前言
偶然发现小米智能摄像头可以将视频文件传输的到NAS服务器上,因为本地SD卡存储时常有限,所以将录像上传至服务器,服务器端是CentOS Linux release 8.5.2111,部署了SBM服务,将1T数据盘挂载到/data目录,后期将所有视频文件上传至该路径下。
二、部署服务器服务
1、配置/data权限、配置hostname(配置smb服务之前挂载好存储数据的硬盘,这里我的存储路径为/data)chmod 777 -R /data
hostnamectl set-hostname MiNAS --static
2、安装smb服务端yum install samba
3、编辑配置文件 vim /etc/samba/smb.conf
[global]下将workgroup工作组设置为WORKGROUP
[global]下添加”server min protocol = NT1“,因为小米摄像头支支持SMBv1协议。
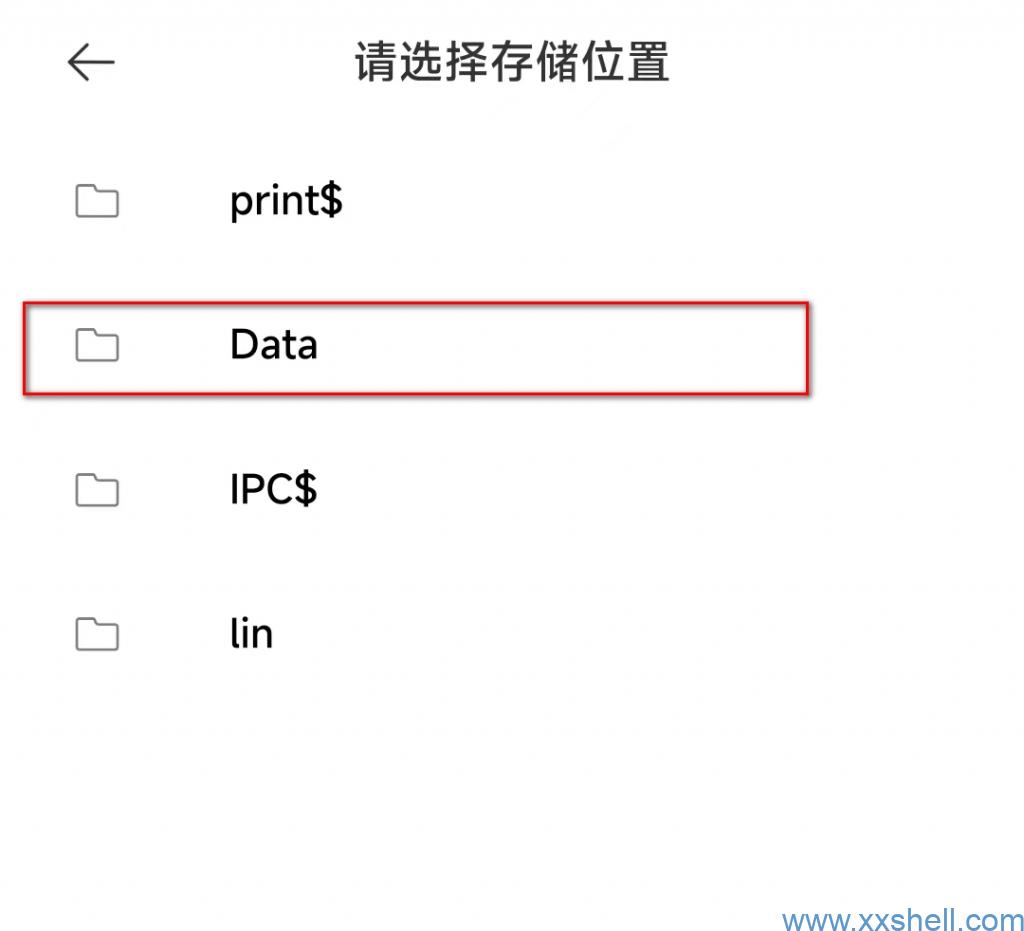
#在文件最后添加配置[Data]path = /datavalid users = linforce user = linforce group = MiNASpublic = yeswritable = yesavailable = yesbrowseable = yes
配置文件内容如下:
[root@MiNAS ~]# cat /etc/samba/smb.conf # See smb.conf.example for a more detailed config file or # read the smb.conf manpage. # Run 'testparm' to verify the config is correct after # you modified it. [global] workgroup = WORKGROUP server min protocol = NT1 security = user #netbios name = MiNas passdb backend = tdbsam printing = cups printcap name = cups load printers = yes cups options = raw [homes] comment = Home Directories valid users = %S, %D%w%S browseable = No read only = No inherit acls = Yes [printers] comment = All Printers path = /var/tmp printable = Yes create mask = 0600 browseable = No [print$] comment = Printer Drivers path = /var/lib/samba/drivers write list = @printadmin root force group = @printadmin create mask = 0664 directory mask = 0775 [Data] path = /data valid users = lin force user = lin force group = MiNAS public = yes writable = yes available = yes browseable = yes[root@MiNAS ~]# cat /etc/samba/smb.conf # See smb.conf.example for a more detailed config file or # read the smb.conf manpage. # Run 'testparm' to verify the config is correct after # you modified it. [global] workgroup = WORKGROUP server min protocol = NT1 security = user #netbios name = MiNas passdb backend = tdbsam printing = cups printcap name = cups load printers = yes cups options = raw [homes] comment = Home Directories valid users = %S, %D%w%S browseable = No read only = No inherit acls = Yes [printers] comment = All Printers path = /var/tmp printable = Yes create mask = 0600 browseable = No [print$] comment = Printer Drivers path = /var/lib/samba/drivers write list = @printadmin root force group = @printadmin create mask = 0664 directory mask = 0775 [Data] path = /data valid users = lin force user = lin force group = MiNAS public = yes writable = yes available = yes browseable = yes[root@MiNAS ~]# cat /etc/samba/smb.conf # See smb.conf.example for a more detailed config file or # read the smb.conf manpage. # Run 'testparm' to verify the config is correct after # you modified it. [global] workgroup = WORKGROUP server min protocol = NT1 security = user #netbios name = MiNas passdb backend = tdbsam printing = cups printcap name = cups load printers = yes cups options = raw [homes] comment = Home Directories valid users = %S, %D%w%S browseable = No read only = No inherit acls = Yes [printers] comment = All Printers path = /var/tmp printable = Yes create mask = 0600 browseable = No [print$] comment = Printer Drivers path = /var/lib/samba/drivers write list = @printadmin root force group = @printadmin create mask = 0664 directory mask = 0775 [Data] path = /data valid users = lin force user = lin force group = MiNAS public = yes writable = yes available = yes browseable = yes
4、创建用户组和用户groupadd MiNASuseradd lin -G MiNAS -s /sbin/nologin
5、设置smb用户密码smbpasswd -a lin
6、启动服务并设置开机自启systemctl enable smb.service --nowsystemctl enable nmb.service --now
7、放行SMB防火墙流量firewall-cmd --zone=public --add-port=139/tcp --permanentfirewall-cmd --zone=public --add-port=445/tcp --permanentfirewall-cmd --zone=public --add-port=137/udp --permanentfirewall-cmd --zone=public --add-port=138/udp --permanentfirewall-cmd --reload
三、摄像头中添加NAS存储
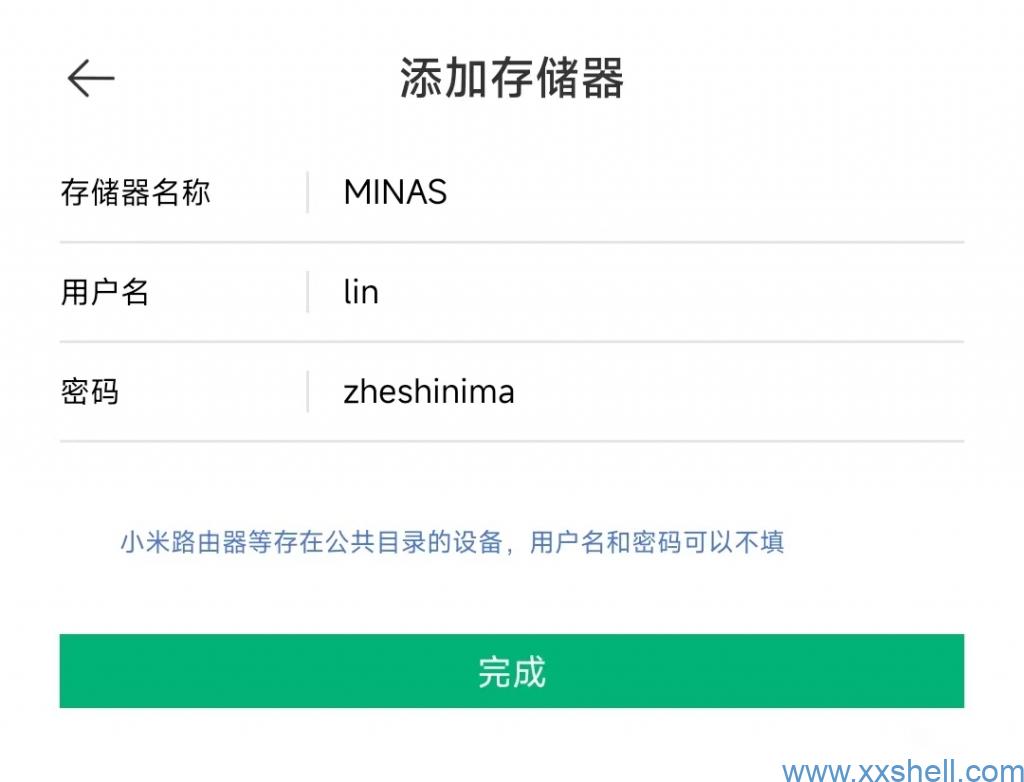
1、在存储设置中找到NAS网络存储,然后找到扫描到的SMB存储,添加存储输入用户名和密码。

原文链接:https://www.xxshell.com/3820.html




![android 小米imei 空,[教程]小米2s IMEI刷机造成的丢失 恢复及写入教程 【申精】-陌上烟雨遥](https://www.moluyao.wang/wp-content/uploads/2025/02/unnamed-file-971.jpeg)


