硬件配置
光猫:ZXHN F650(GPON ONU)
硬件环境:openwrt x86
openwrt固件版本:21.02.0 r16279-5cc0535800
网络连接方式
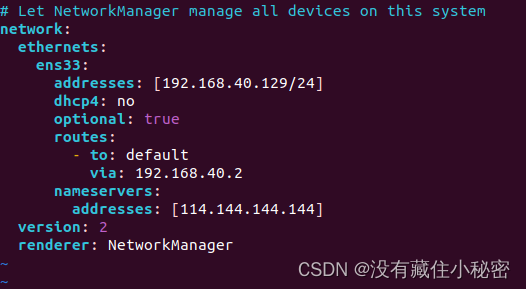
由光猫拨号,openwrt直接使用DHCP客户端连接。光猫具体配置如下图:


防火墙讲道理应该是不用设置的。因为看说明好像只是ipv4的设置。
而openwrt的应设置3个接口。分别为与光猫连接的WAN口,这个口只是用于ip4协议使用DHCP4客户端,然后再在这个接口上添加WAN6,协议使用DHCP6客户端用于获取光猫下发的ipv6。而LAN口除了正常的ip4的配置外,还应该添加ipv6 DHCP6服务。如下图
WAN


WAN6


LAN


防火墙
PC侧的防火墙我就不演示了,实在不行可以直接关掉试试。
openwrt的防火墙可以在网络->防火墙->常规设置。将forward设置为accept。然后再讲区域中的都改成accept。这样就可以连接到你ipv6上的每一个端口。但是这样设置几乎就完全暴露自己了。但是可以先这样试试看是否能连接常用的一些端口。
正常做法是自定义规则来,避免完全暴露。如下
在Firewall – Traffic Rules中添加规则

这里的目标地址可以不填。当然你也可以指定IP,避免lan口上所有的设备都暴露下面的端口。
Openwrt 阿里云DDNS设置
我这里是直接用的阿里云,因为官方固件对阿里的ddns不是很友好,用阿里云的DDNS API来做。具体做法
1、在openwrt中安装python环境
2、python pip 安装阿里云Python API
3、编写脚本,查询本机IP,如有更改就调用阿里云API更新DNS
4、使用openwrt的定时脚本,定时执行
使用openwrt opkg安装python3,当然也可以用web管理界面安装。其中需要安装 python3、python3-pip、python3-dev、python3-cffi、python3-cff3-src。黑体字这3个会影响到阿里云SDK的正确安装。
按照阿里云的说明,先安装pip install alibabacloud_tea_openapi,然后安装pip install alibabacloud_alidns20150109==2.0.2。到这里阿里云API的环境搭建完成。
脚本可以按照说明书下面的示例写,需要用到AccessKey,这个直接在阿里云的网站上面设置。下面给出一个我自己写的脚本。
Openwrt路由的IP可以通过连接2400:da00:2::29获得,而我个人PC的IP是直接通过ping我PC的计算机名称来获取,我的计算机名为HomeComputer,所以有一行代码是
val = os.popen('ping -6 -c 1 HomeComputer').read()val = os.popen('ping -6 -c 1 HomeComputer').read()val = os.popen('ping -6 -c 1 HomeComputer').read()
以下是完整的python刷新openwrt IP的脚本
from socket import AddressFamily from socket import SocketKind from socket import socket from typing import List import os import time import traceback from alibabacloud_alidns20150109 import client from alibabacloud_alidns20150109.client import Client as Client from alibabacloud_alidns20150109 import models as alidns_20150109_models from alibabacloud_tea_openapi import models as open_api_models def CalculateComputerIP(ipv6): newIP = '' val = os.popen('ping -6 -c 1 HomeComputer').read() #此处使用自己的计算机名称 if 'bad address' in val: #电脑关机休眠的情况 newIP = ipv6 else: newIP = val[val.rfind('(') + 1:val.rfind(')')] return newIP def UpdateRecord(): localtime = time.asctime( time.localtime(time.time())) print(localtime) s = socket(AddressFamily.AF_INET6,SocketKind.SOCK_DGRAM) s.connect(('2400:da00:2::29',80)) ip = s.getsockname()[0] print('current openwrt ip6->' + ip) config = open_api_models.Config( # 您的AccessKey ID, access_key_id='-----------------', # 您的AccessKey Secret, access_key_secret='----------------' ) config.endpoint='alidns.cn-hangzhou.aliyuncs.com' client = Client(config) request = alidns_20150109_models.DescribeDomainRecordsRequest() request.domain_name = '*******.cn' request.lang = 'en' response = client.describe_domain_records(request) #for record in response.body.domain_records.record: #print(record.value) results = [r for r in response.body.domain_records.record if r.type == 'AAAA'] computerResult = results[0] openwrtResult = results[1] computerIP = CalculateComputerIP(computerResult.value) print('current computer ip->' + computerIP) print('ali computer ip->' + computerResult.value + '\t' + "ali openwrt id->" + openwrtResult.value) print('ali computer id->' + computerResult.record_id + '\t' + "ali openwrt id->" + openwrtResult.record_id) isUpdateOpenwrt = False isUpdateComputer = False if(openwrtResult.value!=ip): print('current openwrt ip != ali ip,will be update ddns.') # 更新AAAA纪录 update_openwrt_request = alidns_20150109_models.UpdateDomainRecordRequest( rr='openwrt', type='AAAA', record_id=openwrtResult.record_id, value=ip ) print('update openwrt AAAA record.') try: #print('update_openwrt_request:' + update_openwrt_request.__str__) updateOpenwrtIPReponse = client.update_domain_record(update_openwrt_request) isUpdateOpenwrt = True print('update openwrtIP is ok.') except Exception as e: print('update openwrtIP record except:' + e.args) UpdateRecord()from socket import AddressFamily from socket import SocketKind from socket import socket from typing import List import os import time import traceback from alibabacloud_alidns20150109 import client from alibabacloud_alidns20150109.client import Client as Client from alibabacloud_alidns20150109 import models as alidns_20150109_models from alibabacloud_tea_openapi import models as open_api_models def CalculateComputerIP(ipv6): newIP = '' val = os.popen('ping -6 -c 1 HomeComputer').read() #此处使用自己的计算机名称 if 'bad address' in val: #电脑关机休眠的情况 newIP = ipv6 else: newIP = val[val.rfind('(') + 1:val.rfind(')')] return newIP def UpdateRecord(): localtime = time.asctime( time.localtime(time.time())) print(localtime) s = socket(AddressFamily.AF_INET6,SocketKind.SOCK_DGRAM) s.connect(('2400:da00:2::29',80)) ip = s.getsockname()[0] print('current openwrt ip6->' + ip) config = open_api_models.Config( # 您的AccessKey ID, access_key_id='-----------------', # 您的AccessKey Secret, access_key_secret='----------------' ) config.endpoint='alidns.cn-hangzhou.aliyuncs.com' client = Client(config) request = alidns_20150109_models.DescribeDomainRecordsRequest() request.domain_name = '*******.cn' request.lang = 'en' response = client.describe_domain_records(request) #for record in response.body.domain_records.record: #print(record.value) results = [r for r in response.body.domain_records.record if r.type == 'AAAA'] computerResult = results[0] openwrtResult = results[1] computerIP = CalculateComputerIP(computerResult.value) print('current computer ip->' + computerIP) print('ali computer ip->' + computerResult.value + '\t' + "ali openwrt id->" + openwrtResult.value) print('ali computer id->' + computerResult.record_id + '\t' + "ali openwrt id->" + openwrtResult.record_id) isUpdateOpenwrt = False isUpdateComputer = False if(openwrtResult.value!=ip): print('current openwrt ip != ali ip,will be update ddns.') # 更新AAAA纪录 update_openwrt_request = alidns_20150109_models.UpdateDomainRecordRequest( rr='openwrt', type='AAAA', record_id=openwrtResult.record_id, value=ip ) print('update openwrt AAAA record.') try: #print('update_openwrt_request:' + update_openwrt_request.__str__) updateOpenwrtIPReponse = client.update_domain_record(update_openwrt_request) isUpdateOpenwrt = True print('update openwrtIP is ok.') except Exception as e: print('update openwrtIP record except:' + e.args) UpdateRecord()from socket import AddressFamily from socket import SocketKind from socket import socket from typing import List import os import time import traceback from alibabacloud_alidns20150109 import client from alibabacloud_alidns20150109.client import Client as Client from alibabacloud_alidns20150109 import models as alidns_20150109_models from alibabacloud_tea_openapi import models as open_api_models def CalculateComputerIP(ipv6): newIP = '' val = os.popen('ping -6 -c 1 HomeComputer').read() #此处使用自己的计算机名称 if 'bad address' in val: #电脑关机休眠的情况 newIP = ipv6 else: newIP = val[val.rfind('(') + 1:val.rfind(')')] return newIP def UpdateRecord(): localtime = time.asctime( time.localtime(time.time())) print(localtime) s = socket(AddressFamily.AF_INET6,SocketKind.SOCK_DGRAM) s.connect(('2400:da00:2::29',80)) ip = s.getsockname()[0] print('current openwrt ip6->' + ip) config = open_api_models.Config( # 您的AccessKey ID, access_key_id='-----------------', # 您的AccessKey Secret, access_key_secret='----------------' ) config.endpoint='alidns.cn-hangzhou.aliyuncs.com' client = Client(config) request = alidns_20150109_models.DescribeDomainRecordsRequest() request.domain_name = '*******.cn' request.lang = 'en' response = client.describe_domain_records(request) #for record in response.body.domain_records.record: #print(record.value) results = [r for r in response.body.domain_records.record if r.type == 'AAAA'] computerResult = results[0] openwrtResult = results[1] computerIP = CalculateComputerIP(computerResult.value) print('current computer ip->' + computerIP) print('ali computer ip->' + computerResult.value + '\t' + "ali openwrt id->" + openwrtResult.value) print('ali computer id->' + computerResult.record_id + '\t' + "ali openwrt id->" + openwrtResult.record_id) isUpdateOpenwrt = False isUpdateComputer = False if(openwrtResult.value!=ip): print('current openwrt ip != ali ip,will be update ddns.') # 更新AAAA纪录 update_openwrt_request = alidns_20150109_models.UpdateDomainRecordRequest( rr='openwrt', type='AAAA', record_id=openwrtResult.record_id, value=ip ) print('update openwrt AAAA record.') try: #print('update_openwrt_request:' + update_openwrt_request.__str__) updateOpenwrtIPReponse = client.update_domain_record(update_openwrt_request) isUpdateOpenwrt = True print('update openwrtIP is ok.') except Exception as e: print('update openwrtIP record except:' + e.args) UpdateRecord()
然后使用crontab来设置定时启动上面这个文件就好了。
PC端 阿里云DDNS代码
而PC端的IP可以直接改上面的Python代码来实现,但是经过测试很不稳定,所以我在PC端写了一个服务定时刷新IP进行DDNS。主要的代码如下
public partial class AliDDNSService : ServiceBase { Client _ddnsClient; DescribeDomainRecordsRequest _request; DescribeDomainRecordsResponse _response; bool _running = false; Timer _timer; public AliDDNSService() { InitializeComponent(); _ddnsClient = CreateClient("-------------", "-------------------"); _request = new DescribeDomainRecordsRequest(); _response = new DescribeDomainRecordsResponse(); _timer = new Timer(10 * 60 * 1000); _timer.Elapsed += RefreshDNS; } protected override void OnStart(string[] args) { _timer.Start(); } private void RefreshDNS(object sender, ElapsedEventArgs e) { if (_running) return; try { _running = true; _request.DomainName = "*********.cn"; _request.Lang = "en"; _response = _ddnsClient.DescribeDomainRecords(_request); var results = _response.Body.DomainRecords.Record.Where(w => w.Type == "AAAA"); var result = results.ElementAt(0); //设计第一个IP为PC的IP string recordIP = result.Value; string currentIP = GetCurrenIPV6(); if (recordIP == currentIP) return; _ddnsClient.UpdateDomainRecord(new UpdateDomainRecordRequest { RR = "computer", Type = "AAAA", RecordId = result.RecordId, Value = currentIP }); } catch (Exception exp) { } finally { _running = false; } } protected override void OnStop() { _timer.Stop(); } protected override void OnPause() { _timer.Stop(); } protected override void OnContinue() { _timer.Start(); } protected override void OnShutdown() { _timer.Stop(); } private Client CreateClient(string accessKeyId, string accessKeySecret) { Config config = new Config { // 必填,您的 AccessKey ID AccessKeyId = accessKeyId, // 必填,您的 AccessKey Secret AccessKeySecret = accessKeySecret, }; // 访问的域名 config.Endpoint = "alidns.cn-hangzhou.aliyuncs.com"; return new Client(config); } private string GetCurrenIPV6() { var hostName = Dns.GetHostName(); var addresses = Dns.GetHostAddresses(hostName); var list = addresses.Where(w => w.AddressFamily == System.Net.Sockets.AddressFamily.InterNetworkV6); list = list.Where(l => l.ToString().First() == '2'); return list.OrderBy(l=>l.ToString().Length).First().ToString(); } }public partial class AliDDNSService : ServiceBase { Client _ddnsClient; DescribeDomainRecordsRequest _request; DescribeDomainRecordsResponse _response; bool _running = false; Timer _timer; public AliDDNSService() { InitializeComponent(); _ddnsClient = CreateClient("-------------", "-------------------"); _request = new DescribeDomainRecordsRequest(); _response = new DescribeDomainRecordsResponse(); _timer = new Timer(10 * 60 * 1000); _timer.Elapsed += RefreshDNS; } protected override void OnStart(string[] args) { _timer.Start(); } private void RefreshDNS(object sender, ElapsedEventArgs e) { if (_running) return; try { _running = true; _request.DomainName = "*********.cn"; _request.Lang = "en"; _response = _ddnsClient.DescribeDomainRecords(_request); var results = _response.Body.DomainRecords.Record.Where(w => w.Type == "AAAA"); var result = results.ElementAt(0); //设计第一个IP为PC的IP string recordIP = result.Value; string currentIP = GetCurrenIPV6(); if (recordIP == currentIP) return; _ddnsClient.UpdateDomainRecord(new UpdateDomainRecordRequest { RR = "computer", Type = "AAAA", RecordId = result.RecordId, Value = currentIP }); } catch (Exception exp) { } finally { _running = false; } } protected override void OnStop() { _timer.Stop(); } protected override void OnPause() { _timer.Stop(); } protected override void OnContinue() { _timer.Start(); } protected override void OnShutdown() { _timer.Stop(); } private Client CreateClient(string accessKeyId, string accessKeySecret) { Config config = new Config { // 必填,您的 AccessKey ID AccessKeyId = accessKeyId, // 必填,您的 AccessKey Secret AccessKeySecret = accessKeySecret, }; // 访问的域名 config.Endpoint = "alidns.cn-hangzhou.aliyuncs.com"; return new Client(config); } private string GetCurrenIPV6() { var hostName = Dns.GetHostName(); var addresses = Dns.GetHostAddresses(hostName); var list = addresses.Where(w => w.AddressFamily == System.Net.Sockets.AddressFamily.InterNetworkV6); list = list.Where(l => l.ToString().First() == '2'); return list.OrderBy(l=>l.ToString().Length).First().ToString(); } }public partial class AliDDNSService : ServiceBase { Client _ddnsClient; DescribeDomainRecordsRequest _request; DescribeDomainRecordsResponse _response; bool _running = false; Timer _timer; public AliDDNSService() { InitializeComponent(); _ddnsClient = CreateClient("-------------", "-------------------"); _request = new DescribeDomainRecordsRequest(); _response = new DescribeDomainRecordsResponse(); _timer = new Timer(10 * 60 * 1000); _timer.Elapsed += RefreshDNS; } protected override void OnStart(string[] args) { _timer.Start(); } private void RefreshDNS(object sender, ElapsedEventArgs e) { if (_running) return; try { _running = true; _request.DomainName = "*********.cn"; _request.Lang = "en"; _response = _ddnsClient.DescribeDomainRecords(_request); var results = _response.Body.DomainRecords.Record.Where(w => w.Type == "AAAA"); var result = results.ElementAt(0); //设计第一个IP为PC的IP string recordIP = result.Value; string currentIP = GetCurrenIPV6(); if (recordIP == currentIP) return; _ddnsClient.UpdateDomainRecord(new UpdateDomainRecordRequest { RR = "computer", Type = "AAAA", RecordId = result.RecordId, Value = currentIP }); } catch (Exception exp) { } finally { _running = false; } } protected override void OnStop() { _timer.Stop(); } protected override void OnPause() { _timer.Stop(); } protected override void OnContinue() { _timer.Start(); } protected override void OnShutdown() { _timer.Stop(); } private Client CreateClient(string accessKeyId, string accessKeySecret) { Config config = new Config { // 必填,您的 AccessKey ID AccessKeyId = accessKeyId, // 必填,您的 AccessKey Secret AccessKeySecret = accessKeySecret, }; // 访问的域名 config.Endpoint = "alidns.cn-hangzhou.aliyuncs.com"; return new Client(config); } private string GetCurrenIPV6() { var hostName = Dns.GetHostName(); var addresses = Dns.GetHostAddresses(hostName); var list = addresses.Where(w => w.AddressFamily == System.Net.Sockets.AddressFamily.InterNetworkV6); list = list.Where(l => l.ToString().First() == '2'); return list.OrderBy(l=>l.ToString().Length).First().ToString(); } }
远程唤醒PC
注意:如果要远程连接PC,需要先使用OpenWrt的Wake On Lan唤醒我们的计算机。
当然也可以写一个脚本完成此项操作,我这里用C#写了一个控制台的程序。思路就是OpenWrt打开SSH,然后通过SSH来操作路由器,让路由器上的WakeOnLan工作。我这个引用了nuget包ssh.net
以下就是我的控制台程序
namespace wakeOnLan { internal class Program { static SshClient _client; static void Main(string[] args) { try { var result = GetOpenwrtIP().Result; if (!result.Item1) { Console.WriteLine("Get openwrt ip failure."); return; } _client = new SshClient($"{result.Item2}", 2222, "root", "root密码");//使用2222作为ssh的端口,这里可以在openwrt中更改 _client.Connect(); var command = _client.RunCommand("/usr/bin/etherwake -D -i br-lan -b mac地址");//这里填入自己的设备MAC地址 Console.WriteLine(command.Result); _client.Disconnect(); _client.Dispose(); } catch (Exception exp) { Console.WriteLine(exp.Message); } finally { Console.WriteLine("Wait a minute."); } } static async Task<(bool, string)> GetOpenwrtIP() { Process process = new Process(); process.StartInfo.FileName = "cmd.exe"; process.StartInfo.UseShellExecute = false; process.StartInfo.RedirectStandardInput = true; process.StartInfo.RedirectStandardOutput = true; process.StartInfo.RedirectStandardError = true; process.StartInfo.CreateNoWindow = true; process.Start(); process.StandardInput.WriteLine("ping -6 -n 1 *****.*****.cn");//通过域名来找到IPv6 process.StandardInput.Flush(); process.StandardInput.Close(); Thread.Sleep(1000); string content = await process.StandardOutput.ReadToEndAsync(); if (!content.Contains("0% loss")) return (false, ""); var contents = content.Split("\r\n"); content = contents[5]; content = content.Split("]")[0].Split("[")[1]; return (true, content); } } }namespace wakeOnLan { internal class Program { static SshClient _client; static void Main(string[] args) { try { var result = GetOpenwrtIP().Result; if (!result.Item1) { Console.WriteLine("Get openwrt ip failure."); return; } _client = new SshClient($"{result.Item2}", 2222, "root", "root密码");//使用2222作为ssh的端口,这里可以在openwrt中更改 _client.Connect(); var command = _client.RunCommand("/usr/bin/etherwake -D -i br-lan -b mac地址");//这里填入自己的设备MAC地址 Console.WriteLine(command.Result); _client.Disconnect(); _client.Dispose(); } catch (Exception exp) { Console.WriteLine(exp.Message); } finally { Console.WriteLine("Wait a minute."); } } static async Task<(bool, string)> GetOpenwrtIP() { Process process = new Process(); process.StartInfo.FileName = "cmd.exe"; process.StartInfo.UseShellExecute = false; process.StartInfo.RedirectStandardInput = true; process.StartInfo.RedirectStandardOutput = true; process.StartInfo.RedirectStandardError = true; process.StartInfo.CreateNoWindow = true; process.Start(); process.StandardInput.WriteLine("ping -6 -n 1 *****.*****.cn");//通过域名来找到IPv6 process.StandardInput.Flush(); process.StandardInput.Close(); Thread.Sleep(1000); string content = await process.StandardOutput.ReadToEndAsync(); if (!content.Contains("0% loss")) return (false, ""); var contents = content.Split("\r\n"); content = contents[5]; content = content.Split("]")[0].Split("[")[1]; return (true, content); } } }namespace wakeOnLan { internal class Program { static SshClient _client; static void Main(string[] args) { try { var result = GetOpenwrtIP().Result; if (!result.Item1) { Console.WriteLine("Get openwrt ip failure."); return; } _client = new SshClient($"{result.Item2}", 2222, "root", "root密码");//使用2222作为ssh的端口,这里可以在openwrt中更改 _client.Connect(); var command = _client.RunCommand("/usr/bin/etherwake -D -i br-lan -b mac地址");//这里填入自己的设备MAC地址 Console.WriteLine(command.Result); _client.Disconnect(); _client.Dispose(); } catch (Exception exp) { Console.WriteLine(exp.Message); } finally { Console.WriteLine("Wait a minute."); } } static async Task<(bool, string)> GetOpenwrtIP() { Process process = new Process(); process.StartInfo.FileName = "cmd.exe"; process.StartInfo.UseShellExecute = false; process.StartInfo.RedirectStandardInput = true; process.StartInfo.RedirectStandardOutput = true; process.StartInfo.RedirectStandardError = true; process.StartInfo.CreateNoWindow = true; process.Start(); process.StandardInput.WriteLine("ping -6 -n 1 *****.*****.cn");//通过域名来找到IPv6 process.StandardInput.Flush(); process.StandardInput.Close(); Thread.Sleep(1000); string content = await process.StandardOutput.ReadToEndAsync(); if (!content.Contains("0% loss")) return (false, ""); var contents = content.Split("\r\n"); content = contents[5]; content = content.Split("]")[0].Split("[")[1]; return (true, content); } } }
编译后,将可执行的文件拷贝至Windows/system32文件夹下,即可在cmd或powershell中运行。

这里因为是这电脑没有ipv6所以失败了
原文链接:https://blog.csdn.net/qq_24629901/article/details/122267945?ops_request_misc=%257B%2522request%255Fid%2522%253A%2522168525635616800213086355%2522%252C%2522scm%2522%253A%252220140713.130102334.pc%255Fblog.%2522%257D&request_id=168525635616800213086355&biz_id=0&utm_medium=distribute.pc_search_result.none-task-blog-2~blog~first_rank_ecpm_v1~times_rank-20-122267945-null-null.268%5Ev1%5Econtrol&utm_term=NAS%E3%80%81%E7%BE%A4%E6%99%96%E3%80%81%E9%98%BF%E9%87%8C%E4%BA%91%E3%80%81%E5%9F%9F%E5%90%8D%E8%A7%A3%E6%9E%90%E3%80%81%E5%86%85%E7%BD%91%E7%A9%BF%E9%80%8F%E3%80%81ipv6%E3%80%81ddns%E3%80%81%E8%BD%BB%E9%87%8F%E7%BA%A7%E4%BA%91%E6%9C%8D%E5%8A%A1%E5%99%A8%E3%80%81%E9%93%81%E5%A8%81%E9%A9%AC%E3%80%81%E5%A8%81%E8%81%94%E9%80%9A%E3%80%81DSM%E3%80%81DSM6.0%E3%80%81%E7%BE%A4%E6%99%96nas%E3%80%81%E4%BA%91%E6%9C%8D%E5%8A%A1%E5%99%A8%E3%80%81%E8%9C%97%E7%89%9B%E6%98%9F%E9%99%85%E3%80%81%E9%BB%91%E7%BE%A4%E6%99%96%E3%80%81docker%E3%80%81%E5%AE%B9%E5%99%A8%E9%95%9C%E5%83%8F%E3%80%81%E5%9F%9F%E5%90%8D%E6%B3%A8%E5%86%8C%E3%80%81%E5%AE%9D%E5%A1%94%E3%80%81%E5%8F%8D%E5%90%91%E4%BB%A3%E7%90%86%E3%80%81nginx%E3%80%81frp%E3%80%81%E5%8A%A8%E6%80%81%E5%9F%9F%E5%90%8D%E8%A7%A3%E6%9E%90