简介
Harbor是VMware公司开源的企业级DockerRegistry项目,项目地址为https://github.com/vmware/harbor。其目标是帮助用户迅速搭建一个企业级的Dockerregistry服务。它以Docker公司开源的registry为基础,提供了管理UI,基于角色的访问控制(Role Based Access Control),AD/LDAP集成、以及审计日志(Auditlogging) 等企业用户需求的功能,同时还原生支持中文。Harbor的每个组件都是以Docker容器的形式构建的,使用Docker Compose来对它进行部署。用于部署Harbor的Docker Compose模板位于 /Deployer/docker-compose.yml,由5个容器组成:
Proxy:由Nginx 服务器构成的反向代理。
Registry:由Docker官方的开源registry镜像构成的容器实例。
UI:即架构中的core services, 构成此容器的代码是Harbor项目的主体。
MySQL:由官方MySQL镜像构成的数据库容器。
Log:运行着rsyslogd的容器,通过log-driver的形式收集其他容器的日志。
这几个容器通过Docker link的形式连接在一起,在容器之间通过容器名字互相访问。对终端用户而言,只需要暴露proxy (即Nginx)的服务端口。
Harbor特性
基于角色控制
用户和仓库都是基于项目进行组织的, 而用户基于项目可以拥有不同的权限。
基于镜像的复制策略
镜像可以在多个Harbor实例之间进行复制。
支持LDAP
Harbor的用户授权可以使用已经存在LDAP用户。
镜像删除 & 垃圾回收
Image可以被删除并且回收Image占用的空间。
用户UI
用户可以轻松的浏览、搜索镜像仓库以及对项目进行管理。
镜像删除 & 垃圾回收
绝大部分的用户操作API, 方便用户对系统进行扩展。
轻松的部署功能
Harbor提供了online、offline安装,除此之外还提供了virtualappliance安装。
Harbor和docker registry关系
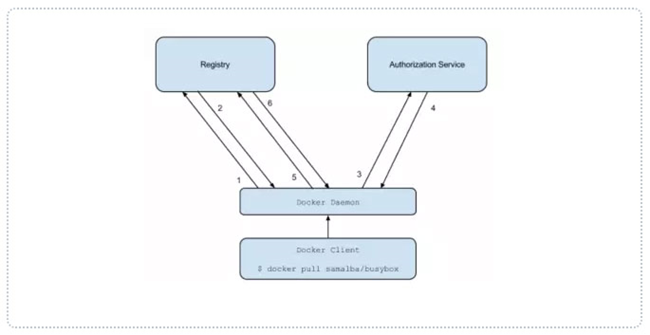
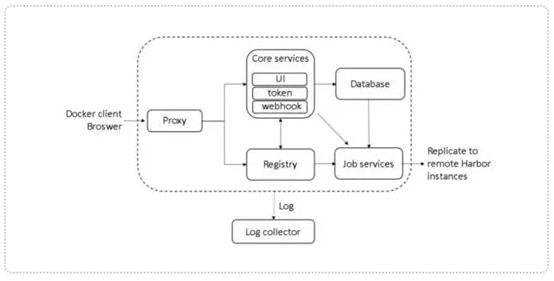
Harbor实质上是对docker registry做了封装,扩展了自己的业务模块.下面展示一下docker registry和Harbor的架构图用以说明。
Harbor认证过程
1、dockerdaemon从docker registry拉取镜像。
2、如果dockerregistry需要进行授权时,registry将会返回401 Unauthorized响应,同时在响应中包含了docker client如何进行认证的信息。
3、dockerclient根据registry返回的信息,向auth server发送请求获取认证token。
4、auth server则根据自己的业务实现去验证提交的用户信息是否存符合业务要求。
5、用户数据仓库返回用户的相关信息。
6、auth server将会根据查询的用户信息,生成token令牌,以及当前用户所具有的相关权限信息。
上述就是完整的授权过程.当用户完成上述过程以后便可以执行相关的pull/push操作。认证信息会每次都带在请求头中。
Harbor整体架构
Harbor认证流程
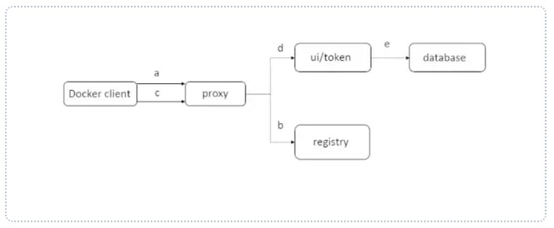
A、首先,请求被代理容器监听拦截,并跳转到指定的认证服务器。
B、 如果认证服务器配置了权限认证,则会返回401。通知dockerclient在特定的请求中需要带上一个合法的token。而认证的逻辑地址则指向架构图中的core services。
C、 当docker client接受到错误code。client就会发送认证请求(带有用户名和密码)到coreservices进行basic auth认证。
D、 当C的请求发送给ngnix以后,ngnix会根据配置的认证地址将带有用户名和密码的请求发送到core serivces。
E、 coreservices获取用户名和密码以后对用户信息进行认证(自己的数据库或者介入LDAP都可以)。成功以后,返回认证成功的信息。
从上面的docker registry 和 Harbor的架构图、流程图可以看出Harbor的扩展部分为coreservices。这部分实现了用户的认证,添加了UI模块已经webhook。
Harbor配置
· hostname
运行Harbor的主机地址(域名或者IP地址,不能是localhostor 127.0.0.1)。
· ui_url_protocol
url协议(http或者https)
默认为http。
https配置可以参考Configuring Harbor with HTTPS Access。
https://github.com/vmware/harbor/blob/master/docs/configure_https.md
· Email设定
配置的邮件可以用户Harbor进行密码重置处理。
#Email accountsettings for sending out password resetting emails.
email_server =smtp.mydomain.com
email_server_port= 25
email_username =sample_admin@mydomain.com
email_password =abc
email_from =admin <sample_admin@mydomain.com>
email_ssl =false
· harbor_admin_password
admin初始化密码Harbor12345。
· auth_mode
认证方式,默认为db_auth。也可以使用ldap_auth由于参数太多就不一一列举了。 Harbor安装手册讲的很清楚。
· 持久化data和日志文件
默认情况下data是被存储在Harbor host机的/data目录.不管harborcontainer是删除还是重新创建这里的数据都是一致存在的。另外harbor的日志文件默认情况下是存在/var/log/harbor/目录下的。
· 自定义ngnix监听端口
1、修改docker-compose.yml文件。
替换80端口为任意存在未被占用的端口,比如28080
proxy:
image: nginx:1.9
container_name: nginx
restart: always
volumes:
-./common/config/nginx:/etc/nginx
ports:
– 28080:80
– 443:443
depends_on:
– mysql
– registry
– ui
– log
logging:
driver: "syslog"
options:
syslog-address:"tcp://127.0.0.1:1514"
tag: "proxy"
1、 修改common/templates/registry/config.yml文件
auth:
token:
issuer:registry-token-issuer
realm: $ui_url:28080/service/token
rootcertbundle:/etc/registry/root.crt
service: token-service
2、 运行install.sh来更新并启动Harbor
docker-compose down
./install.sh
HTTPS 协议的修改和自定义监听端口修改一样的操作
· storage配置
默认情况下,Harbor是把镜像存储在本地文件系统中的。但是在生产环境中你可能会考虑到使用其他的存储方案来代替本地存储。比如S3、Openstack Swift、Ceph等等。那么这个时候你就需要更改common/templates/registry/config.yml中的存储配置部分。例如:
storage:
cache:
layerinfo: inmemory
filesystem:
rootdirectory: /storage
maintenance:
uploadpurging:
enabled: false
delete:
enabled: true
· Harbor的Docker镜像存放路径修改
Harbor是一个Docker镜像的托管系统,帮助用户建立自己的类似于Docker Hub的镜像托管和分享服务。Harbor的默认镜像存储路径在/data/registry目录下,映射到docker容器里面的/storage目录下。
这个参数是在docker-compose.yml中指定的,在docker-compose up -d运行之前修改。
如果希望将Docker镜像存储到其他的磁盘路径,可以修改这个参数。
安装并启动
Harbor的运行时由多个DockerContainer组成,包括:Nginx、MySQL、UI、Proxy、log、JobService六个主要组成部分。
Harbor安装有三种方式,这里以offline安装的方式为例,另外两种可以参考Harbor的官方文档。
前提条件:
Harbor使用几个Docker容器来部署的,因此部署Harbor的节点上要求安装好Docker服务,同时要求安装好Python,DockerCompose,如下:
l Python应该在2.7或以上版本
l Docker engine应该在1.10或以上版本
l Docker Compose需要在1.6.0或以上版本
Harbor的安装:
3、 下载安装包
tar xvfharbor-offline-installer-<version>.tgz
2、配置harbor.cfg文件
3、执行install.sh脚本安装并启动Harbor
./install.sh
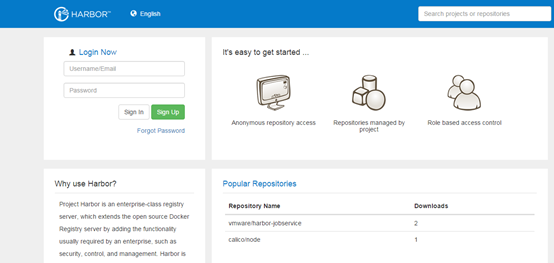
登录并创建自己的镜像仓库(初始用户名/密码初始化为:admin/Harbor12345)。
这里我们使用HTTP方式,那么访问地址为:
常用操作
如果开启HTTPS时,在使用过程中,发现如果Registry的5000端口没有映射出来时,报如下错误:
[root@docker02harbor]# docker login xx.xxx.xx.xx
Username: admin
Password:
Error responsefrom daemon: Get https://xx.xxx.xx.xx/v1/users/: dial tcp xx.xxx.xx.xx:443:getsockopt: connection refused
[root@docker02harbor]# docker login xx.xxx.xx.xx:5000
Username: admin
Password:
Error responsefrom daemon: Get http://xx.xxx.xx.xx:5000/v1/users/: dial tcp xx.xxx.xx.xx:5000:getsockopt: connection refused
我们修改docker-compose.yml文件,添加Registry端口号映射出来,部分内容如下:
registry:
image: library/registry:2.5.0
container_name: registry
restart: always
volumes:
– /data/registry:/storage
-./common/config/registry/:/etc/registry/
ports:
– 5000:5000
environment:
– GODEBUG=netdns=cgo
command:
["serve","/etc/registry/config.yml"]
depends_on:
– log
logging:
driver: "syslog"
options:
syslog-address:"tcp://127.0.0.1:1514"
tag: "registry"
修改docker-compose.yml配置文件后,我们执行:
docker-composestop
./install.sh
再次登录就OK了:
[root@docker02appl]# docker login xx.xxx.xx.xx:5000
Username(admin): admin
Password:
Login Succeeded
Harbor的生命周期管理 你可以使用docker-compose来管理Harbor的生命周期,下面列举一些有用的常用的命令。
停止Harbor:
docker-composestop
移除docker container 但是保留相关镜像文件:
docker-composerm
如果想删除数据的话,执行:
rm -r/data/database
rm -r/data/registry
停止:
docker-compose-f docker-compose.yml stop
启动:
docker-compose-f docker-compose.yml start
如果修改了配置文件,执行如下步骤:
docker-composedown
vim harbor.cfg
./install.sh
查看容器状态:
[root@docker02 harbor]# docker-compose ps
Name Command State Ports
—————————————————————————————————–
harbor-db docker-entrypoint.sh mysqld Up 3306/tcp
harbor-jobservice /harbor/harbor_jobservice Up
harbor-log /bin/sh -c crond && rsyslo… Up 0.0.0.0:1514->514/tcp
harbor-ui /harbor/harbor_ui Up
nginx nginx -g daemon off; Up 0.0.0.0:443->443/tcp,0.0.0.0:80->80/tcp
registry /entrypoint.sh serve /etc/ … Up 0.0.0.0:5000->5000/tcp
问题总结
问题记录1:
[root@docker02 ~]# docker push xx.xxx.xx.xx/calico/node
The push refers to a repository [xx.xxx.xx.xx/calico/node]
5a5054a0b567: Preparing
dc759f36d103: Preparing
0ae8598a5313: Preparing
b7fc58bf47e2: Preparing
799d9a47057e: Waiting
503925f2fc18: Waiting
unauthorized: authentication required
如果权限都没有问题的话,那就是在Harbor里面没有calico项目,Harbor要求xx.xxx.xx.xx/calico/node中第一个/后面的为项目名称,要求Harbor中存在这个项目名称,否则就会报这个错误。
问题记录2:
Harbor只支持Registry V2 API,因此你需要使用Docker1.6以及以上的客户端。
问题记录3:
[root@docker02 harbor]# curl https://192.168.1.200/v2/
curl: (60) Peer's Certificate issuer is notrecognized.
More details here:http://curl.haxx.se/docs/sslcerts.html
curl performs SSL certificate verificationby default, using a "bundle"
ofCertificate Authority (CA) public keys (CA certs). If the default
bundlefile isn't adequate, you can specify an alternate file
using the –cacert option.
If this HTTPS server uses a certificatesigned by a CA represented in
thebundle, the certificate verification probably failed due to a
problem with the certificate (it might beexpired, or the name might
notmatch the domain name in the URL).
If you'd like to turn off curl'sverification of the certificate, use
the-k (or –insecure) option.
此种情况多发生在自签名的证书,报错含义是签发证书机构未经认证,无法识别。
解决办法是将签发该证书的私有CA公钥ca.crt文件内容,追加到/etc/pki/tls/certs/ca-bundle.crt。
[root@docker02 harbor]# cat/etc/docker/certs.d/192.168.1.200/ca.crt >>/etc/pki/tls/certs/ca-bundle.crt
[root@docker02 harbor]# curl https://192.168.1.200/v2/
{"errors":[{"code":"UNAUTHORIZED","message":"authenticationrequired","detail":null}]}
问题记录4:
如果出现如下错误:
[root@docker01 harbor]# docker pull xx.xxx.xx.xx:5000/vmware/harbor-db:0.4.5
Error response from daemon: Get https://xx.xxx.xx.xx:5000/v1/_ping:http: server gave HTTP response to HTTPS client
解决方法:
修改/usr/lib/systemd/system/docker.service文件,在ExecStart中添加–insecure-registry内容:
ExecStart=/usr/bin/dockerd–insecure-registry=xx.xxx.xx.xx:5000
然后重启Docker服务:
systemctl restart docker
然后再登录执行pull就可以了:
[root@docker01 harbor]# docker login xx.xxx.xx.xx:5000
Username: admin
Password:
Login Succeeded
[root@docker01 harbor]# docker pull xx.xxx.xx.xx:5000/calico/node
Using default tag: latest
latest: Pulling from calico/node
dd951796ec8a: Pull complete
2ed92f708362: Pull complete
1703d9b705ad: Pull complete
a45fbe27e680: Pull complete
8c874d304eb0: Pull complete
0b3e16347231: Pull complete
4670f2d45133: Pull complete
Digest:sha256:2585b48d929f6279637b27c85725cef44ec4cafaee3dafaa99ca3b1756e5a525
Status: Downloaded newer image for xx.xxx.xx.xx:5000/calico/node:latest
原文链接:https://blog.csdn.net/jiangshouzhuang/article/details/53267094


