Mac_Docker_Wordpress安装wordpress新建数据库配置数据库外网访问
安装wordpress

设置本地数据库位置,可以自己在电脑上自己选定一个位置新建一个文件夹专门用于存放这些数据。


修改对外端口,如果不修改每次重启wordpress端口都会自动变一次。

设置为中文


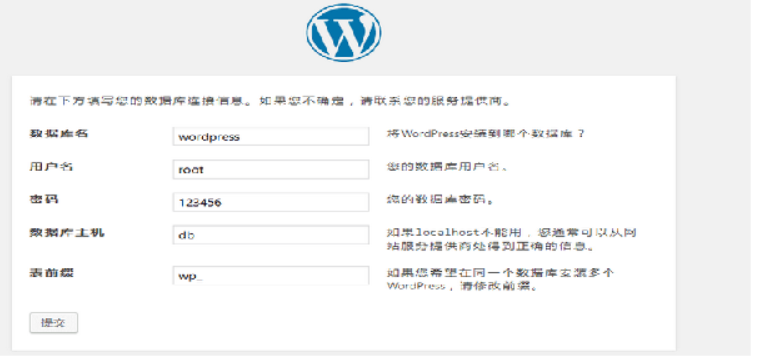
配置数据库,要配置之前我们得新建一个数据库。

新建数据库
这里有一个要点得注意一下。Docker可以通过修改容器的本地端口映射实现运行多个mysql容器,之前咱们有安装过图床容器chevereto,当时就使用了一个mysql数据库容器。所以在创建mysql数据库时应该把端口映射到3307,因为chevereto使用了端口3306。-p 3307:3306,3307是对外,3306是mysql本地端口。这样就不会有冲突了,如果没有这样设置两个mysql数据库不能同时运行,只能运行一个。
打开Mac上的终端,然后输入命令。mycomputer:是我电脑的名称,不用管。命令从docker开始
mycomputer: docker run -p 3307:3306 –name mysqlwo## -e MYSQL_ROOT_PASSWOrd=填写自己的密码 -d mysql
docker运行容器mysql新建一个名为:mysqlwo##的数据库,密码为:填写自己的密码;端口设置为55029(对外):3306(本地),
############################6c######7############################
mycomputer: docker ps
docker列出运行的容器
CONTAINER ID IMAGE COMMAND CREATED STATUS PORTS NAMES 9c65f728fcfa mysql "docker-entrypoint.s…" 24 hours ago Up 20 hours 0.0.0.0:55029->3306/tcp, :::3307->3306/tcp, 0.0.0.0:49586->33060/tcp mysqlwo## f9c9b8b6ed77 wordpress:latest "docker-entrypoint.s…" 24 hours ago Up 21 hours 0.0.0.0:55044->80/tcp, :::55044->80/tcp wordpress
mycomputer: docker exec -it 9c65 bashroot@6e1d412310de:/# ifconfig
显示网络配置,失败没有网络配置,所以我们得安装一些软件获得这个功能。
bash: ifconfig: command not found
root@6e1d412310de:/# apt-get update -y
获得最新软件,这个过程要一两分钟,决定于网速快慢
Get:1 http://repo.mysql.com/apt/debian buster InRelease [21.5 kB] Get:2 http://deb.debian.org/debian buster InRelease [122 kB] Get:3 http://security.debian.org/debian-security buster/updates InRelease [65.4 kB] Get:4 http://repo.mysql.com/apt/debian buster/mysql-8.0 amd64 Packages [8341 B] Get:5 http://deb.debian.org/debian buster-updates InRelease [51.9 kB] Get:6 http://security.debian.org/debian-security buster/updates/main amd64 Packages [298 kB] Get:7 http://deb.debian.org/debian buster/main amd64 Packages [7907 kB] Get:8 http://deb.debian.org/debian buster-updates/main amd64 Packages [15.2 kB] Fetched 8489 kB in 7min 36s (18.6 kB/s) Reading package lists… Done
root@6e1d412310de:/# apt-get install net-tools
安装net-tools工具包,包含ifconfig功能命令
Reading package lists… Done Building dependency tree Reading state information… Done The following NEW packages will be installed: net-tools 0 upgraded, 1 newly installed, 0 to remove and 5 not upgraded. Need to get 248 kB of archives. After this operation, 1002 kB of additional disk space will be used. Get:1 http://deb.debian.org/debian buster/main amd64 net-tools amd64 1.60+git20180626.aebd88e-1 [248 kB] Fetched 248 kB in 7s (34.3 kB/s) debconf: delaying package configuration, since apt-utils is not installed Selecting previously unselected package net-tools. (Reading database … 9284 files and directories currently installed.) Preparing to unpack …/net-tools_1.60+git20180626.aebd88e-1_amd64.deb … Unpacking net-tools (1.60+git20180626.aebd88e-1) … Setting up net-tools (1.60+git20180626.aebd88e-1) …
root@6e1d412310de:/# ifconfig
显示网络配置,下面我们可以看到 172.##.0.# ,就是这个数据库的IP。记下这个IP等会要用到。
eth0: flags=4163<UP,BROADCAST,RUNNING,MULTICAST> mtu 1500 inet 172.##.0.# netmask 255.255.0.0 broadcast 172.18.255.255 ether 02:42:ac:12:00:03 txqueuelen 0 (Ethernet) RX packets 7024 bytes 9133545 (8.7 MiB) RX errors 0 dropped 0 overruns 0 frame 0 TX packets 4968 bytes 286032 (279.3 KiB) TX errors 0 dropped 0 overruns 0 carrier 0 collisions 0
lo: flags=73<UP,LOOPBACK,RUNNING> mtu 65536 inet 127.##.0.1 netmask 255.0.0.0 loop txqueuelen 1000 (Local Loopback) RX packets 8 bytes 751 (751.0 B) RX errors 0 dropped 0 overruns 0 frame 0 TX packets 8 bytes 751 (751.0 B) TX errors 0 dropped 0 overruns 0 carrier 0 collisions 0
root@6e1d412310de:/# mysql -u root -p
进入数据库,看到Enter password: 时就可以输入密码(上面新建数据库的时候设置的密码),当你在按密码的时候它是不会显示的,按完直接按确认键就行。
Enter password: Welcome to the MySQL monitor. Commands end with ; or \g. Your MySQL connection id is 13 Server version: 8.0.26 MySQL Community Server – GPL
Copyright (c) 2000, 2021, Oracle and/or its affiliates.
Oracle is a registered trademark of Oracle Corporation and/or its affiliates. Other names may be trademarks of their respective owners.
Type 'help;' or '\h' for help. Type '\c' to clear the current input statement.
mysql> create database 数据表名称 charset=utf8;
在数据库内新建一个名为:数据表名称,记得使用英文命名。的数据表,使用utf8,使用这个是为了数据表中可以有中文字符。
Query OK, 1 row affected, 1 warning (0.36 sec)
mysql> show databases;
+——————–+ | Database | +——————–+ | information_schema | | mysql | | performance_schema | | sys | | 数据表名称 | +——————–+ 5 rows in set (0.08 sec)
mysql> exit
Bye
root@1d2e7807293f:/# exit
exit mycomputer:
配置数据库
容器IP: 172.##.0.#
数据表名称
数据库密码
管理员用户:root


外网访问
新建好自己的个人网站后,最重要的是让网友们可以看到,而现在我们只能是在自己的本地局域网内打开这个网站。所以我们需要进行一些设置。可以看一下我另一个分享(如何获得


保存之后,就可以通过你设定好的网站在外网进行访问了。
原文链接:https://www.bilibili.com/read/cv12598038/