如下操作在centos7中完成
一、Docker CE安装
- 1.检查是否安装过旧的版本
如果系统安装旧版本Docker需要先卸载,命令如下:
<span class="hljs-blockquote">> docker-common \</span> <span class="hljs-blockquote">> docker-selinux \</span> <span class="hljs-blockquote">> docker-engine</span> <span class="hljs-blockquote">> docker-common \</span> <span class="hljs-blockquote">> docker-selinux \</span> <span class="hljs-blockquote">> docker-engine</span>
> docker-common \ > docker-selinux \ > docker-engine
- 2.本文基于yum方式安装,需要安装以下的依赖包:yum-utils 、device-mapper-persistent-data、lvm2命令如下:
<span class="hljs-blockquote">> device-mapper-persistent-data \</span> <span class="hljs-blockquote">> lvm2</span> <span class="hljs-blockquote">> device-mapper-persistent-data \</span> <span class="hljs-blockquote">> lvm2</span>
> device-mapper-persistent-data \ > lvm2
- 3.基于yum命令配置Docker CE仓库,命令如下:
<span class="hljs-preprocessor"># sudo yum-config-manager \</span> --<span class="hljs-keyword">add</span>-repo \ <span class="hljs-label">https:</span>//download<span class="hljs-preprocessor">.docker</span><span class="hljs-preprocessor">.com</span>/linux/centos/docker-ce<span class="hljs-preprocessor">.repo</span> <span class="hljs-preprocessor"># sudo yum-config-manager \</span> --<span class="hljs-keyword">add</span>-repo \ <span class="hljs-label">https:</span>//download<span class="hljs-preprocessor">.docker</span><span class="hljs-preprocessor">.com</span>/linux/centos/docker-ce<span class="hljs-preprocessor">.repo</span>
# sudo yum-config-manager \ --add-repo \ https://download.docker.com/linux/centos/docker-ce.repo
- 4.安装docker CE 命令如下:
<span class="hljs-preprocessor"># sudo yum install docker-ce</span><span class="hljs-preprocessor"># sudo yum install docker-ce</span>
# sudo yum install docker-ce
结果如下:
<span class="hljs-label">Installed:</span> docker-ce<span class="hljs-preprocessor">.x</span>86_64 <span class="hljs-number">0</span>:<span class="hljs-number">18.03</span><span class="hljs-number">.0</span><span class="hljs-preprocessor">.ce</span>-<span class="hljs-number">1.</span>el7<span class="hljs-preprocessor">.centos</span> Dependency Installed: container-selinux<span class="hljs-preprocessor">.noarch</span> <span class="hljs-number">2</span>:<span class="hljs-number">2.42</span>-<span class="hljs-number">1.</span>gitad8f0f7<span class="hljs-preprocessor">.el</span>7 libtool-ltdl<span class="hljs-preprocessor">.x</span>86_64 <span class="hljs-number">0</span>:<span class="hljs-number">2.4</span><span class="hljs-number">.2</span>-<span class="hljs-number">22.</span>el7_3 pigz<span class="hljs-preprocessor">.x</span>86_64 <span class="hljs-number">0</span>:<span class="hljs-number">2.3</span><span class="hljs-number">.4</span>-<span class="hljs-number">1.</span>el7 Complete!<span class="hljs-label">Installed:</span> docker-ce<span class="hljs-preprocessor">.x</span>86_64 <span class="hljs-number">0</span>:<span class="hljs-number">18.03</span><span class="hljs-number">.0</span><span class="hljs-preprocessor">.ce</span>-<span class="hljs-number">1.</span>el7<span class="hljs-preprocessor">.centos</span> Dependency Installed: container-selinux<span class="hljs-preprocessor">.noarch</span> <span class="hljs-number">2</span>:<span class="hljs-number">2.42</span>-<span class="hljs-number">1.</span>gitad8f0f7<span class="hljs-preprocessor">.el</span>7 libtool-ltdl<span class="hljs-preprocessor">.x</span>86_64 <span class="hljs-number">0</span>:<span class="hljs-number">2.4</span><span class="hljs-number">.2</span>-<span class="hljs-number">22.</span>el7_3 pigz<span class="hljs-preprocessor">.x</span>86_64 <span class="hljs-number">0</span>:<span class="hljs-number">2.3</span><span class="hljs-number">.4</span>-<span class="hljs-number">1.</span>el7 Complete!
Installed: docker-ce.x86_64 0:18.03.0.ce-1.el7.centos Dependency Installed: container-selinux.noarch 2:2.42-1.gitad8f0f7.el7 libtool-ltdl.x86_64 0:2.4.2-22.el7_3 pigz.x86_64 0:2.3.4-1.el7 Complete!
- 5.启动docker
<span class="hljs-preprocessor"># sudo systemctl start docker</span><span class="hljs-preprocessor"># sudo systemctl start docker</span>
# sudo systemctl start docker
- 6.运行docker run hello-world
<span class="hljs-preprocessor"># sudo docker run hello-world</span> <span class="hljs-preprocessor"># sudo docker run hello-world</span>
# sudo docker run hello-world
结果查看:
Unable <span class="hljs-built_in">to</span> find image <span class="hljs-string">'hello-world:latest'</span> locally latest: Pulling <span class="hljs-built_in">from</span> library/hello-world <span class="hljs-number">9</span>bb5a5d4561a: Pull complete Digest: sha256:f5233545e43561214ca4891fd1157e1c3c563316ed8e237750d59bde73361e77 Status: Downloaded newer image <span class="hljs-keyword">for</span> hello-world:latest Hello <span class="hljs-built_in">from</span> Docker! This message shows that your installation appears <span class="hljs-built_in">to</span> be working correctly. To generate this message, Docker took <span class="hljs-operator">the</span> following steps: <span class="hljs-number">1.</span> The Docker client contacted <span class="hljs-operator">the</span> Docker daemon. <span class="hljs-number">2.</span> The Docker daemon pulled <span class="hljs-operator">the</span> <span class="hljs-string">"hello-world"</span> image <span class="hljs-built_in">from</span> <span class="hljs-operator">the</span> Docker Hub. (amd64) <span class="hljs-number">3.</span> The Docker daemon created <span class="hljs-operator">a</span> <span class="hljs-built_in">new</span> container <span class="hljs-built_in">from</span> that image which runs <span class="hljs-operator">the</span> executable that produces <span class="hljs-operator">the</span> output you are currently reading. <span class="hljs-number">4.</span> The Docker daemon streamed that output <span class="hljs-built_in">to</span> <span class="hljs-operator">the</span> Docker client, which sent <span class="hljs-keyword">it</span> <span class="hljs-built_in">to</span> your terminal. To <span class="hljs-keyword">try</span> something more ambitious, you can run <span class="hljs-operator">an</span> Ubuntu container <span class="hljs-operator">with</span>: $ docker run -<span class="hljs-keyword">it</span> ubuntu bash Share images, automate workflows, <span class="hljs-operator">and</span> more <span class="hljs-operator">with</span> <span class="hljs-operator">a</span> free Docker ID: <span class="hljs-keyword">https</span>://hub.docker.com/ For more examples <span class="hljs-operator">and</span> ideas, visit: <span class="hljs-keyword">https</span>://docs.docker.com/engine/userguide/ Unable <span class="hljs-built_in">to</span> find image <span class="hljs-string">'hello-world:latest'</span> locally latest: Pulling <span class="hljs-built_in">from</span> library/hello-world <span class="hljs-number">9</span>bb5a5d4561a: Pull complete Digest: sha256:f5233545e43561214ca4891fd1157e1c3c563316ed8e237750d59bde73361e77 Status: Downloaded newer image <span class="hljs-keyword">for</span> hello-world:latest Hello <span class="hljs-built_in">from</span> Docker! This message shows that your installation appears <span class="hljs-built_in">to</span> be working correctly. To generate this message, Docker took <span class="hljs-operator">the</span> following steps: <span class="hljs-number">1.</span> The Docker client contacted <span class="hljs-operator">the</span> Docker daemon. <span class="hljs-number">2.</span> The Docker daemon pulled <span class="hljs-operator">the</span> <span class="hljs-string">"hello-world"</span> image <span class="hljs-built_in">from</span> <span class="hljs-operator">the</span> Docker Hub. (amd64) <span class="hljs-number">3.</span> The Docker daemon created <span class="hljs-operator">a</span> <span class="hljs-built_in">new</span> container <span class="hljs-built_in">from</span> that image which runs <span class="hljs-operator">the</span> executable that produces <span class="hljs-operator">the</span> output you are currently reading. <span class="hljs-number">4.</span> The Docker daemon streamed that output <span class="hljs-built_in">to</span> <span class="hljs-operator">the</span> Docker client, which sent <span class="hljs-keyword">it</span> <span class="hljs-built_in">to</span> your terminal. To <span class="hljs-keyword">try</span> something more ambitious, you can run <span class="hljs-operator">an</span> Ubuntu container <span class="hljs-operator">with</span>: $ docker run -<span class="hljs-keyword">it</span> ubuntu bash Share images, automate workflows, <span class="hljs-operator">and</span> more <span class="hljs-operator">with</span> <span class="hljs-operator">a</span> free Docker ID: <span class="hljs-keyword">https</span>://hub.docker.com/ For more examples <span class="hljs-operator">and</span> ideas, visit: <span class="hljs-keyword">https</span>://docs.docker.com/engine/userguide/
Unable to find image 'hello-world:latest' locally latest: Pulling from library/hello-world 9bb5a5d4561a: Pull complete Digest: sha256:f5233545e43561214ca4891fd1157e1c3c563316ed8e237750d59bde73361e77 Status: Downloaded newer image for hello-world:latest Hello from Docker! This message shows that your installation appears to be working correctly. To generate this message, Docker took the following steps: 1. The Docker client contacted the Docker daemon. 2. The Docker daemon pulled the "hello-world" image from the Docker Hub. (amd64) 3. The Docker daemon created a new container from that image which runs the executable that produces the output you are currently reading. 4. The Docker daemon streamed that output to the Docker client, which sent it to your terminal. To try something more ambitious, you can run an Ubuntu container with: $ docker run -it ubuntu bash Share images, automate workflows, and more with a free Docker ID: https://hub.docker.com/ For more examples and ideas, visit: https://docs.docker.com/engine/userguide/
- 7.查看docker版本
Client: Version: <span class="hljs-number">18.03</span><span class="hljs-number">.0</span>-ce API <span class="hljs-built_in">version</span>: <span class="hljs-number">1.37</span> Go <span class="hljs-built_in">version</span>: go1<span class="hljs-number">.9</span><span class="hljs-number">.4</span> Git commit: <span class="hljs-number">0520e24</span> Built: Wed Mar <span class="hljs-number">21</span> <span class="hljs-number">23</span>:<span class="hljs-number">09</span>:<span class="hljs-number">15</span> <span class="hljs-number">2018</span> OS/Arch: linux/amd64 Experimental: <span class="hljs-constant">false</span> Orchestrator: swarm Server: Engine: Version: <span class="hljs-number">18.03</span><span class="hljs-number">.0</span>-ce API <span class="hljs-built_in">version</span>: <span class="hljs-number">1.37</span> (minimum <span class="hljs-built_in">version</span> <span class="hljs-number">1.12</span>) Go <span class="hljs-built_in">version</span>: go1<span class="hljs-number">.9</span><span class="hljs-number">.4</span> Git commit: <span class="hljs-number">0520e24</span> Built: Wed Mar <span class="hljs-number">21</span> <span class="hljs-number">23</span>:<span class="hljs-number">13</span>:<span class="hljs-number">03</span> <span class="hljs-number">2018</span> OS/Arch: linux/amd64 Experimental: <span class="hljs-constant">false</span> Client: Version: <span class="hljs-number">18.03</span><span class="hljs-number">.0</span>-ce API <span class="hljs-built_in">version</span>: <span class="hljs-number">1.37</span> Go <span class="hljs-built_in">version</span>: go1<span class="hljs-number">.9</span><span class="hljs-number">.4</span> Git commit: <span class="hljs-number">0520e24</span> Built: Wed Mar <span class="hljs-number">21</span> <span class="hljs-number">23</span>:<span class="hljs-number">09</span>:<span class="hljs-number">15</span> <span class="hljs-number">2018</span> OS/Arch: linux/amd64 Experimental: <span class="hljs-constant">false</span> Orchestrator: swarm Server: Engine: Version: <span class="hljs-number">18.03</span><span class="hljs-number">.0</span>-ce API <span class="hljs-built_in">version</span>: <span class="hljs-number">1.37</span> (minimum <span class="hljs-built_in">version</span> <span class="hljs-number">1.12</span>) Go <span class="hljs-built_in">version</span>: go1<span class="hljs-number">.9</span><span class="hljs-number">.4</span> Git commit: <span class="hljs-number">0520e24</span> Built: Wed Mar <span class="hljs-number">21</span> <span class="hljs-number">23</span>:<span class="hljs-number">13</span>:<span class="hljs-number">03</span> <span class="hljs-number">2018</span> OS/Arch: linux/amd64 Experimental: <span class="hljs-constant">false</span>
Client: Version: 18.03.0-ce API version: 1.37 Go version: go1.9.4 Git commit: 0520e24 Built: Wed Mar 21 23:09:15 2018 OS/Arch: linux/amd64 Experimental: false Orchestrator: swarm Server: Engine: Version: 18.03.0-ce API version: 1.37 (minimum version 1.12) Go version: go1.9.4 Git commit: 0520e24 Built: Wed Mar 21 23:13:03 2018 OS/Arch: linux/amd64 Experimental: false
二、安装docker-compose
1.进入官网 https://github.com/docker/compose/releases 查看docker-compose最新版的安装命令。
2.安装最新版本的docker-compose
<span class="hljs-label"># curl -L https:</span>//github.com/docker/compose/releases/download/<span class="hljs-number">1.21</span>.<span class="hljs-number">0</span>/docker-compose-<span class="hljs-escape">`u</span>name -s<span class="hljs-escape">`-</span><span class="hljs-escape">`u</span>name -m<span class="hljs-escape">` </span>-o /usr/local/bin/docker-compose<span class="hljs-label"># curl -L https:</span>//github.com/docker/compose/releases/download/<span class="hljs-number">1.21</span>.<span class="hljs-number">0</span>/docker-compose-<span class="hljs-escape">`u</span>name -s<span class="hljs-escape">`-</span><span class="hljs-escape">`u</span>name -m<span class="hljs-escape">` </span>-o /usr/local/bin/docker-compose
# curl -L https://github.com/docker/compose/releases/download/1.21.0/docker-compose-`uname -s`-`uname -m` -o /usr/local/bin/docker-compose
结果如下:
% <span class="hljs-constant">Total</span> % <span class="hljs-constant">Received</span> % <span class="hljs-constant">Xferd</span> <span class="hljs-constant">Average</span> <span class="hljs-constant">Speed</span> <span class="hljs-constant">Time</span> <span class="hljs-constant">Time</span> <span class="hljs-constant">Time</span> <span class="hljs-constant">Current</span> <span class="hljs-constant">Dload</span> <span class="hljs-constant">Upload</span> <span class="hljs-constant">Total</span> <span class="hljs-constant">Spent</span> <span class="hljs-constant">Left</span> <span class="hljs-constant">Speed</span> <span class="hljs-number">100</span> <span class="hljs-number">617</span> <span class="hljs-number">0</span> <span class="hljs-number">617</span> <span class="hljs-number">0</span> <span class="hljs-number">0</span> <span class="hljs-number">571</span> <span class="hljs-number">0</span> --<span class="hljs-symbol">:--</span><span class="hljs-symbol">:--</span> <span class="hljs-number">0</span><span class="hljs-symbol">:</span><span class="hljs-number">00</span><span class="hljs-symbol">:</span><span class="hljs-number">01</span> --<span class="hljs-symbol">:--</span><span class="hljs-symbol">:--</span> <span class="hljs-number">571</span> <span class="hljs-number">100</span> <span class="hljs-number">10.3</span>M <span class="hljs-number">100</span> <span class="hljs-number">10.3</span>M <span class="hljs-number">0</span> <span class="hljs-number">0</span> <span class="hljs-number">511</span>k <span class="hljs-number">0</span> <span class="hljs-number">0</span><span class="hljs-symbol">:</span><span class="hljs-number">00</span><span class="hljs-symbol">:</span><span class="hljs-number">20</span> <span class="hljs-number">0</span><span class="hljs-symbol">:</span><span class="hljs-number">00</span><span class="hljs-symbol">:</span><span class="hljs-number">20</span> --<span class="hljs-symbol">:--</span><span class="hljs-symbol">:--</span> <span class="hljs-number">1703</span>k % <span class="hljs-constant">Total</span> % <span class="hljs-constant">Received</span> % <span class="hljs-constant">Xferd</span> <span class="hljs-constant">Average</span> <span class="hljs-constant">Speed</span> <span class="hljs-constant">Time</span> <span class="hljs-constant">Time</span> <span class="hljs-constant">Time</span> <span class="hljs-constant">Current</span> <span class="hljs-constant">Dload</span> <span class="hljs-constant">Upload</span> <span class="hljs-constant">Total</span> <span class="hljs-constant">Spent</span> <span class="hljs-constant">Left</span> <span class="hljs-constant">Speed</span> <span class="hljs-number">100</span> <span class="hljs-number">617</span> <span class="hljs-number">0</span> <span class="hljs-number">617</span> <span class="hljs-number">0</span> <span class="hljs-number">0</span> <span class="hljs-number">571</span> <span class="hljs-number">0</span> --<span class="hljs-symbol">:--</span><span class="hljs-symbol">:--</span> <span class="hljs-number">0</span><span class="hljs-symbol">:</span><span class="hljs-number">00</span><span class="hljs-symbol">:</span><span class="hljs-number">01</span> --<span class="hljs-symbol">:--</span><span class="hljs-symbol">:--</span> <span class="hljs-number">571</span> <span class="hljs-number">100</span> <span class="hljs-number">10.3</span>M <span class="hljs-number">100</span> <span class="hljs-number">10.3</span>M <span class="hljs-number">0</span> <span class="hljs-number">0</span> <span class="hljs-number">511</span>k <span class="hljs-number">0</span> <span class="hljs-number">0</span><span class="hljs-symbol">:</span><span class="hljs-number">00</span><span class="hljs-symbol">:</span><span class="hljs-number">20</span> <span class="hljs-number">0</span><span class="hljs-symbol">:</span><span class="hljs-number">00</span><span class="hljs-symbol">:</span><span class="hljs-number">20</span> --<span class="hljs-symbol">:--</span><span class="hljs-symbol">:--</span> <span class="hljs-number">1703</span>k
% Total % Received % Xferd Average Speed Time Time Time Current Dload Upload Total Spent Left Speed 100 617 0 617 0 0 571 0 --:--:-- 0:00:01 --:--:-- 571 100 10.3M 100 10.3M 0 0 511k 0 0:00:20 0:00:20 --:--:-- 1703k
- 3.对二进制文件应用可执行权限
<span class="hljs-preprocessor"># chmod +x /usr/local/bin/docker-compose</span><span class="hljs-preprocessor"># chmod +x /usr/local/bin/docker-compose</span>
# chmod +x /usr/local/bin/docker-compose
- 4.查看docker-compose版本:
docker-compose <span class="hljs-built_in">version</span> <span class="hljs-number">1.21</span><span class="hljs-number">.0</span>, build <span class="hljs-number">5920</span>eb0 docker-py <span class="hljs-built_in">version</span>: <span class="hljs-number">3.2</span><span class="hljs-number">.1</span> CPython <span class="hljs-built_in">version</span>: <span class="hljs-number">3.6</span><span class="hljs-number">.5</span> OpenSSL <span class="hljs-built_in">version</span>: OpenSSL <span class="hljs-number">1.0</span><span class="hljs-number">.1</span>t <span class="hljs-number">3</span> May <span class="hljs-number">2016</span> docker-compose <span class="hljs-built_in">version</span> <span class="hljs-number">1.21</span><span class="hljs-number">.0</span>, build <span class="hljs-number">5920</span>eb0 docker-py <span class="hljs-built_in">version</span>: <span class="hljs-number">3.2</span><span class="hljs-number">.1</span> CPython <span class="hljs-built_in">version</span>: <span class="hljs-number">3.6</span><span class="hljs-number">.5</span> OpenSSL <span class="hljs-built_in">version</span>: OpenSSL <span class="hljs-number">1.0</span><span class="hljs-number">.1</span>t <span class="hljs-number">3</span> May <span class="hljs-number">2016</span>
docker-compose version 1.21.0, build 5920eb0 docker-py version: 3.2.1 CPython version: 3.6.5 OpenSSL version: OpenSSL 1.0.1t 3 May 2016
三、使用docker-compose安装wordpress
- 1.创建一个空的项目目录。
<span class="hljs-preprocessor"># mkdir WordPresss</span><span class="hljs-preprocessor"># mkdir WordPresss</span>
# mkdir WordPresss
- 2.切换到目录
<span class="hljs-built_in">cd</span> WordPresss/<span class="hljs-built_in">cd</span> WordPresss/
cd WordPresss/
- 3.创建一个docker-compose.yml启动您的WordPress博客的文件, 并创建一个独立MySQL实例,并使用卷挂接来实现数据持久性:
# vi docker-compose.yml version: '3.3' services: db: image: mysql:5.7 volumes: -<span class="ruby"> <span class="hljs-symbol">db_data:</span>/var/lib/mysql </span> restart: always environment: MYSQL_ROOT_PASSWORD: somewordpress MYSQL_DATABASE: wordpress MYSQL_USER: wordpress MYSQL_PASSWORD: wordpress wordpress: depends_on: -<span class="ruby"> db </span> image: wordpress:latest ports: -<span class="ruby"> <span class="hljs-string">"8000:80"</span> </span> restart: always environment: WORDPRESS_DB_HOST: db:3306 WORDPRESS_DB_USER: wordpress WORDPRESS_DB_PASSWORD: wordpress volumes: db_data:# vi docker-compose.yml version: '3.3' services: db: image: mysql:5.7 volumes: -<span class="ruby"> <span class="hljs-symbol">db_data:</span>/var/lib/mysql </span> restart: always environment: MYSQL_ROOT_PASSWORD: somewordpress MYSQL_DATABASE: wordpress MYSQL_USER: wordpress MYSQL_PASSWORD: wordpress wordpress: depends_on: -<span class="ruby"> db </span> image: wordpress:latest ports: -<span class="ruby"> <span class="hljs-string">"8000:80"</span> </span> restart: always environment: WORDPRESS_DB_HOST: db:3306 WORDPRESS_DB_USER: wordpress WORDPRESS_DB_PASSWORD: wordpress volumes: db_data:
# vi docker-compose.yml version: '3.3' services: db: image: mysql:5.7 volumes: - db_data:/var/lib/mysql restart: always environment: MYSQL_ROOT_PASSWORD: somewordpress MYSQL_DATABASE: wordpress MYSQL_USER: wordpress MYSQL_PASSWORD: wordpress wordpress: depends_on: - db image: wordpress:latest ports: - "8000:80" restart: always environment: WORDPRESS_DB_HOST: db:3306 WORDPRESS_DB_USER: wordpress WORDPRESS_DB_PASSWORD: wordpress volumes: db_data:
- 4.建立项目
<span class="hljs-preprocessor"># docker-compose up</span><span class="hljs-preprocessor"># docker-compose up</span>
# docker-compose up
- 5.浏览器输入地址+端口(若无法打开,可检查一下8000端口是否开启),进入WordPress初始化页面
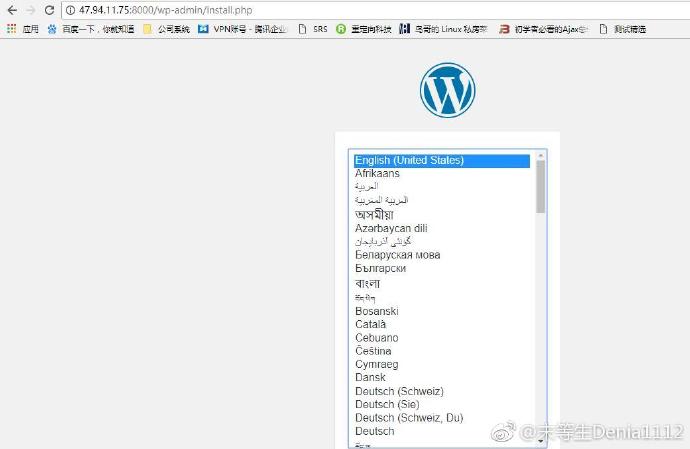
安装之后进入WordPress主页:

原文链接:https://blog.csdn.net/dhr201499/article/details/81874327
© 版权声明
声明📢本站内容均来自互联网,归原创作者所有,如有侵权必删除。
本站文章皆由CC-4.0协议发布,如无来源则为原创,转载请注明出处。
THE END


