Quickstart: Compose and WordPress
You can use Docker Compose to easily run WordPress in an isolated environment built with Docker containers. This quick-start guide demonstrates how to use Compose to set up and run WordPress. Before starting, make sure you have Compose installed.
-
Create an empty project directory.
You can name the directory something easy for you to remember. This directory is the context for your application image. The directory should only contain resources to build that image.
This project directory contains a
docker-compose.ymlfile which is complete in itself for a good starter wordpress project.Tip: You can use either a
.ymlor.yamlextension for this file. They both work.
2. Change into your project directory. For example, if you named your directory my_wordpress:
[root@www ~]# mkdir -p /my_wordpress [root@www ~]# cd /my_wordpress/[root@www ~]# mkdir -p /my_wordpress [root@www ~]# cd /my_wordpress/[root@www ~]# mkdir -p /my_wordpress [root@www ~]# cd /my_wordpress/
3.Create a docker-compose.yml file that starts your WordPress blog and a separate MySQL instance with a volume mount for data persistence:
[root@www my_wordpress]# cat docker-compose.yml version: '2' services: db: image: mysql:5.7 volumes: - /db_data:/var/lib/mysql ports: - "3306:3306" restart: always environment: MYSQL_ROOT_PASSWORD: somewordpress MYSQL_DATABASE: wordpress MYSQL_USER: wordpress MYSQL_PASSWORD: wordpress wordpress: depends_on: - db image: wordpress:latest ports: - "8000:80" restart: always environment: WORDPRESS_DB_HOST: db:3306 WORDPRESS_DB_USER: wordpress WORDPRESS_DB_PASSWORD: wordpress WORDPRESS_DB_NAME: wordpress[root@www my_wordpress]# cat docker-compose.yml version: '2' services: db: image: mysql:5.7 volumes: - /db_data:/var/lib/mysql ports: - "3306:3306" restart: always environment: MYSQL_ROOT_PASSWORD: somewordpress MYSQL_DATABASE: wordpress MYSQL_USER: wordpress MYSQL_PASSWORD: wordpress wordpress: depends_on: - db image: wordpress:latest ports: - "8000:80" restart: always environment: WORDPRESS_DB_HOST: db:3306 WORDPRESS_DB_USER: wordpress WORDPRESS_DB_PASSWORD: wordpress WORDPRESS_DB_NAME: wordpress[root@www my_wordpress]# cat docker-compose.yml version: '2' services: db: image: mysql:5.7 volumes: - /db_data:/var/lib/mysql ports: - "3306:3306" restart: always environment: MYSQL_ROOT_PASSWORD: somewordpress MYSQL_DATABASE: wordpress MYSQL_USER: wordpress MYSQL_PASSWORD: wordpress wordpress: depends_on: - db image: wordpress:latest ports: - "8000:80" restart: always environment: WORDPRESS_DB_HOST: db:3306 WORDPRESS_DB_USER: wordpress WORDPRESS_DB_PASSWORD: wordpress WORDPRESS_DB_NAME: wordpress
Now, run docker-compose up -d from your project directory.
This runs docker-compose up in detached mode, pulls the needed Docker images, and starts the wordpress and database containers, as shown in the example below.
[root@www my_wordpress]# docker-compose up -d Creating network "mywordpress_default" with the default driver Creating mywordpress_db_1 Creating mywordpress_wordpress_1 [root@www my_wordpress]# docker images REPOSITORY TAG IMAGE ID CREATED SIZE wordpress latest 2da59c54a06a 5 days ago 543MB mysql 5.7 718a6da099d8 7 days ago 448MB [root@www my_wordpress]# docker-compose ps Name Command State Ports ---------------------------------------------------------------------------------------------------- mywordpress_db_1 docker-entrypoint.sh mysqld Up 0.0.0.0:3306->3306/tcp, 33060/tcp mywordpress_wordpress_1 docker-entrypoint.sh apach ... Up 0.0.0.0:8000->80/tcp [root@www my_wordpress]# ls /db_data/ auto.cnf client-cert.pem ibdata1 ibtmp1 private_key.pem server-key.pem ca-key.pem client-key.pem ib_logfile0 mysql public_key.pem sys ca.pem ib_buffer_pool ib_logfile1 performance_schema server-cert.pem wordpress [root@www my_wordpress]# docker network ls | awk 'NR==1 || $2=="mywordpress_default"' NETWORK ID NAME DRIVER SCOPE 41aa3ed609bc mywordpress_default bridge local[root@www my_wordpress]# docker-compose up -d Creating network "mywordpress_default" with the default driver Creating mywordpress_db_1 Creating mywordpress_wordpress_1 [root@www my_wordpress]# docker images REPOSITORY TAG IMAGE ID CREATED SIZE wordpress latest 2da59c54a06a 5 days ago 543MB mysql 5.7 718a6da099d8 7 days ago 448MB [root@www my_wordpress]# docker-compose ps Name Command State Ports ---------------------------------------------------------------------------------------------------- mywordpress_db_1 docker-entrypoint.sh mysqld Up 0.0.0.0:3306->3306/tcp, 33060/tcp mywordpress_wordpress_1 docker-entrypoint.sh apach ... Up 0.0.0.0:8000->80/tcp [root@www my_wordpress]# ls /db_data/ auto.cnf client-cert.pem ibdata1 ibtmp1 private_key.pem server-key.pem ca-key.pem client-key.pem ib_logfile0 mysql public_key.pem sys ca.pem ib_buffer_pool ib_logfile1 performance_schema server-cert.pem wordpress [root@www my_wordpress]# docker network ls | awk 'NR==1 || $2=="mywordpress_default"' NETWORK ID NAME DRIVER SCOPE 41aa3ed609bc mywordpress_default bridge local[root@www my_wordpress]# docker-compose up -d Creating network "mywordpress_default" with the default driver Creating mywordpress_db_1 Creating mywordpress_wordpress_1 [root@www my_wordpress]# docker images REPOSITORY TAG IMAGE ID CREATED SIZE wordpress latest 2da59c54a06a 5 days ago 543MB mysql 5.7 718a6da099d8 7 days ago 448MB [root@www my_wordpress]# docker-compose ps Name Command State Ports ---------------------------------------------------------------------------------------------------- mywordpress_db_1 docker-entrypoint.sh mysqld Up 0.0.0.0:3306->3306/tcp, 33060/tcp mywordpress_wordpress_1 docker-entrypoint.sh apach ... Up 0.0.0.0:8000->80/tcp [root@www my_wordpress]# ls /db_data/ auto.cnf client-cert.pem ibdata1 ibtmp1 private_key.pem server-key.pem ca-key.pem client-key.pem ib_logfile0 mysql public_key.pem sys ca.pem ib_buffer_pool ib_logfile1 performance_schema server-cert.pem wordpress [root@www my_wordpress]# docker network ls | awk 'NR==1 || $2=="mywordpress_default"' NETWORK ID NAME DRIVER SCOPE 41aa3ed609bc mywordpress_default bridge local
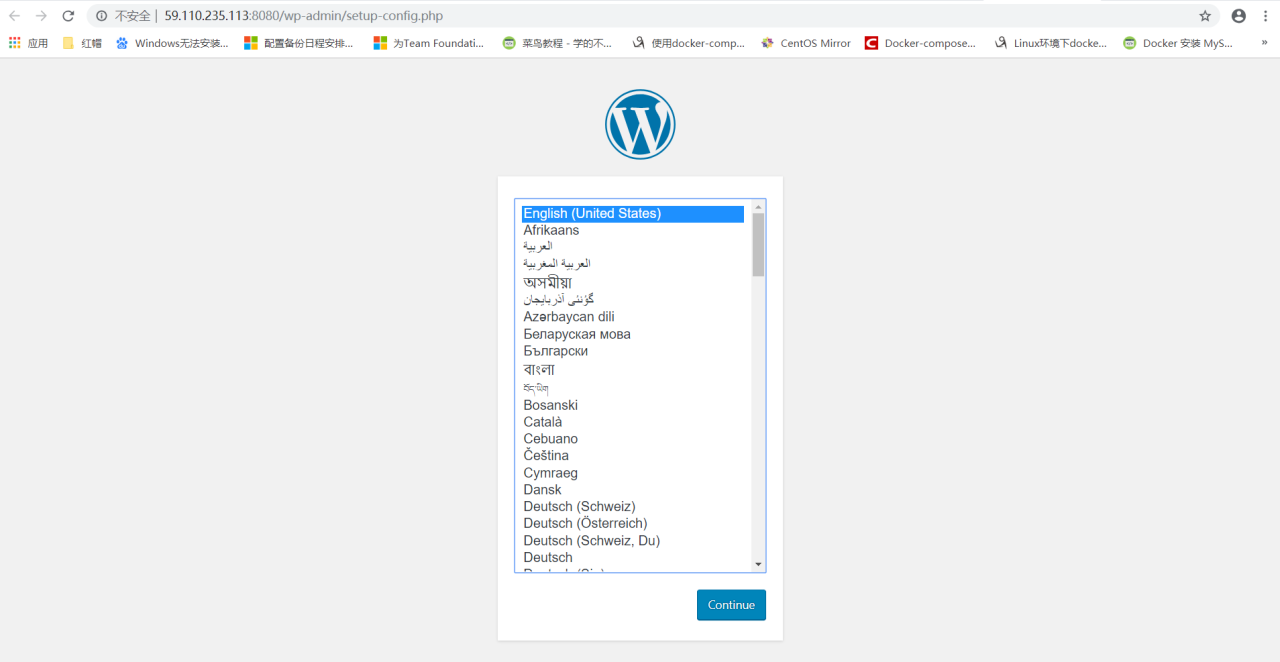
Bring up WordPress in a web browser🔗
At this point, WordPress should be running on port 8000 of your Docker Host, and you can complete the “famous five-minute installation” as a WordPress administrator.
Note: The WordPress site is not immediately available on port
8000because the containers are still being initialized and may take a couple of minutes before the first load.


The command docker-compose down removes the containers and default network, but preserves your WordPress database.
The command docker-compose down --volumes removes the containers, default network, and the WordPress database.
原文链接:https://blog.csdn.net/qq_34556414/article/details/107934559