一、环境说明
采用三台主机部署,其中1台master,2台node,因为资源比较不足,所以配置也比较低,目前按照2C\2G\40G的配置来的。
| 主机名 | IP地址 |
| k8s-master | 192.168.186.111 |
| k8s-node1 | 192.168.186.112 |
| k8s-node2 | 192.168.186.113 |
二、系统初始化
1. 配置hosts
修改所有主机hosts,把每台主机IP和主机名对应关系写入host文件
#执行三条命令 echo "192.168.186.111 k8s-master" >> /etc/hosts echo "192.168.186.112 k8s-node1" >> /etc/hosts echo "192.168.186.113 k8s-node2" >> /etc/hosts#执行三条命令 echo "192.168.186.111 k8s-master" >> /etc/hosts echo "192.168.186.112 k8s-node1" >> /etc/hosts echo "192.168.186.113 k8s-node2" >> /etc/hosts#执行三条命令 echo "192.168.186.111 k8s-master" >> /etc/hosts echo "192.168.186.112 k8s-node1" >> /etc/hosts echo "192.168.186.113 k8s-node2" >> /etc/hosts
检查确认下:
root@k8s-node2:~# cat /etc/hosts 127.0.0.1 localhost # The following lines are desirable for IPv6 capable hosts ::1 ip6-localhost ip6-loopback fe00::0 ip6-localnet ff00::0 ip6-mcastprefix ff02::1 ip6-allnodes ff02::2 ip6-allrouters 192.168.186.111 k8s-master 192.168.186.112 k8s-node1 192.168.186.113 k8s-node2root@k8s-node2:~# cat /etc/hosts 127.0.0.1 localhost # The following lines are desirable for IPv6 capable hosts ::1 ip6-localhost ip6-loopback fe00::0 ip6-localnet ff00::0 ip6-mcastprefix ff02::1 ip6-allnodes ff02::2 ip6-allrouters 192.168.186.111 k8s-master 192.168.186.112 k8s-node1 192.168.186.113 k8s-node2root@k8s-node2:~# cat /etc/hosts 127.0.0.1 localhost # The following lines are desirable for IPv6 capable hosts ::1 ip6-localhost ip6-loopback fe00::0 ip6-localnet ff00::0 ip6-mcastprefix ff02::1 ip6-allnodes ff02::2 ip6-allrouters 192.168.186.111 k8s-master 192.168.186.112 k8s-node1 192.168.186.113 k8s-node2
2. 关闭防火墙
sudo systemctl status ufw.service sudo systemctl stop ufw.service sudo systemctl disable ufw.servicesudo systemctl status ufw.service sudo systemctl stop ufw.service sudo systemctl disable ufw.servicesudo systemctl status ufw.service sudo systemctl stop ufw.service sudo systemctl disable ufw.service
3. 关闭swap:
systemctl stop swap.target systemctl disable swap.target systemctl status swap.target systemctl stop swap.img.swap systemctl status swap.img.swapsystemctl stop swap.target systemctl disable swap.target systemctl status swap.target systemctl stop swap.img.swap systemctl status swap.img.swapsystemctl stop swap.target systemctl disable swap.target systemctl status swap.target systemctl stop swap.img.swap systemctl status swap.img.swap
vim /etc/fstab #把/swap.img开头的这一行注释掉,同时修改swap挂在为sw,noauto,如下所以: cat /etc/fstab # /etc/fstab: static file system information. # # Use 'blkid' to print the universally unique identifier for a # device; this may be used with UUID= as a more robust way to name devices # that works even if disks are added and removed. See fstab(5). # # <file system> <mount point> <type> <options> <dump> <pass> /dev/disk/by-uuid/fb8812a4-bbb4-4ab4-a0a6-5dcdc103c2fc none swap sw,noauto 0 0 # / was on /dev/sda4 during curtin installation /dev/disk/by-uuid/f797ac9a-ece0-4fae-af84-cc3ec41d0419 / ext4 defaults 0 1 # /boot was on /dev/sda2 during curtin installation /dev/disk/by-uuid/3e71e4e2-538e-4340-9239-eef1675baa0d /boot ext4 defaults 0 1 #/swap.img none swap sw 0 0vim /etc/fstab #把/swap.img开头的这一行注释掉,同时修改swap挂在为sw,noauto,如下所以: cat /etc/fstab # /etc/fstab: static file system information. # # Use 'blkid' to print the universally unique identifier for a # device; this may be used with UUID= as a more robust way to name devices # that works even if disks are added and removed. See fstab(5). # # <file system> <mount point> <type> <options> <dump> <pass> /dev/disk/by-uuid/fb8812a4-bbb4-4ab4-a0a6-5dcdc103c2fc none swap sw,noauto 0 0 # / was on /dev/sda4 during curtin installation /dev/disk/by-uuid/f797ac9a-ece0-4fae-af84-cc3ec41d0419 / ext4 defaults 0 1 # /boot was on /dev/sda2 during curtin installation /dev/disk/by-uuid/3e71e4e2-538e-4340-9239-eef1675baa0d /boot ext4 defaults 0 1 #/swap.img none swap sw 0 0vim /etc/fstab #把/swap.img开头的这一行注释掉,同时修改swap挂在为sw,noauto,如下所以: cat /etc/fstab # /etc/fstab: static file system information. # # Use 'blkid' to print the universally unique identifier for a # device; this may be used with UUID= as a more robust way to name devices # that works even if disks are added and removed. See fstab(5). # # <file system> <mount point> <type> <options> <dump> <pass> /dev/disk/by-uuid/fb8812a4-bbb4-4ab4-a0a6-5dcdc103c2fc none swap sw,noauto 0 0 # / was on /dev/sda4 during curtin installation /dev/disk/by-uuid/f797ac9a-ece0-4fae-af84-cc3ec41d0419 / ext4 defaults 0 1 # /boot was on /dev/sda2 during curtin installation /dev/disk/by-uuid/3e71e4e2-538e-4340-9239-eef1675baa0d /boot ext4 defaults 0 1 #/swap.img none swap sw 0 0
完成之后,重启系统,使用free -m检查一下是否禁用成功,如下就是禁用成功:

4. 安装IPVS,加载内核模块
sudo apt -y install ipvsadm ipset sysstat conntracksudo apt -y install ipvsadm ipset sysstat conntracksudo apt -y install ipvsadm ipset sysstat conntrack
#创建目录 mkdir ~/k8s-init/ #写入参数配置 tee ~/k8s-init/ipvs.modules <<'EOF' #!/bin/bash modprobe -- ip_vs modprobe -- ip_vs_lc modprobe -- ip_vs_lblc modprobe -- ip_vs_lblcr modprobe -- ip_vs_rr modprobe -- ip_vs_wrr modprobe -- ip_vs_sh modprobe -- ip_vs_dh modprobe -- ip_vs_fo modprobe -- ip_vs_nq modprobe -- ip_vs_sed modprobe -- ip_vs_ftp modprobe -- ip_vs_sh modprobe -- ip_tables modprobe -- ip_set modprobe -- ipt_set modprobe -- ipt_rpfilter modprobe -- ipt_REJECT modprobe -- ipip modprobe -- xt_set modprobe -- br_netfilter modprobe -- nf_conntrack EOF#创建目录 mkdir ~/k8s-init/ #写入参数配置 tee ~/k8s-init/ipvs.modules <<'EOF' #!/bin/bash modprobe -- ip_vs modprobe -- ip_vs_lc modprobe -- ip_vs_lblc modprobe -- ip_vs_lblcr modprobe -- ip_vs_rr modprobe -- ip_vs_wrr modprobe -- ip_vs_sh modprobe -- ip_vs_dh modprobe -- ip_vs_fo modprobe -- ip_vs_nq modprobe -- ip_vs_sed modprobe -- ip_vs_ftp modprobe -- ip_vs_sh modprobe -- ip_tables modprobe -- ip_set modprobe -- ipt_set modprobe -- ipt_rpfilter modprobe -- ipt_REJECT modprobe -- ipip modprobe -- xt_set modprobe -- br_netfilter modprobe -- nf_conntrack EOF#创建目录 mkdir ~/k8s-init/ #写入参数配置 tee ~/k8s-init/ipvs.modules <<'EOF' #!/bin/bash modprobe -- ip_vs modprobe -- ip_vs_lc modprobe -- ip_vs_lblc modprobe -- ip_vs_lblcr modprobe -- ip_vs_rr modprobe -- ip_vs_wrr modprobe -- ip_vs_sh modprobe -- ip_vs_dh modprobe -- ip_vs_fo modprobe -- ip_vs_nq modprobe -- ip_vs_sed modprobe -- ip_vs_ftp modprobe -- ip_vs_sh modprobe -- ip_tables modprobe -- ip_set modprobe -- ipt_set modprobe -- ipt_rpfilter modprobe -- ipt_REJECT modprobe -- ipip modprobe -- xt_set modprobe -- br_netfilter modprobe -- nf_conntrack EOF
#加载内核配置(临时|永久)注意管理员执行 chmod 755 ~/k8s-init/ipvs.modules && sudo bash ~/k8s-init/ipvs.modules sudo cp ~/k8s-init/ipvs.modules /etc/profile.d/ipvs.modules.sh lsmod | grep -e ip_vs -e nf_conntrack #ip_vs_ftp 16384 0 #nf_nat 45056 1 ip_vs_ftp #ip_vs_sed 16384 0 #ip_vs_nq 16384 0 #ip_vs_fo 16384 0 #ip_vs_dh 16384 0 #ip_vs_sh 16384 0 #ip_vs_wrr 16384 0 #ip_vs_rr 16384 0 #ip_vs_lblcr 16384 0 #ip_vs_lblc 16384 0 #ip_vs_lc 16384 0 #ip_vs 155648 22 #ip_vs_rr,ip_vs_dh,ip_vs_lblcr,ip_vs_sh,ip_vs_fo,ip_vs_nq,ip_vs_lblc,ip_vs_wrr,ip_vs_lc,ip_vs_sed,ip_vs_ftp #nf_conntrack 139264 2 nf_nat,ip_vs #nf_defrag_ipv6 24576 2 nf_conntrack,ip_vs #nf_defrag_ipv4 16384 1 nf_conntrack #libcrc32c 16384 5 nf_conntrack,nf_nat,btrfs,raid456,ip_vs#加载内核配置(临时|永久)注意管理员执行 chmod 755 ~/k8s-init/ipvs.modules && sudo bash ~/k8s-init/ipvs.modules sudo cp ~/k8s-init/ipvs.modules /etc/profile.d/ipvs.modules.sh lsmod | grep -e ip_vs -e nf_conntrack #ip_vs_ftp 16384 0 #nf_nat 45056 1 ip_vs_ftp #ip_vs_sed 16384 0 #ip_vs_nq 16384 0 #ip_vs_fo 16384 0 #ip_vs_dh 16384 0 #ip_vs_sh 16384 0 #ip_vs_wrr 16384 0 #ip_vs_rr 16384 0 #ip_vs_lblcr 16384 0 #ip_vs_lblc 16384 0 #ip_vs_lc 16384 0 #ip_vs 155648 22 #ip_vs_rr,ip_vs_dh,ip_vs_lblcr,ip_vs_sh,ip_vs_fo,ip_vs_nq,ip_vs_lblc,ip_vs_wrr,ip_vs_lc,ip_vs_sed,ip_vs_ftp #nf_conntrack 139264 2 nf_nat,ip_vs #nf_defrag_ipv6 24576 2 nf_conntrack,ip_vs #nf_defrag_ipv4 16384 1 nf_conntrack #libcrc32c 16384 5 nf_conntrack,nf_nat,btrfs,raid456,ip_vs#加载内核配置(临时|永久)注意管理员执行 chmod 755 ~/k8s-init/ipvs.modules && sudo bash ~/k8s-init/ipvs.modules sudo cp ~/k8s-init/ipvs.modules /etc/profile.d/ipvs.modules.sh lsmod | grep -e ip_vs -e nf_conntrack #ip_vs_ftp 16384 0 #nf_nat 45056 1 ip_vs_ftp #ip_vs_sed 16384 0 #ip_vs_nq 16384 0 #ip_vs_fo 16384 0 #ip_vs_dh 16384 0 #ip_vs_sh 16384 0 #ip_vs_wrr 16384 0 #ip_vs_rr 16384 0 #ip_vs_lblcr 16384 0 #ip_vs_lblc 16384 0 #ip_vs_lc 16384 0 #ip_vs 155648 22 #ip_vs_rr,ip_vs_dh,ip_vs_lblcr,ip_vs_sh,ip_vs_fo,ip_vs_nq,ip_vs_lblc,ip_vs_wrr,ip_vs_lc,ip_vs_sed,ip_vs_ftp #nf_conntrack 139264 2 nf_nat,ip_vs #nf_defrag_ipv6 24576 2 nf_conntrack,ip_vs #nf_defrag_ipv4 16384 1 nf_conntrack #libcrc32c 16384 5 nf_conntrack,nf_nat,btrfs,raid456,ip_vs
5. 内核参数调整
# 1.Kernel 参数调整 mkdir ~/k8s-init/ cat > ~/k8s-init/kubernetes-sysctl.conf <<EOF # iptables 网桥模式开启 net.bridge.bridge-nf-call-iptables=1 net.bridge.bridge-nf-call-ip6tables=1 # 禁用 ipv6 协议 net.ipv6.conf.all.disable_ipv6=1 # 启用ipv4转发 net.ipv4.ip_forward=1 # net.ipv4.tcp_tw_recycle=0 #Ubuntu 没有参数 # 禁止使用 swap 空间,只有当系统 OOM 时才允许使用它 vm.swappiness=0 # 不检查物理内存是否够用 vm.overcommit_memory=1 # 不启 OOM vm.panic_on_oom=0 # 文件系统通知数(根据内存大小和空间大小配置) fs.inotify.max_user_instances=8192 fs.inotify.max_user_watches=1048576 # 文件件打开句柄数 fs.file-max=52706963 fs.nr_open=52706963 net.netfilter.nf_conntrack_max=2310720 # tcp keepalive 相关参数配置 net.ipv4.tcp_keepalive_time = 600 net.ipv4.tcp_keepalive_probes = 3 net.ipv4.tcp_keepalive_intvl =15 net.ipv4.tcp_max_tw_buckets = 36000 net.ipv4.tcp_tw_reuse = 1 net.ipv4.tcp_max_orphans = 327680 net.ipv4.tcp_orphan_retries = 3 net.ipv4.tcp_syncookies = 1 net.ipv4.tcp_max_syn_backlog = 16384 # net.ipv4.ip_conntrack_max = 65536 # Ubuntu 没有参数 net.ipv4.tcp_timestamps = 0 net.core.somaxconn = 32768 EOF sudo cp ~/k8s-init/kubernetes-sysctl.conf /etc/sysctl.d/99-kubernetes.conf sudo sysctl -p /etc/sysctl.d/99-kubernetes.conf # 2.nftables 模式切换 # 在 Linux 中 nftables 当前可以作为内核 iptables 子系统的替代品,该工具可以充当兼容性层其行为类似于 iptables 但实际上是在配置 nftables。 $ apt list | grep "nftables/focal" # nftables/focal 0.9.3-2 amd64 # python3-nftables/focal 0.9.3-2 amd64 # iptables 旧模式切换 (nftables 后端与当前的 kubeadm 软件包不兼容, 它会导致重复防火墙规则并破坏 kube-proxy, 所则需要把 iptables 工具切换到“旧版”模式来避免这些问题) sudo update-alternatives --set iptables /usr/sbin/iptables-legacy sudo update-alternatives --set ip6tables /usr/sbin/ip6tables-legacy # sudo update-alternatives --set arptables /usr/sbin/arptables-legacy # PS: # Ubuntu 20.04 TLS 无该模块 # sudo update-alternatives --set ebtables /usr/sbin/ebtables-legacy # PS: # Ubuntu 20.04 TLS 无该模块 作者:WeiyiGeek https://www.bilibili.com/read/cv16278587/ 出处:bilibili# 1.Kernel 参数调整 mkdir ~/k8s-init/ cat > ~/k8s-init/kubernetes-sysctl.conf <<EOF # iptables 网桥模式开启 net.bridge.bridge-nf-call-iptables=1 net.bridge.bridge-nf-call-ip6tables=1 # 禁用 ipv6 协议 net.ipv6.conf.all.disable_ipv6=1 # 启用ipv4转发 net.ipv4.ip_forward=1 # net.ipv4.tcp_tw_recycle=0 #Ubuntu 没有参数 # 禁止使用 swap 空间,只有当系统 OOM 时才允许使用它 vm.swappiness=0 # 不检查物理内存是否够用 vm.overcommit_memory=1 # 不启 OOM vm.panic_on_oom=0 # 文件系统通知数(根据内存大小和空间大小配置) fs.inotify.max_user_instances=8192 fs.inotify.max_user_watches=1048576 # 文件件打开句柄数 fs.file-max=52706963 fs.nr_open=52706963 net.netfilter.nf_conntrack_max=2310720 # tcp keepalive 相关参数配置 net.ipv4.tcp_keepalive_time = 600 net.ipv4.tcp_keepalive_probes = 3 net.ipv4.tcp_keepalive_intvl =15 net.ipv4.tcp_max_tw_buckets = 36000 net.ipv4.tcp_tw_reuse = 1 net.ipv4.tcp_max_orphans = 327680 net.ipv4.tcp_orphan_retries = 3 net.ipv4.tcp_syncookies = 1 net.ipv4.tcp_max_syn_backlog = 16384 # net.ipv4.ip_conntrack_max = 65536 # Ubuntu 没有参数 net.ipv4.tcp_timestamps = 0 net.core.somaxconn = 32768 EOF sudo cp ~/k8s-init/kubernetes-sysctl.conf /etc/sysctl.d/99-kubernetes.conf sudo sysctl -p /etc/sysctl.d/99-kubernetes.conf # 2.nftables 模式切换 # 在 Linux 中 nftables 当前可以作为内核 iptables 子系统的替代品,该工具可以充当兼容性层其行为类似于 iptables 但实际上是在配置 nftables。 $ apt list | grep "nftables/focal" # nftables/focal 0.9.3-2 amd64 # python3-nftables/focal 0.9.3-2 amd64 # iptables 旧模式切换 (nftables 后端与当前的 kubeadm 软件包不兼容, 它会导致重复防火墙规则并破坏 kube-proxy, 所则需要把 iptables 工具切换到“旧版”模式来避免这些问题) sudo update-alternatives --set iptables /usr/sbin/iptables-legacy sudo update-alternatives --set ip6tables /usr/sbin/ip6tables-legacy # sudo update-alternatives --set arptables /usr/sbin/arptables-legacy # PS: # Ubuntu 20.04 TLS 无该模块 # sudo update-alternatives --set ebtables /usr/sbin/ebtables-legacy # PS: # Ubuntu 20.04 TLS 无该模块 作者:WeiyiGeek https://www.bilibili.com/read/cv16278587/ 出处:bilibili# 1.Kernel 参数调整 mkdir ~/k8s-init/ cat > ~/k8s-init/kubernetes-sysctl.conf <<EOF # iptables 网桥模式开启 net.bridge.bridge-nf-call-iptables=1 net.bridge.bridge-nf-call-ip6tables=1 # 禁用 ipv6 协议 net.ipv6.conf.all.disable_ipv6=1 # 启用ipv4转发 net.ipv4.ip_forward=1 # net.ipv4.tcp_tw_recycle=0 #Ubuntu 没有参数 # 禁止使用 swap 空间,只有当系统 OOM 时才允许使用它 vm.swappiness=0 # 不检查物理内存是否够用 vm.overcommit_memory=1 # 不启 OOM vm.panic_on_oom=0 # 文件系统通知数(根据内存大小和空间大小配置) fs.inotify.max_user_instances=8192 fs.inotify.max_user_watches=1048576 # 文件件打开句柄数 fs.file-max=52706963 fs.nr_open=52706963 net.netfilter.nf_conntrack_max=2310720 # tcp keepalive 相关参数配置 net.ipv4.tcp_keepalive_time = 600 net.ipv4.tcp_keepalive_probes = 3 net.ipv4.tcp_keepalive_intvl =15 net.ipv4.tcp_max_tw_buckets = 36000 net.ipv4.tcp_tw_reuse = 1 net.ipv4.tcp_max_orphans = 327680 net.ipv4.tcp_orphan_retries = 3 net.ipv4.tcp_syncookies = 1 net.ipv4.tcp_max_syn_backlog = 16384 # net.ipv4.ip_conntrack_max = 65536 # Ubuntu 没有参数 net.ipv4.tcp_timestamps = 0 net.core.somaxconn = 32768 EOF sudo cp ~/k8s-init/kubernetes-sysctl.conf /etc/sysctl.d/99-kubernetes.conf sudo sysctl -p /etc/sysctl.d/99-kubernetes.conf # 2.nftables 模式切换 # 在 Linux 中 nftables 当前可以作为内核 iptables 子系统的替代品,该工具可以充当兼容性层其行为类似于 iptables 但实际上是在配置 nftables。 $ apt list | grep "nftables/focal" # nftables/focal 0.9.3-2 amd64 # python3-nftables/focal 0.9.3-2 amd64 # iptables 旧模式切换 (nftables 后端与当前的 kubeadm 软件包不兼容, 它会导致重复防火墙规则并破坏 kube-proxy, 所则需要把 iptables 工具切换到“旧版”模式来避免这些问题) sudo update-alternatives --set iptables /usr/sbin/iptables-legacy sudo update-alternatives --set ip6tables /usr/sbin/ip6tables-legacy # sudo update-alternatives --set arptables /usr/sbin/arptables-legacy # PS: # Ubuntu 20.04 TLS 无该模块 # sudo update-alternatives --set ebtables /usr/sbin/ebtables-legacy # PS: # Ubuntu 20.04 TLS 无该模块 作者:WeiyiGeek https://www.bilibili.com/read/cv16278587/ 出处:bilibili
6. 设置 rsyslogd 和 systemd journald 记录
sudo mkdir -pv /var/log/journal/ /etc/systemd/journald.conf.d/ sudo tee /etc/systemd/journald.conf.d/99-prophet.conf <<'EOF' [Journal] # 持久化保存到磁盘 Storage=persistent # 压缩历史日志 Compress=yes SyncIntervalSec=5m RateLimitInterval=30s RateLimitBurst=1000 # 最大占用空间 10G SystemMaxUse=10G # 单日志文件最大 100M SystemMaxFileSize=100M # 日志保存时间 2 周 MaxRetentionSec=2week # 不将日志转发到syslog ForwardToSyslog=no EOF cp /etc/systemd/journald.conf.d/99-prophet.conf ~/k8s-init/journald-99-prophet.conf sudo systemctl restart systemd-journaldsudo mkdir -pv /var/log/journal/ /etc/systemd/journald.conf.d/ sudo tee /etc/systemd/journald.conf.d/99-prophet.conf <<'EOF' [Journal] # 持久化保存到磁盘 Storage=persistent # 压缩历史日志 Compress=yes SyncIntervalSec=5m RateLimitInterval=30s RateLimitBurst=1000 # 最大占用空间 10G SystemMaxUse=10G # 单日志文件最大 100M SystemMaxFileSize=100M # 日志保存时间 2 周 MaxRetentionSec=2week # 不将日志转发到syslog ForwardToSyslog=no EOF cp /etc/systemd/journald.conf.d/99-prophet.conf ~/k8s-init/journald-99-prophet.conf sudo systemctl restart systemd-journaldsudo mkdir -pv /var/log/journal/ /etc/systemd/journald.conf.d/ sudo tee /etc/systemd/journald.conf.d/99-prophet.conf <<'EOF' [Journal] # 持久化保存到磁盘 Storage=persistent # 压缩历史日志 Compress=yes SyncIntervalSec=5m RateLimitInterval=30s RateLimitBurst=1000 # 最大占用空间 10G SystemMaxUse=10G # 单日志文件最大 100M SystemMaxFileSize=100M # 日志保存时间 2 周 MaxRetentionSec=2week # 不将日志转发到syslog ForwardToSyslog=no EOF cp /etc/systemd/journald.conf.d/99-prophet.conf ~/k8s-init/journald-99-prophet.conf sudo systemctl restart systemd-journald
三、安装docker
# 1.卸载旧版本 sudo apt-get remove docker docker-engine docker.io containerd runc # 2.更新apt包索引并安装包以允许apt在HTTPS上使用存储库 sudo apt-get install -y \ apt-transport-https \ ca-certificates \ curl \ gnupg-agent \ software-properties-common # 3.添加Docker官方GPG密钥 # -fsSL curl https://download.docker.com/linux/ubuntu/gpg | sudo apt-key add - # 4.通过搜索指纹的最后8个字符进行密钥验证 sudo apt-key fingerprint 0EBFCD88 # 5.设置稳定存储库 sudo add-apt-repository \ "deb [arch=amd64] https://download.docker.com/linux/ubuntu \ $(lsb_release -cs) \ stable" # 6.Install Docker Engine 默认最新版本 sudo apt-get update && sudo apt-get install -y docker-ce docker-ce-cli containerd.io sudo apt-get install -y docker-ce=5:19.03.15~3-0~ubuntu-focal docker-ce-cli=5:19.03.15~3-0~ubuntu-focal containerd.io # 7.安装特定版本的Docker引擎,请在repo中列出可用的版本 # $apt-cache madison docker-ce # docker-ce | 5:20.10.2~3-0~ubuntu-focal | https://download.docker.com/linux/ubuntu focal/stable amd64 Packages # docker-ce | 5:18.09.1~3-0~ubuntu-xenial | https://download.docker.com/linux/ubuntu xenial/stable amd64 Packages # 使用第二列中的版本字符串安装特定的版本,例如:5:18.09.1~3-0~ubuntu-xenial。 # $sudo apt-get install docker-ce=<VERSION_STRING> docker-ce-cli=<VERSION_STRING> containerd.io #8.将当前用户加入docker用户组然后重新登陆当前用户使得低权限用户 sudo gpasswd -a ${USER} docker #9.加速器建立 mkdir -vp /etc/docker/ sudo tee /etc/docker/daemon.json <<-'EOF' { "registry-mirrors": ["https://xlx9erfu.mirror.aliyuncs.com"], "exec-opts": ["native.cgroupdriver=systemd"], "log-driver": "json-file", "log-opts": { "max-size": "100m" } } EOF # 9.自启与启动 sudo systemctl enable --now docker sudo systemctl restart docker # 10.退出登陆生效 exit# 1.卸载旧版本 sudo apt-get remove docker docker-engine docker.io containerd runc # 2.更新apt包索引并安装包以允许apt在HTTPS上使用存储库 sudo apt-get install -y \ apt-transport-https \ ca-certificates \ curl \ gnupg-agent \ software-properties-common # 3.添加Docker官方GPG密钥 # -fsSL curl https://download.docker.com/linux/ubuntu/gpg | sudo apt-key add - # 4.通过搜索指纹的最后8个字符进行密钥验证 sudo apt-key fingerprint 0EBFCD88 # 5.设置稳定存储库 sudo add-apt-repository \ "deb [arch=amd64] https://download.docker.com/linux/ubuntu \ $(lsb_release -cs) \ stable" # 6.Install Docker Engine 默认最新版本 sudo apt-get update && sudo apt-get install -y docker-ce docker-ce-cli containerd.io sudo apt-get install -y docker-ce=5:19.03.15~3-0~ubuntu-focal docker-ce-cli=5:19.03.15~3-0~ubuntu-focal containerd.io # 7.安装特定版本的Docker引擎,请在repo中列出可用的版本 # $apt-cache madison docker-ce # docker-ce | 5:20.10.2~3-0~ubuntu-focal | https://download.docker.com/linux/ubuntu focal/stable amd64 Packages # docker-ce | 5:18.09.1~3-0~ubuntu-xenial | https://download.docker.com/linux/ubuntu xenial/stable amd64 Packages # 使用第二列中的版本字符串安装特定的版本,例如:5:18.09.1~3-0~ubuntu-xenial。 # $sudo apt-get install docker-ce=<VERSION_STRING> docker-ce-cli=<VERSION_STRING> containerd.io #8.将当前用户加入docker用户组然后重新登陆当前用户使得低权限用户 sudo gpasswd -a ${USER} docker #9.加速器建立 mkdir -vp /etc/docker/ sudo tee /etc/docker/daemon.json <<-'EOF' { "registry-mirrors": ["https://xlx9erfu.mirror.aliyuncs.com"], "exec-opts": ["native.cgroupdriver=systemd"], "log-driver": "json-file", "log-opts": { "max-size": "100m" } } EOF # 9.自启与启动 sudo systemctl enable --now docker sudo systemctl restart docker # 10.退出登陆生效 exit# 1.卸载旧版本 sudo apt-get remove docker docker-engine docker.io containerd runc # 2.更新apt包索引并安装包以允许apt在HTTPS上使用存储库 sudo apt-get install -y \ apt-transport-https \ ca-certificates \ curl \ gnupg-agent \ software-properties-common # 3.添加Docker官方GPG密钥 # -fsSL curl https://download.docker.com/linux/ubuntu/gpg | sudo apt-key add - # 4.通过搜索指纹的最后8个字符进行密钥验证 sudo apt-key fingerprint 0EBFCD88 # 5.设置稳定存储库 sudo add-apt-repository \ "deb [arch=amd64] https://download.docker.com/linux/ubuntu \ $(lsb_release -cs) \ stable" # 6.Install Docker Engine 默认最新版本 sudo apt-get update && sudo apt-get install -y docker-ce docker-ce-cli containerd.io sudo apt-get install -y docker-ce=5:19.03.15~3-0~ubuntu-focal docker-ce-cli=5:19.03.15~3-0~ubuntu-focal containerd.io # 7.安装特定版本的Docker引擎,请在repo中列出可用的版本 # $apt-cache madison docker-ce # docker-ce | 5:20.10.2~3-0~ubuntu-focal | https://download.docker.com/linux/ubuntu focal/stable amd64 Packages # docker-ce | 5:18.09.1~3-0~ubuntu-xenial | https://download.docker.com/linux/ubuntu xenial/stable amd64 Packages # 使用第二列中的版本字符串安装特定的版本,例如:5:18.09.1~3-0~ubuntu-xenial。 # $sudo apt-get install docker-ce=<VERSION_STRING> docker-ce-cli=<VERSION_STRING> containerd.io #8.将当前用户加入docker用户组然后重新登陆当前用户使得低权限用户 sudo gpasswd -a ${USER} docker #9.加速器建立 mkdir -vp /etc/docker/ sudo tee /etc/docker/daemon.json <<-'EOF' { "registry-mirrors": ["https://xlx9erfu.mirror.aliyuncs.com"], "exec-opts": ["native.cgroupdriver=systemd"], "log-driver": "json-file", "log-opts": { "max-size": "100m" } } EOF # 9.自启与启动 sudo systemctl enable --now docker sudo systemctl restart docker # 10.退出登陆生效 exit
四、K8S安装
1.安装kubeadm
使用阿里云镜像源,安装kubeadm,可参考:https://developer.aliyun.com/mirror/kubernetes
apt-get update && apt-get install -y apt-transport-https curl https://mirrors.aliyun.com/kubernetes/apt/doc/apt-key.gpg | apt-key add - cat <<EOF >/etc/apt/sources.list.d/kubernetes.list deb https://mirrors.aliyun.com/kubernetes/apt/ kubernetes-xenial main EOF apt-get update #安装最新版的kubelet kubeadm kubectl(二选一) sudo apt-get install -y kubelet kubeadm kubectl #安装指定版本的 kubelet kubeadm kubectl,我这里安装的是1.22.2的版本(二选一) sudo apt-get install -y kubelet=1.22.2-00 kubeadm=1.22.2-00 kubectl=1.22.2-00 #设置开机自启动 systemctl enable kubelet.service #查看版本 kubeadm versionapt-get update && apt-get install -y apt-transport-https curl https://mirrors.aliyun.com/kubernetes/apt/doc/apt-key.gpg | apt-key add - cat <<EOF >/etc/apt/sources.list.d/kubernetes.list deb https://mirrors.aliyun.com/kubernetes/apt/ kubernetes-xenial main EOF apt-get update #安装最新版的kubelet kubeadm kubectl(二选一) sudo apt-get install -y kubelet kubeadm kubectl #安装指定版本的 kubelet kubeadm kubectl,我这里安装的是1.22.2的版本(二选一) sudo apt-get install -y kubelet=1.22.2-00 kubeadm=1.22.2-00 kubectl=1.22.2-00 #设置开机自启动 systemctl enable kubelet.service #查看版本 kubeadm versionapt-get update && apt-get install -y apt-transport-https curl https://mirrors.aliyun.com/kubernetes/apt/doc/apt-key.gpg | apt-key add - cat <<EOF >/etc/apt/sources.list.d/kubernetes.list deb https://mirrors.aliyun.com/kubernetes/apt/ kubernetes-xenial main EOF apt-get update #安装最新版的kubelet kubeadm kubectl(二选一) sudo apt-get install -y kubelet kubeadm kubectl #安装指定版本的 kubelet kubeadm kubectl,我这里安装的是1.22.2的版本(二选一) sudo apt-get install -y kubelet=1.22.2-00 kubeadm=1.22.2-00 kubectl=1.22.2-00 #设置开机自启动 systemctl enable kubelet.service #查看版本 kubeadm version
2.初始化集群
使用kubeadm 初始化集群(仅master节点运行)
sudo kubeadm init \ --kubernetes-version=1.22.1 \ --apiserver-advertise-address=192.168.186.111 \ --pod-network-cidr=10.244.0.0/16 \ --image-repository registry.aliyuncs.com/google_containers #kubernetes-version,是k8s的版本,不设置默认是最新 #apiserver-advertise-address是填 master节点的IP #pod-network-cidr pod的网络,取决了flannel的网络(本文) #image-repository 镜像源地址sudo kubeadm init \ --kubernetes-version=1.22.1 \ --apiserver-advertise-address=192.168.186.111 \ --pod-network-cidr=10.244.0.0/16 \ --image-repository registry.aliyuncs.com/google_containers #kubernetes-version,是k8s的版本,不设置默认是最新 #apiserver-advertise-address是填 master节点的IP #pod-network-cidr pod的网络,取决了flannel的网络(本文) #image-repository 镜像源地址sudo kubeadm init \ --kubernetes-version=1.22.1 \ --apiserver-advertise-address=192.168.186.111 \ --pod-network-cidr=10.244.0.0/16 \ --image-repository registry.aliyuncs.com/google_containers #kubernetes-version,是k8s的版本,不设置默认是最新 #apiserver-advertise-address是填 master节点的IP #pod-network-cidr pod的网络,取决了flannel的网络(本文) #image-repository 镜像源地址
直到出现"Your Kubernetes control-plane has initialized successfully!"就表示初始化完成,如下图所示:
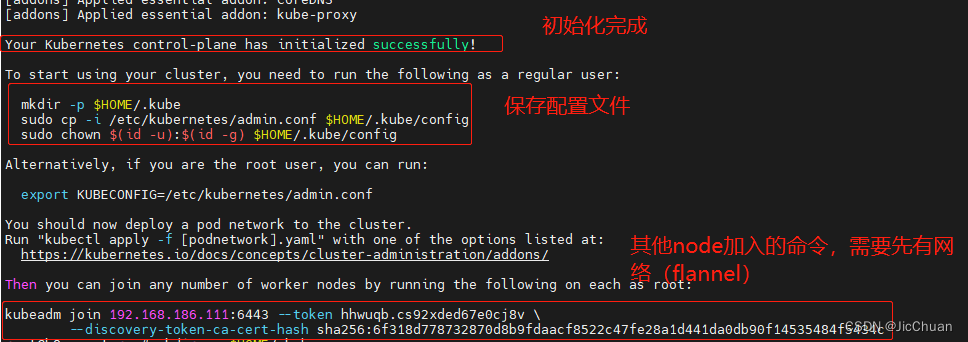
执行下面命令保存k8s的配置文件:
mkdir -p $HOME/.kube sudo cp -i /etc/kubernetes/admin.conf $HOME/.kube/config sudo chown $(id -u):$(id -g) $HOME/.kube/configmkdir -p $HOME/.kube sudo cp -i /etc/kubernetes/admin.conf $HOME/.kube/config sudo chown $(id -u):$(id -g) $HOME/.kube/configmkdir -p $HOME/.kube sudo cp -i /etc/kubernetes/admin.conf $HOME/.kube/config sudo chown $(id -u):$(id -g) $HOME/.kube/config
3. 安装flannel(仅master节点运行)
#使用gitee,github因为网络原因可能无法正常下载 git clone --depth 1 https://gitee.com/CaiJinHao/flannel.git #安装 kubectl apply -f flannel/Documentation/kube-flannel.yml #查看pod状态,当flannel状态为Running的时候就表示安装完成 kubectl get pod -n kube-system#使用gitee,github因为网络原因可能无法正常下载 git clone --depth 1 https://gitee.com/CaiJinHao/flannel.git #安装 kubectl apply -f flannel/Documentation/kube-flannel.yml #查看pod状态,当flannel状态为Running的时候就表示安装完成 kubectl get pod -n kube-system#使用gitee,github因为网络原因可能无法正常下载 git clone --depth 1 https://gitee.com/CaiJinHao/flannel.git #安装 kubectl apply -f flannel/Documentation/kube-flannel.yml #查看pod状态,当flannel状态为Running的时候就表示安装完成 kubectl get pod -n kube-system
4. 配置kube-proxy开启IPVS模式
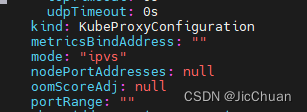
kubectl edit configmap kube-proxy -n kube-system #把原来mode配置为ipvs,默认是空 42 kind: KubeProxyConfiguration 43 metricsBindAddress: "" 44 mode: "ipvs" 45 nodePortAddresses: nullkubectl edit configmap kube-proxy -n kube-system #把原来mode配置为ipvs,默认是空 42 kind: KubeProxyConfiguration 43 metricsBindAddress: "" 44 mode: "ipvs" 45 nodePortAddresses: nullkubectl edit configmap kube-proxy -n kube-system #把原来mode配置为ipvs,默认是空 42 kind: KubeProxyConfiguration 43 metricsBindAddress: "" 44 mode: "ipvs" 45 nodePortAddresses: null
5. 重启kube-proxy pod,并且查看状态
#删除pod重新运行 kubectl delete pod -n kube-system kube-proxy-mtkns #查看状态 ipvsadm -Ln#删除pod重新运行 kubectl delete pod -n kube-system kube-proxy-mtkns #查看状态 ipvsadm -Ln#删除pod重新运行 kubectl delete pod -n kube-system kube-proxy-mtkns #查看状态 ipvsadm -Ln
6. 添加节点
#运行此命令把其他node节点加入集群,具体命令是自己集群kubeadm初始化完成之后的提示命令中 kubeadm join 192.168.186.111:6443 --token hhwuqb.cs92xded67e0cj8v \ --discovery-token-ca-cert-hash sha256:6f318d778732870d8b9fdaacf8522c47fe28a1d441da0db90f14535484f5434c#运行此命令把其他node节点加入集群,具体命令是自己集群kubeadm初始化完成之后的提示命令中 kubeadm join 192.168.186.111:6443 --token hhwuqb.cs92xded67e0cj8v \ --discovery-token-ca-cert-hash sha256:6f318d778732870d8b9fdaacf8522c47fe28a1d441da0db90f14535484f5434c#运行此命令把其他node节点加入集群,具体命令是自己集群kubeadm初始化完成之后的提示命令中 kubeadm join 192.168.186.111:6443 --token hhwuqb.cs92xded67e0cj8v \ --discovery-token-ca-cert-hash sha256:6f318d778732870d8b9fdaacf8522c47fe28a1d441da0db90f14535484f5434c
完成之后之后,等待几分钟,使用kubectl get node查看集群状态,当所有节点状态都是Ready时,就表示成功。

五、部署服务
部署nginx(deployment )
kubectl create deployment nginx --image=nginx:1.17.1kubectl create deployment nginx --image=nginx:1.17.1kubectl create deployment nginx --image=nginx:1.17.1
暴露端口(创建svc)
kubectl expose deployment nginx --port=80 --type=NodePortkubectl expose deployment nginx --port=80 --type=NodePortkubectl expose deployment nginx --port=80 --type=NodePort
查看 deployment和svc
kubectl get deployment,pod,svckubectl get deployment,pod,svckubectl get deployment,pod,svc
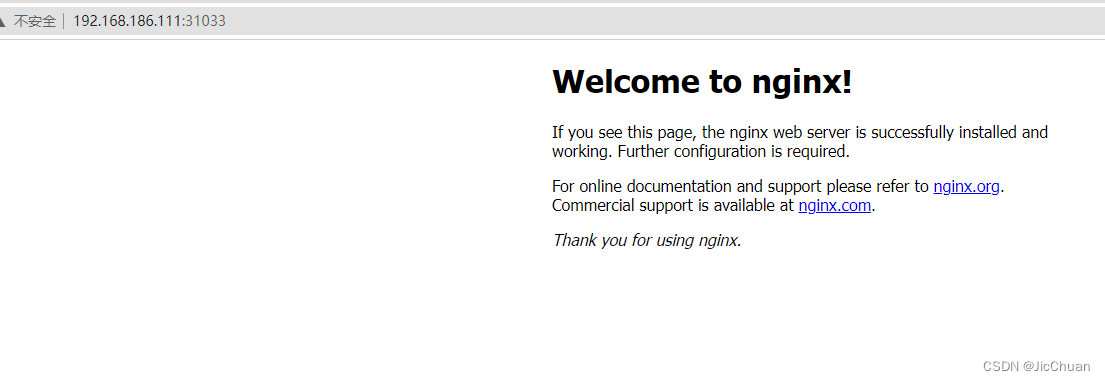
使用集群内任意node的IP加NodePort的端口访问,验证是否正常
本文部分配置参考了如下链接:5.我在B站学云原生之Kubernetes入门实践Ubuntu系统上安装部署K8S单控制平面环境 – 哔哩哔哩
原文链接:https://blog.csdn.net/qq_38696270/article/details/127879600
© 版权声明
声明📢本站内容均来自互联网,归原创作者所有,如有侵权必删除。
本站文章皆由CC-4.0协议发布,如无来源则为原创,转载请注明出处。
THE END


