一、首先,Ubuntu20.04自带Python2,为了避坑,需要将Python版本升级至与你的Django项目(下称“project”)同一个版本:
sudo apt update sudo apt install python3.9sudo apt update sudo apt install python3.9sudo apt update sudo apt install python3.9
二、本地project执行以下命令收集所用到的包:
pip freeze > plist.txtpip freeze > plist.txtpip freeze > plist.txt
执行完后project根目录下就生成了plist.txt文本文档。
三、使用Xftp 7这个软件连接到你的云服务器,把本地的project直接拖到云服务器的/home文件夹内。
Xftp 7的具体连接方法网上很多,注意记得把云服务器入方向规则的22端口加上。
四、使用Xshell 7这个软件连接到你的云服务器,这样就可以远程操作控制你的Linux服务器了。
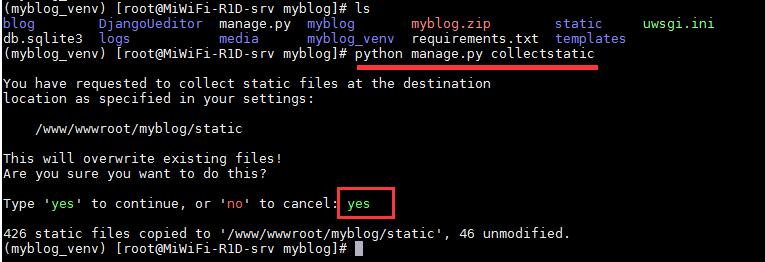
进入到你的project目录,安装project所要用到的包:
cd /home/project pip install -r plist.txtcd /home/project pip install -r plist.txtcd /home/project pip install -r plist.txt
五、云服务器安装Mysql。
这个网上很多教程方法,照着做就行。
安装完后本地使用Navicat远程连接云服务器的Mysql,将本地的数据库数据传输至云服务器,要记住,windows系统的Mysql表名是大小写不敏感的,Linux系统的Mysql表名是需要区分大小写的,所以表名一定要严格与project代码用到的表大小写一致。
六、云服务器安装Nginx。
apt-get update apt-get install nginxapt-get update apt-get install nginxapt-get update apt-get install nginx
安装好后,Nginx会自动启动,本地浏览器输入你的云服务器的公网IP:xx.xx.xx.xx即可看到以下页面:(注意记得把云服务器入方向规则的80端口加上。)
云服务器(Nginx+uwsgi),大佬请指教插图")
七、云服务器安装uwsgi。
pip install uwsgipip install uwsgipip install uwsgi
在本地新建一个uwsgi.ini文件,以文本文档格式打开,输入下面的配置内容:
[uwsgi] chdir = /home/project module = project.wsgi:application socket = 127.0.0.1:8000 master = true daemonize = /home/project/run.log disable-logging = true
其中,project改为你的项目名称,保存即可。
通过Xftp 7将这个uwsgi.ini文件拖到云服务器/home/project里,且在/home/project里新建一个文本文档,重命名为run.log。
八、配置Nginx。
通过Xftp 7将/etc/nginx/sites-available文件夹内的default文件拖到本地,以文本文档打开方式打开,然后编辑,内容如下:
## # You should look at the following URL's in order to grasp a solid understanding # of Nginx configuration files in order to fully unleash the power of Nginx. # http://wiki.nginx.org/Pitfalls # http://wiki.nginx.org/QuickStart # http://wiki.nginx.org/Configuration # # Generally, you will want to move this file somewhere, and start with a clean # file but keep this around for reference. Or just disable in sites-enabled. # # Please see /usr/share/doc/nginx-doc/examples/ for more detailed examples. ## # Default server configuration # server { listen 80; listen [::]:80; # SSL configuration # # listen 443 ssl default_server; # listen [::]:443 ssl default_server; # # Note: You should disable gzip for SSL traffic. # See: https://bugs.debian.org/773332 # # Read up on ssl_ciphers to ensure a secure configuration. # See: https://bugs.debian.org/765782 # # Self signed certs generated by the ssl-cert package # Don't use them in a production server! # # include snippets/snakeoil.conf; # root /var/www/html; # Add index.php to the list if you are using PHP # index index.html index.htm index.nginx-debian.html; server_name xx.xx.xx.xx; location / { # First attempt to serve request as file, then # as directory, then fall back to displaying a 404. # try_files $uri $uri/ =404; include uwsgi_params; uwsgi_pass 127.0.0.1:8000; } location /static { alias /home/project/static; } # pass the PHP scripts to FastCGI server listening on 127.0.0.1:9000 # #location ~ \.php$ { # include snippets/fastcgi-php.conf; # # # With php7.0-cgi alone: # fastcgi_pass 127.0.0.1:9000; # # With php7.0-fpm: # fastcgi_pass unix:/run/php/php7.0-fpm.sock; #} # deny access to .htaccess files, if Apache's document root # concurs with nginx's one # #location ~ /\.ht { # deny all; #} } # Virtual Host configuration for example.com # # You can move that to a different file under sites-available/ and symlink that # to sites-enabled/ to enable it. # #server { # listen 80; # listen [::]:80; # # server_name example.com; # # root /var/www/example.com; # index index.html; # # location / { # try_files $uri $uri/ =404; # } #}
server_name xx.xx.xx.xx填上你的云服务器公网IP。
编辑完后保存退出,然后拖进去/etc/nginx/sites-available把原来的default替换掉。
然后重启Nginx服务:
sudo service nginx restartsudo service nginx restartsudo service nginx restart
九、本地修改你的Django项目的settings.py文件:
DEBUG = False ALLOWED_HOSTS = ['xx.xx.xx.xx']
xx.xx.xx.xx填上你的云服务器公网IP。
十、云服务器启动服务:
sudo killall -9 uwsgisudo killall -9 uwsgisudo killall -9 uwsgi
删除之前的uwsgi进程,等待10秒钟(因为端口释放有延迟),然后:
cd /home/project sudo uwsgi uwsgi.inicd /home/project sudo uwsgi uwsgi.inicd /home/project sudo uwsgi uwsgi.ini
最后在你的本地浏览器输入你的云服务器公网IP xx.xx.xx.xx就可以看到你的项目成功上线了。
总结:本人是小白,以上项目是经过亲身实践可行的Django部署方案,有大佬认为不妥的请多多指教,同是小白的欢迎私信或留言交流,谢谢!
原文链接:https://blog.csdn.net/woaicaijunyu/article/details/126889013