一。安装nginx
# 彻底卸载nginx
apt-get –purge autoremove nginx
安装命令
sudo apt-get install nginxsudo apt-get install nginxsudo apt-get install nginx
#查看nginx的版本号
nginx -v
访问nginx
网页输入ip地址,访问成功,到此,nginx安装完毕

nginx服务器配置文件
/etc/nginx :Nginx配置目录。 所有的Nginx配置文件都驻留在这里。
/etc/nginx/nginx.conf :主要的Nginx配置文件。 这可以修改,以更改Nginx全局配置。
其中nginx.conf是主配置文件。Nginx.conf配置文件主要分成四个部分:
– main (全局设置) 。
– sever (虚拟主机设置)。
– upstream负载均街服务器设置。
– location(URL匹配特定位置的设置)。
listen 80; # 监听端口
server_name rrc.test.jiedaibao.com; # 允许域名
root /data/release/rrc/web; # 项目根目录
index index.php index.html index.htm; # 访问根文件
二.nginx的转发功能配置
修改/etc/nginx/nginx.conf下nginx.conf文件
# cd /etc/nginx/
#vim nginx.conf
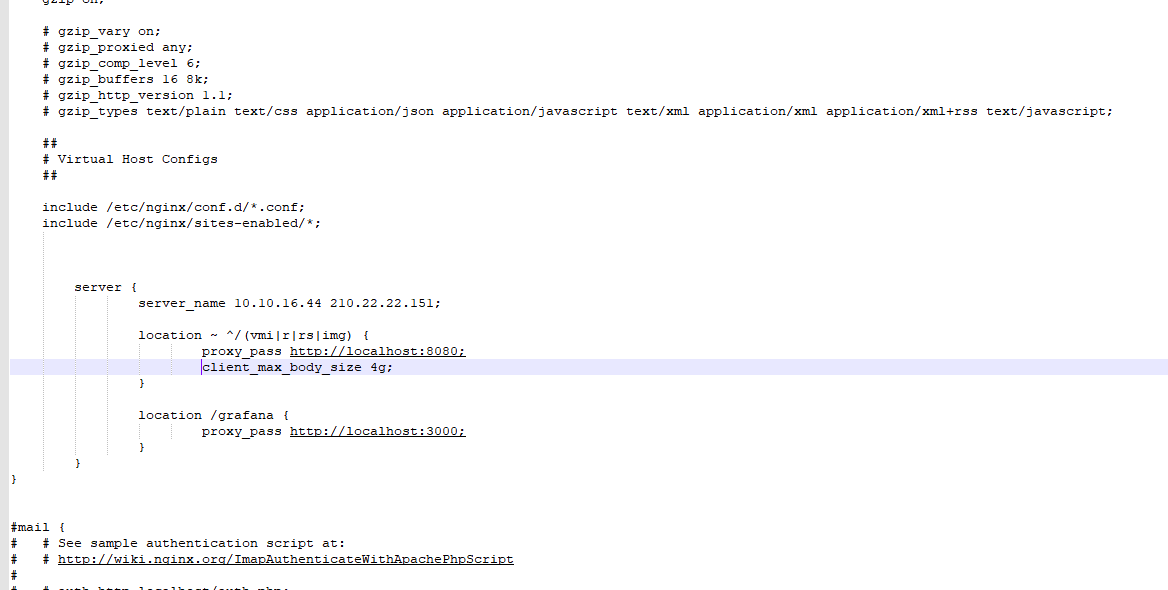
加入以下配置:将以/vmi以及/r,/rs/img访问路径的地址转发到http://localhost:8080服务器中,将以访问路径 /grafana 的请求转发到服务器http://localhost:3000中,server_name 10.10.16.44 xx.xx.xxx.com; # 允许域名或ip
server { server_name 10.10.16.216 xxx.xx.22.151; location ~ ^/(vmi|r|rs|img) { proxy_pass http://localhost:8080; client_max_body_size 4g; } location /grafana { proxy_pass http://localhost:3000; } }server { server_name 10.10.16.216 xxx.xx.22.151; location ~ ^/(vmi|r|rs|img) { proxy_pass http://localhost:8080; client_max_body_size 4g; } location /grafana { proxy_pass http://localhost:3000; } }server { server_name 10.10.16.216 xxx.xx.22.151; location ~ ^/(vmi|r|rs|img) { proxy_pass http://localhost:8080; client_max_body_size 4g; } location /grafana { proxy_pass http://localhost:3000; } }
重新加载配置
在进行一些配置更改后重新加载Nginx服务:
$sudo systemctl reload nginx
然后访问地址

三.配置nginx负载均衡
修改/etc/nginx/nginx.conf下nginx.conf文件
# cd /etc/nginx/
#vim nginx.conf
upstream backserver{ server xxx.xx.xx.151:1048;#服务器tomcat1输入具体的ip加端口号 server xxx.xx.xx.151:1120;#服务器tomcat2 server xxx.xx.xx.xx:1127;#服务器tomcat3 } server{ server_name 10.10.16.216 xxx.xx.22.151; location ~ ^/(vmi|r|rs|img) { proxy_pass http://backserver; client_max_body_size 4g; } location /grafana{ proxy_pass http://localhost:3000; } }upstream backserver{ server xxx.xx.xx.151:1048;#服务器tomcat1输入具体的ip加端口号 server xxx.xx.xx.151:1120;#服务器tomcat2 server xxx.xx.xx.xx:1127;#服务器tomcat3 } server{ server_name 10.10.16.216 xxx.xx.22.151; location ~ ^/(vmi|r|rs|img) { proxy_pass http://backserver; client_max_body_size 4g; } location /grafana{ proxy_pass http://localhost:3000; } }upstream backserver{ server xxx.xx.xx.151:1048;#服务器tomcat1输入具体的ip加端口号 server xxx.xx.xx.151:1120;#服务器tomcat2 server xxx.xx.xx.xx:1127;#服务器tomcat3 } server{ server_name 10.10.16.216 xxx.xx.22.151; location ~ ^/(vmi|r|rs|img) { proxy_pass http://backserver; client_max_body_size 4g; } location /grafana{ proxy_pass http://localhost:3000; } }
在进行一些配置更改后重新加载Nginx服务:
$sudo systemctl reload nginx
# /etc/init.d/nginx -s reload (重启没报错说明配置文件没问题。)
四.nginx设置默认的访问页面配置
在浏览器中输入ip或者域名,设置直接跳转页面到路径 /opt/apache-tomcat-9.0.27/webapps/vm-cloud下的index.html页面。注意如果设置重启nginx输入ip/域名访问页面返回禁止访问forbidden,则设置
修改权限
$ sudo chmod -R 777 apache-tomcat-9.0.27
upstream backserver{ server xxx.xx.xx.151:1048;#服务器tomcat1输入具体的ip加端口号 server xxx.xx.xx.151:1120;#服务器tomcat2 server xxx.xx.xx.xx:1127;#服务器tomcat3 } server{ server_name 10.10.16.216 xxx.xx.22.151; location / { root /opt/apache-tomcat-9.0.27/webapps/vm-cloud;#文件根路径 index index.html;#默认访问的页面名 autoindex on; } location ~ ^/(vmi|r|rs|img) { proxy_pass http://backserver; client_max_body_size 4g; } location /grafana{ proxy_pass http://localhost:3000; } }upstream backserver{ server xxx.xx.xx.151:1048;#服务器tomcat1输入具体的ip加端口号 server xxx.xx.xx.151:1120;#服务器tomcat2 server xxx.xx.xx.xx:1127;#服务器tomcat3 } server{ server_name 10.10.16.216 xxx.xx.22.151; location / { root /opt/apache-tomcat-9.0.27/webapps/vm-cloud;#文件根路径 index index.html;#默认访问的页面名 autoindex on; } location ~ ^/(vmi|r|rs|img) { proxy_pass http://backserver; client_max_body_size 4g; } location /grafana{ proxy_pass http://localhost:3000; } }upstream backserver{ server xxx.xx.xx.151:1048;#服务器tomcat1输入具体的ip加端口号 server xxx.xx.xx.151:1120;#服务器tomcat2 server xxx.xx.xx.xx:1127;#服务器tomcat3 } server{ server_name 10.10.16.216 xxx.xx.22.151; location / { root /opt/apache-tomcat-9.0.27/webapps/vm-cloud;#文件根路径 index index.html;#默认访问的页面名 autoindex on; } location ~ ^/(vmi|r|rs|img) { proxy_pass http://backserver; client_max_body_size 4g; } location /grafana{ proxy_pass http://localhost:3000; } }
五.nginx配置https
#从此处开始配置 ssl_certificate cert/begoit.com.pem; #https证书路径,在此文件路径下创建包cert ssl_certificate_key cert/begoit.com.key; #https证书路径 ssl_session_timeout 5m; ssl_ciphers ECDHE-RSA-AES128-GCM-SHA256:ECDHE:ECDH:AES:HIGH:!NULL:!aNULL:!MD5:!ADH:!RC4; ssl_protocols TLSv1 TLSv1.1 TLSv1.2 TLSv1.3; ssl_prefer_server_ciphers on; server { listen 80; server_name cloud.xxxxx.com api.xxxx.com; return 307 https://$host$request_uri; #nginx 配置https 并解决重定向后https协议变成了http的问题 } server { listen 443 ssl; server_name cloud.xxxx.com; location ~ ^/(vm-cloud|vmcloud|r|rs|img) { proxy_pass http://localhost:8080; client_max_body_size 4g; } location /grafana/ { proxy_pass http://localhost:9080/; } } server { listen 443 ssl; server_name api.xxxx.com; #ssl_verify_client on; #ssl_client_certificate cert/ca.pem; location /proxy/ { proxy_pass http://localhost:3000/; } location /cloud/ { proxy_pass http://localhost:3000/; client_max_body_size 4g; } }#从此处开始配置 ssl_certificate cert/begoit.com.pem; #https证书路径,在此文件路径下创建包cert ssl_certificate_key cert/begoit.com.key; #https证书路径 ssl_session_timeout 5m; ssl_ciphers ECDHE-RSA-AES128-GCM-SHA256:ECDHE:ECDH:AES:HIGH:!NULL:!aNULL:!MD5:!ADH:!RC4; ssl_protocols TLSv1 TLSv1.1 TLSv1.2 TLSv1.3; ssl_prefer_server_ciphers on; server { listen 80; server_name cloud.xxxxx.com api.xxxx.com; return 307 https://$host$request_uri; #nginx 配置https 并解决重定向后https协议变成了http的问题 } server { listen 443 ssl; server_name cloud.xxxx.com; location ~ ^/(vm-cloud|vmcloud|r|rs|img) { proxy_pass http://localhost:8080; client_max_body_size 4g; } location /grafana/ { proxy_pass http://localhost:9080/; } } server { listen 443 ssl; server_name api.xxxx.com; #ssl_verify_client on; #ssl_client_certificate cert/ca.pem; location /proxy/ { proxy_pass http://localhost:3000/; } location /cloud/ { proxy_pass http://localhost:3000/; client_max_body_size 4g; } }#从此处开始配置 ssl_certificate cert/begoit.com.pem; #https证书路径,在此文件路径下创建包cert ssl_certificate_key cert/begoit.com.key; #https证书路径 ssl_session_timeout 5m; ssl_ciphers ECDHE-RSA-AES128-GCM-SHA256:ECDHE:ECDH:AES:HIGH:!NULL:!aNULL:!MD5:!ADH:!RC4; ssl_protocols TLSv1 TLSv1.1 TLSv1.2 TLSv1.3; ssl_prefer_server_ciphers on; server { listen 80; server_name cloud.xxxxx.com api.xxxx.com; return 307 https://$host$request_uri; #nginx 配置https 并解决重定向后https协议变成了http的问题 } server { listen 443 ssl; server_name cloud.xxxx.com; location ~ ^/(vm-cloud|vmcloud|r|rs|img) { proxy_pass http://localhost:8080; client_max_body_size 4g; } location /grafana/ { proxy_pass http://localhost:9080/; } } server { listen 443 ssl; server_name api.xxxx.com; #ssl_verify_client on; #ssl_client_certificate cert/ca.pem; location /proxy/ { proxy_pass http://localhost:3000/; } location /cloud/ { proxy_pass http://localhost:3000/; client_max_body_size 4g; } }
六.nginx常用命令
#查看nginx的版本号
nginx -v
要停止Nginx服务,请运行:
sudo systemctl stop nginx
要再次启动,请键入:
sudo systemctl start nginx
重新启动Nginx服务:
sudo systemctl restart nginx
在进行一些配置更改后重新加载Nginx服务:
$sudo systemctl reload nginx
如果你想禁用Nginx服务在启动时启动:
$sudo systemctl disable nginx
并重新启用它:
$sudo systemctl enable nginx
原文链接:https://blog.csdn.net/xiegongmiao/article/details/109389631


