一、centos7安装和配置好docker
注意:最好把防火墙和selinux关闭了
停止firewall
systemctl stop firewalld.service
禁止firewall开机启动
systemctl disable firewalld.service
永久关闭selinux : sudo vim /etc/sysconfig/selinux
找到行
SELINUX=enforcing
替换为
SELINUX=disabled
保存退出
重启服务器命令 reboot 就可以了
1.docker的安装与启动
docker最先是以Ubuntu系统发布的,官方建议在Ubuntu系统安装。
也可以安装在centos系统,建议centos7.x以上版本。
以安装到centos7.x为例子,可以在vm虚拟机上操作安装centos7(通过secureCRT软件进行远程服务centos7系统)
使用 root 权限登录 Centos。确保 yum 包更新到最新。
$ sudo yum update$ sudo yum update$ sudo yum update
2、卸载旧版本(如果安装过旧版本的话)
$ sudo yum remove docker docker-common docker-selinux docker-engine$ sudo yum remove docker docker-common docker-selinux docker-engine$ sudo yum remove docker docker-common docker-selinux docker-engine
3、安装需要的软件包, yum-util 提供yum-config-manager功能,另外两个是devicemapper驱动依赖的
$ sudo yum install -y yum-utils device-mapper-persistent-data lvm2$ sudo yum install -y yum-utils device-mapper-persistent-data lvm2$ sudo yum install -y yum-utils device-mapper-persistent-data lvm2
4、设置yum源
$ sudo yum-config-manager --add-repo https://download.docker.com/linux/centos/docker-ce.repo$ sudo yum-config-manager --add-repo https://download.docker.com/linux/centos/docker-ce.repo$ sudo yum-config-manager --add-repo https://download.docker.com/linux/centos/docker-ce.repo
5、可以查看所有仓库中所有docker版本,并选择特定版本安装
$ yum list docker-ce --showduplicates | sort -r$ yum list docker-ce --showduplicates | sort -r$ yum list docker-ce --showduplicates | sort -r
6、安装docker
$ sudo yum install docker-ce #由于repo中默认只开启stable仓库,故这里安装的是最新稳定版18.09.5 #也可以指定安装某个版本 $ sudo yum install <FQPN> # 例如:sudo yum install docker-ce-17.12.0.ce$ sudo yum install docker-ce #由于repo中默认只开启stable仓库,故这里安装的是最新稳定版18.09.5 #也可以指定安装某个版本 $ sudo yum install <FQPN> # 例如:sudo yum install docker-ce-17.12.0.ce$ sudo yum install docker-ce #由于repo中默认只开启stable仓库,故这里安装的是最新稳定版18.09.5 #也可以指定安装某个版本 $ sudo yum install <FQPN> # 例如:sudo yum install docker-ce-17.12.0.ce
7、启动并加入开机启动
$ sudo systemctl start docker $ sudo systemctl enable docker$ sudo systemctl start docker $ sudo systemctl enable docker$ sudo systemctl start docker $ sudo systemctl enable docker
8、验证安装是否成功(有Client和Server两部分表示docker安装启动都成功了)
$ docker version$ docker version$ docker version
设置ustc的镜像(国内的镜像站点)
ustc的docker镜像加速器速度很快,ustc docker mirror优势之一不用注册,真正的公共服务。
配置阿里云镜像加速
mkdir -p /etc/docker
vi /etc/docker/daemon.json
https://lug.ustc.edu.cn/wiki/mirrors/help/docker
编辑该文件 vi /etc/docker/daemon.json
输入以下内容
{“registry-mirrors”:
[“https://5f2jam6c.mirror.aliyuncs.com”,
“http://hub-mirror.c.163.com”]
}
二、Docker创建WordPress个人博客
1、建立应用的目录
[root@] mkdir my_wordpress
[root@] cd my_wordpress
2、创建 docker-compose.yml
[root@] touch docker-compose.yml;vi docker-compose.yml
添加如下内容: version: '3.3' services: db:添加如下内容: version: '3.3' services: db:添加如下内容: version: '3.3' services: db:
image: mysql:5.7
volumes:
-
dbdata:/var/lib/mysql
restart: always
environment:
MYSQL_ROOT_PASSWORD: somewordpress
MYSQL_DATABASE: wordpress
MYSQL_USER: wordpress
MYSQL_PASSWORD: wordpresswordpress:
depends_on: -
db
image: wordpress:latest
ports: -
“8000:80”
restart: always
environment:
WORDPRESS_DB_HOST: db:3306
WORDPRESS_DB_USER: wordpress
WORDPRESS_DB_PASSWORD: wordpress
volumes:
dbdata:
images 镜像名 restart 指定版本 ports 80为镜像端口, 映射的8000为主机端口。 environment 环境配置,数据库用户、密码等。 3、建立项目 [root@] docker-compose up -d 可能出现报错1 ERROR: Couldn't connect to Docker daemon at http+docker://localhost - is it running? If it's at a non-standard location, specify the URL with the DOCKER_HOST environment variable. 解决办法: [root@] sudo groupadd docker #创建docker组。 [root@] sudo usermod -aG docker $(whoami) #将用户添加到docker组。 注销并重新登录以确保docker以正确的权限运行。 [root@] sudo service docker restart #重启docker 还是不行? 请确定你是否以root用户登录,一般Ubuntu 用户会遇到此情况 可能出现报错2 the service name True must be a quoted string ,i.e. 'True'. 原因分析: 上面的docker-compose.yml 文件中遗漏了部分内容,如:版本号 再次尝试 镜像原因较慢,可能 timout 再次尝试,本次尝试3次后成功 [root@VM_0_13_centos my_wordpress]# docker-compose up -d Creating network "my_wordpress_default" with the default driver Creating volume "my_wordpress_dbdata" with default driver Pulling db (mysql:5.7)... 5.7: Pulling from library/mysql f2aa67a397c4: Pull complete 1accf44cb7e0: Pull complete 2d830ea9fa68: Pull complete 740584693b89: Pull complete 4d620357ec48: Pull complete ac3b7158d73d: Pull complete a48d784ee503: Pull complete bf1194add2f3: Pull complete 0e5c74178a02: Pull complete c1614226503e: Pull complete 0038589109a0: Pull complete Digest: sha256:e3ce1b609c9275ed24afb3465a9dd73cce38385e64c94755edd5e596a5c1bc8c Status: Downloaded newer image for mysql:5.7 Pulling wordpress (wordpress:latest)... latest: Pulling from library/wordpress f2aa67a397c4: Already exists c533bdb78a46: Pull complete 65a7293804ac: Pull complete 35a9c1f94aea: Pull complete 651774c607cc: Pull complete 7c01fbe5ed3d: Pull complete 9ff29ed84bfc: Pull complete 647feb0f6355: Pull complete 0b9d1c540863: Pull complete 3416ab5471ed: Pull complete 246c5fc29b1a: Pull complete 547f032430ec: Pull complete 5e139e5ea13c: Pull complete a94f7c8b762e: Pull complete 34e9c8ec80d7: Pull complete 1e3ee2260fe8: Pull complete 04287c0c64aa: Pull complete ef94d58d88a0: Pull complete 5368638c2501: Pull complete 5ef154e9a628: Pull complete Digest: sha256:bd2ee79c6b461aaef56c7dc589d5a8ec9059fa2d01005cbe097e47d943973ca2 Status: Downloaded newer image for wordpress:latest Creating my_wordpress_db_1 ... done Creating my_wordpress_wordpress_1 ... doneimages 镜像名 restart 指定版本 ports 80为镜像端口, 映射的8000为主机端口。 environment 环境配置,数据库用户、密码等。 3、建立项目 [root@] docker-compose up -d 可能出现报错1 ERROR: Couldn't connect to Docker daemon at http+docker://localhost - is it running? If it's at a non-standard location, specify the URL with the DOCKER_HOST environment variable. 解决办法: [root@] sudo groupadd docker #创建docker组。 [root@] sudo usermod -aG docker $(whoami) #将用户添加到docker组。 注销并重新登录以确保docker以正确的权限运行。 [root@] sudo service docker restart #重启docker 还是不行? 请确定你是否以root用户登录,一般Ubuntu 用户会遇到此情况 可能出现报错2 the service name True must be a quoted string ,i.e. 'True'. 原因分析: 上面的docker-compose.yml 文件中遗漏了部分内容,如:版本号 再次尝试 镜像原因较慢,可能 timout 再次尝试,本次尝试3次后成功 [root@VM_0_13_centos my_wordpress]# docker-compose up -d Creating network "my_wordpress_default" with the default driver Creating volume "my_wordpress_dbdata" with default driver Pulling db (mysql:5.7)... 5.7: Pulling from library/mysql f2aa67a397c4: Pull complete 1accf44cb7e0: Pull complete 2d830ea9fa68: Pull complete 740584693b89: Pull complete 4d620357ec48: Pull complete ac3b7158d73d: Pull complete a48d784ee503: Pull complete bf1194add2f3: Pull complete 0e5c74178a02: Pull complete c1614226503e: Pull complete 0038589109a0: Pull complete Digest: sha256:e3ce1b609c9275ed24afb3465a9dd73cce38385e64c94755edd5e596a5c1bc8c Status: Downloaded newer image for mysql:5.7 Pulling wordpress (wordpress:latest)... latest: Pulling from library/wordpress f2aa67a397c4: Already exists c533bdb78a46: Pull complete 65a7293804ac: Pull complete 35a9c1f94aea: Pull complete 651774c607cc: Pull complete 7c01fbe5ed3d: Pull complete 9ff29ed84bfc: Pull complete 647feb0f6355: Pull complete 0b9d1c540863: Pull complete 3416ab5471ed: Pull complete 246c5fc29b1a: Pull complete 547f032430ec: Pull complete 5e139e5ea13c: Pull complete a94f7c8b762e: Pull complete 34e9c8ec80d7: Pull complete 1e3ee2260fe8: Pull complete 04287c0c64aa: Pull complete ef94d58d88a0: Pull complete 5368638c2501: Pull complete 5ef154e9a628: Pull complete Digest: sha256:bd2ee79c6b461aaef56c7dc589d5a8ec9059fa2d01005cbe097e47d943973ca2 Status: Downloaded newer image for wordpress:latest Creating my_wordpress_db_1 ... done Creating my_wordpress_wordpress_1 ... doneimages 镜像名 restart 指定版本 ports 80为镜像端口, 映射的8000为主机端口。 environment 环境配置,数据库用户、密码等。 3、建立项目 [root@] docker-compose up -d 可能出现报错1 ERROR: Couldn't connect to Docker daemon at http+docker://localhost - is it running? If it's at a non-standard location, specify the URL with the DOCKER_HOST environment variable. 解决办法: [root@] sudo groupadd docker #创建docker组。 [root@] sudo usermod -aG docker $(whoami) #将用户添加到docker组。 注销并重新登录以确保docker以正确的权限运行。 [root@] sudo service docker restart #重启docker 还是不行? 请确定你是否以root用户登录,一般Ubuntu 用户会遇到此情况 可能出现报错2 the service name True must be a quoted string ,i.e. 'True'. 原因分析: 上面的docker-compose.yml 文件中遗漏了部分内容,如:版本号 再次尝试 镜像原因较慢,可能 timout 再次尝试,本次尝试3次后成功 [root@VM_0_13_centos my_wordpress]# docker-compose up -d Creating network "my_wordpress_default" with the default driver Creating volume "my_wordpress_dbdata" with default driver Pulling db (mysql:5.7)... 5.7: Pulling from library/mysql f2aa67a397c4: Pull complete 1accf44cb7e0: Pull complete 2d830ea9fa68: Pull complete 740584693b89: Pull complete 4d620357ec48: Pull complete ac3b7158d73d: Pull complete a48d784ee503: Pull complete bf1194add2f3: Pull complete 0e5c74178a02: Pull complete c1614226503e: Pull complete 0038589109a0: Pull complete Digest: sha256:e3ce1b609c9275ed24afb3465a9dd73cce38385e64c94755edd5e596a5c1bc8c Status: Downloaded newer image for mysql:5.7 Pulling wordpress (wordpress:latest)... latest: Pulling from library/wordpress f2aa67a397c4: Already exists c533bdb78a46: Pull complete 65a7293804ac: Pull complete 35a9c1f94aea: Pull complete 651774c607cc: Pull complete 7c01fbe5ed3d: Pull complete 9ff29ed84bfc: Pull complete 647feb0f6355: Pull complete 0b9d1c540863: Pull complete 3416ab5471ed: Pull complete 246c5fc29b1a: Pull complete 547f032430ec: Pull complete 5e139e5ea13c: Pull complete a94f7c8b762e: Pull complete 34e9c8ec80d7: Pull complete 1e3ee2260fe8: Pull complete 04287c0c64aa: Pull complete ef94d58d88a0: Pull complete 5368638c2501: Pull complete 5ef154e9a628: Pull complete Digest: sha256:bd2ee79c6b461aaef56c7dc589d5a8ec9059fa2d01005cbe097e47d943973ca2 Status: Downloaded newer image for wordpress:latest Creating my_wordpress_db_1 ... done Creating my_wordpress_wordpress_1 ... done
查看一下启动的容器
4、在Web浏览器中访问WordPress
如果是本地服务器,那么你可以使用 http://localhost:8000 访问到如下页面了,如果你是云服务器你可以使用你的公网ip 访问你的应用了,如使用本机浏览器访问公网ip:8000
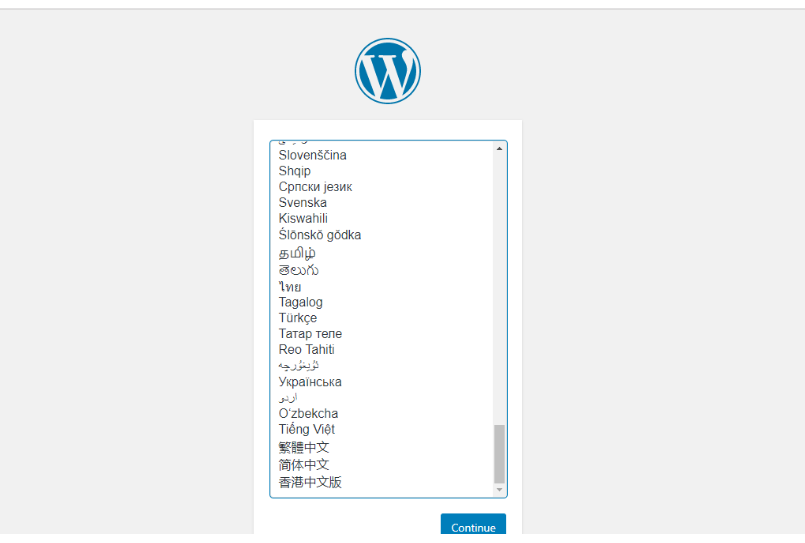
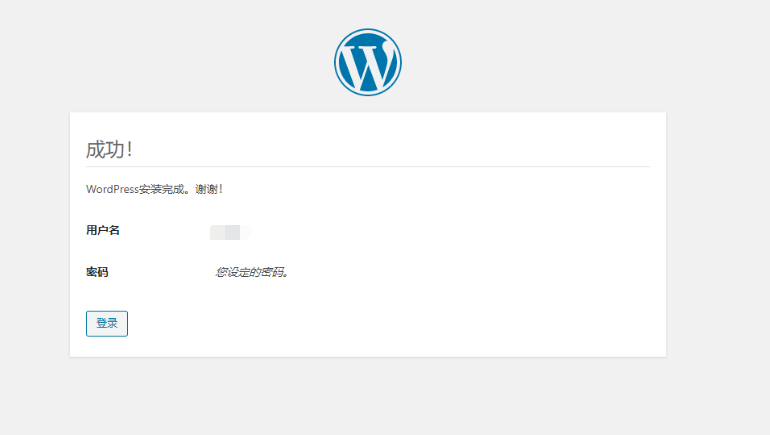
自此在centos7上利用docker搭建好了WordPress个人博客。
原文链接:https://blog.csdn.net/qq_22356995/article/details/105488925?ops_request_misc=&request_id=3129e15c469e46738c4d3d49e8bdfaa1&biz_id=&utm_medium=distribute.pc_search_result.none-task-blog-2~blog~koosearch~default-20-105488925-null-null.268%5Ev1%5Econtrol&utm_term=docker%E3%80%81wordpress%E3%80%81wordpress%E5%BB%BA%E7%AB%99%E3%80%81wordpress%E4%B8%BB%E9%A2%98%E3%80%81%E5%AE%B9%E5%99%A8%E9%95%9C%E5%83%8F%E3%80%81


![[NAS存储]『NAS入门指南』搭建私人网盘,百度云从此是陌人!-陌上烟雨遥](https://wallpaper.moluyao.wang/wp-content/uploads/2024/06/QQ截图20240604170035.png)

