一:项目准备
1.云服务器ECS,centos7操作系统
2.远程连接工具Finalshell
3.项目包
二:项目部署
1.LNMP架构部署
L:Linux操作系统,N:nginx服务,M:mysql服务,P:php服务
a.安装nginx服务
[root@qf-cloud ~]# yum -y install nginx
b.安装php服务
[root@qf-cloud ~]# yum -y install php php-fpm php-curl php-intl php-mcrypt php-mysql php-
mbstring php-xml php-dom php-gd gd
c.安装数据库服务mysql
可登录官网下载:
mysql官网:http://www.mysql.com
下载mysql的yum仓库文件
[root@qf-cloud ~]# wget https://dev.mysql.com/get/mysql80-community-release-el7-3.noarch.rpm
安装mysql的yum仓库文件
[root@qf-cloud ~]# rpm -ivh mysql80-community-release-el7-3.noarch.rpm
检查是否安装成功

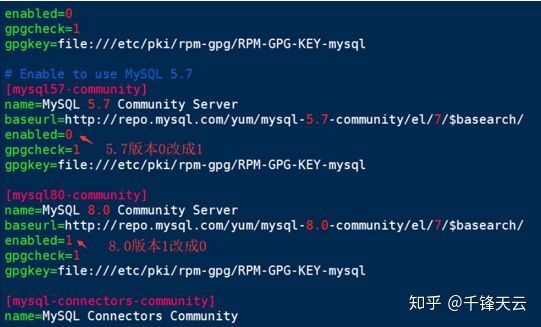
修改mysql的yum仓库的安装版本
注意:enabled=1 是开启 enabled=0 是关闭
[root@qf-cloud ~]# vim /etc/yum.repos.d/mysql-community.repo
安装数据库服务
[root@qf-cloud ~]# yum -y install mysql-server mysql
2. 启动三大服务
[root@qf-cloud ~]# systemctl start nginx
[root@qf-cloud ~]# systemctl start mysqld
[root@qf-cloud ~]# systemctl start php-fpm
3. 开机启动
[root@qf-cloud ~]# systemctl enable mysqld
[root@qf-cloud ~]# systemctl enable nginx
[root@qf-cloud ~]# systemctl enable php-fpm
4.服务部署
a.数据库服务
修改数据库密码,因mysql在启动过程中会生成初始密码,所以先要查看初始密码
[root@qf-cloud ~]# cat /var/log/mysqld.log | grep password
2019-11-12T05:58:36.287033Z 1 [Note] password is generated for root@localhost: =?<V!)hjg0ge
根据初始密码进行密码的修改
[root@qf-cloud ~]# mysqladmin -u root -p'=?<V!)hjg0ge' password 'QianFeng@123'
登录数据库并创建名为farm的数据库
[root@qf-cloud ~]# mysql -u root -pQianFeng@123
mysql: [Warning] Using a password on the command line interface can be insecure.
Welcome to the MySQL monitor. Commands end with ; or \g.
Your MySQL connection id is 3Server version: 5.7.28 MySQL Community Server (GPL)
Copyright (c) 2000, 2019, Oracle and/or its affiliates. All rights reserved.
Oracle is a registered trademark of Oracle Corporation and/or its
affiliates. Other names may be trademarks of their respective
owners.
Type 'help;' or '\h' for help. Type '\c' to clear the current input statement.
mysql>
5.测试访问
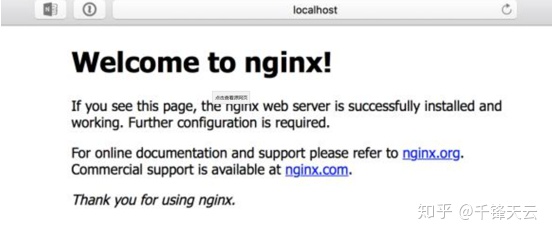
1.在浏览器输入服务器IP地址进行访问
2、测试Php
进入nginx的web根目录:/var/www/html 中写一个最简单的php测试页面
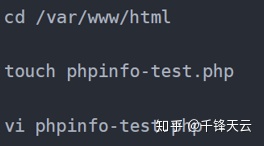
3、进入到了控制模式之后按键盘字母 i 进入到编辑模式,将如下代码输入到文件中

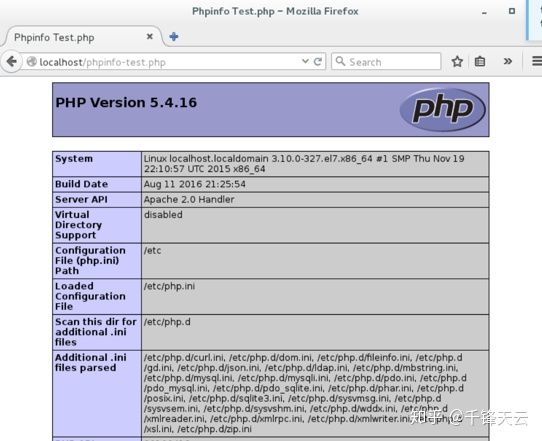
4、按 esc 退出编辑模式,回到控制模式,输入 :wq 然后回车,在浏览器中输入服地址http://localhost/phpinfo-test.php
小结:
当你的浏览器出现这个情况,那么代表lnmp环境已经部署成功。就可以进行后续的项目上线的工作了。
原文链接:https://blog.csdn.net/qfxulei/article/details/105970930


