实验案例:firewall防火墙的地址伪装和端口转发
实验环境
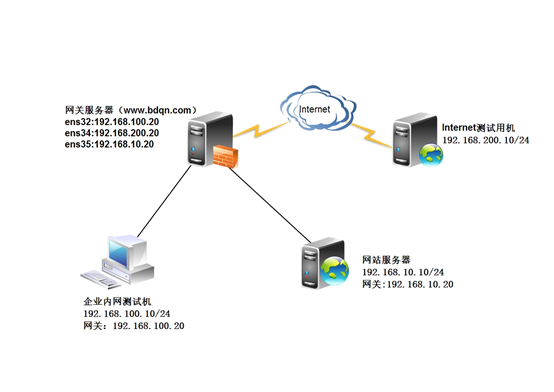
某公司的Web服务器、网关服务器均采用Linux CentOS 7.3操作系统,如图所示。为了加强网络访问的安全性,要求管理员熟悉firewall防火墙规则的编写,以制定有效、可行的主机防护策略。
实验拓扑:
需求描述:
网关服务器ens33网卡分配到trusted(信任)区域,ens34网卡分配到external(外部)区域,ens35网卡分配到dmz(非军事)区域。
网站服务器和网关服务器将ssh默认端口都改为12345
网站服务器开启https,过滤未加密的http流量,且拒绝ping。
公司内网用户需要通过网关服务器共享上网
互联网用户需要访问网站访问
实验步骤:
Step①基本环境配置
(1)为网关服务器与网站服务器配置主机名及网卡地址
网关服务器:
[root@Centos ~]# hostnamectl set-hostname trusted


企业内网测试机:
[root@trusted ~]# hostnamectl set-hostname trusted

Internet测试用机
[root@externsl ~]# hostnamectl set-hostname externsl

网站服务器:
[root@dmz ~]# hostnamectl set-hostname dmz

更改SSH的监听端口
网关改ssh端口
[root@gateway ~]# vim /etc/ssh/sshd_config
网站改ssh端口
[root@dmz ~]# vim /etc/ssh/sshd_config

[root@gateway ~]# systemctl restart sshd //重新启动服务
(2)开启网关服务器的路由转发功能
[root@gateway ~]# vim /etc/sysctl.conf
![]() Step②在网站服务上部署web站点
Step②在网站服务上部署web站点
(1) 安装httpd和mod_ssl软件包
[root@dmz ~]# yum -y install httpd mod_ssl
(2) 启用并启动httpd服务
[root@dmz ~]# systemctl start httpd
[root@dmz ~]# systemctl enable httpd
(3) 创建网站测试页
[root@dmz ~]# echo “this is a test web” >> /var/www/html/index.html
Step③为网站服务和网关服务编写firewalld规则
(1) 网站服务规则
1) 开启并启动firewall
[root@dmz ~]# systemctl start firewalld
[root@dmz ~]# systemctl enable firewalld
2) 将默认区域改为dmz
[root@dmz ~]# firewall-cmd –set-default-zone=dmz
查看默认区域
[root@dmz ~]# firewall-cmd –get-default-zone
Dmz
3) 为dmz区域打开https服务及添加TCP的12345端口
[root@dmz ~]# firewall-cmd –zone=dmz –add-service=https –permanent
[root@dmz ~]# firewall-cmd –zone=dmz –add-port=12345/tcp –permanent
(–permanent为设置永久性规则)
4)禁止ping
[root@dmz ~]# firewall-cmd –add-icmp-block=echo-request –zone=dmz –permanent
5) 因为预定义的ssh更改了默认端口,所以将预定义ssh服务移除
[root@dmz ~]# firewall-cmd –zone=dmz –remove-service=ssh –permanent
6) 重新加载firewalld激活配置,并查看
[root@dmz ~]# firewall-cmd –reload
[root@dmz ~]# firewall-cmd –list-all –zone=dmz
(2)在网关服务器上配置firewalld防火墙
1)启动并启用防火墙
[root@gateway ~]# systemctl start firewalld
[root@gateway ~]# systemctl enable firewalld
查看防火墙状态
[root@gateway ~]# firewall-cmd –state
running
2)设置默认区域为external区域,并查看配置结果
[root@gateway ~]# firewall-cmd –set-default-zone=external
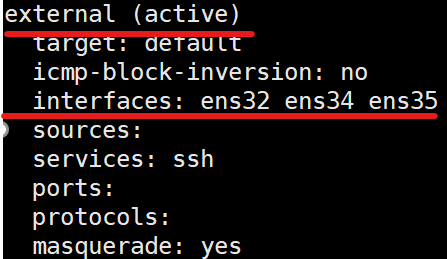
4) 将ens32网卡配置到trusted区域,将ens35配置到dmz区域
[root@gateway ~]# firewall-cmd –change-interface=ens32 –zone=trusted
[root@gateway ~]# firewall-cmd –change-interface=ens35 –zone=dmz
查看配置
[root@gateway ~]# firewall-cmd –get-active-zones

5) 配置external区域添加TCP的12345端口
[root@gateway ~]# firewall-cmd –zone=external –add-port=12345/tcp –permanent
6) 配置external区域移除SSH服务
[root@gateway ~]# firewall-cmd –zone=external –remove-service=ssh –permanent
7)配置external区域禁止ping
[root@gateway ~]# firewall-cmd –zone=external –add-icmp-block=echo-request –permanent
8) 重新加载防火墙激活配置
[root@gateway ~]# firewall-cmd –reload
验证;
- 在互联网测试计算机上通过SSH登录网关外部接口12345端口
[root@externsl ~]# ssh -p 12345 192.168.200.20

2)在企业内网测试计算机SSH登录web网站服务器的12345端口
[root@trusted ~]# ssh -p 12345 192.168.10.10

3)在企业内网测试机上访问网站服务器
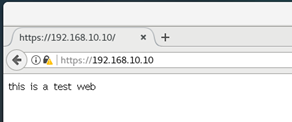
配置IP伪装与端口转发
1.内网用户通过网关服务器共享上网
1)外网搭建网站服务,并添加测试内容
[root@externsl ~]# yum install -y httpd
[root@externsl ~]# echo “www.benet.com” >> /var/www/html/index.html
启动服务
[root@externsl ~]# systemctl start httpd
2)内部测试机访问外网网站,可以访问

3)在dmz网站服务上测试,同样可以访问
![]()
4)查看网关服务器的external区域是否开启地址伪装
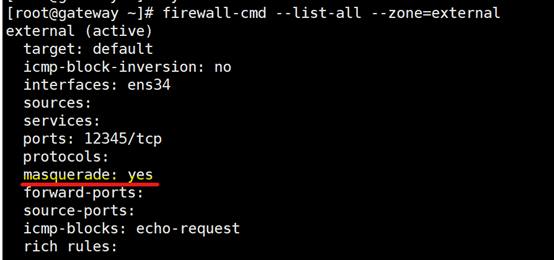
5)在网关服务器上关闭external的地址伪装,添加富规则,要求external区域内,源地址192.168.100.0/24网段地址开启地址伪装
[root@gateway ~]# firewall-cmd –list-all –zone=external
firewall-cmd –zone=external –add-rich-rule=‘rule family=ipv4 source address=192.168.100.0/24 masquerade’
在dmz的网站服务器测试,发现无法访问外网网站
![]()
2.配置端口转发实现互联网用户访问内部web服务
1)将内网服务的192.168.100.10的443号端口映射到web服务器IP地址192.168.10.10 的443端口
[root@gateway ~]# firewall-cmd –zone=external –add-forward-port=port=443:proto=tcp:toaddr=192.168.10.10
2)在互联网测试机访问内部web服务成功

3)如给内网的服务器申请一个新的公网地址192.168.200.15,做端口转发
①将新公网地址192.168.200.15配置在网关服务器外接口ens34上,作为第二个IP地址
[root@gateway ~]# vim /etc/sysconfig/network-scripts/ifcfg-ens34
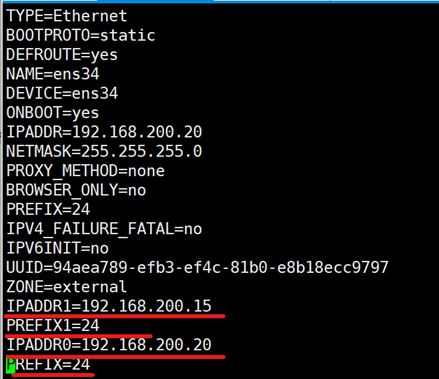
重启服务
[root@gateway ~]# systemctl restart network
[root@gateway ~]# ip add //查看
②使用富规则配置端口转发
[root@gateway ~]#firewall-cmd –zone=external –add-rich-rule=‘rule family=ipv4 destination address=192.168.200.15/32 forward-port port=443 protocol=tcp to-addr=192.168.10.10’
③在互联网测试机访问测试结果

原文链接:https://blog.csdn.net/qq_50748405/article/details/116713383


