wordpress博客系统
LNMP:Linux+nginx+mysql+php
一个操作系统+web网站+一个数据库存放数据+后端编程语言
基于红帽操作系统来搭建
1.需要一个本地yum仓库
[root@server yum.repos.d]# vim local.repo [local] name=local baseurl=file:///media enabled=1 gpgcheck=0 [root@server yum.repos.d]# yum clean all Loaded plugins: langpacks, product-id, search-disabled-repos, subscription-manager This system is not registered to Red Hat Subscription Management. You can use subscription-manager to register. Cleaning repos: local Cleaning up everything [root@server yum.repos.d]# yum repolist Loaded plugins: langpacks, product-id, search-disabled-repos, subscription-manager This system is not registered to Red Hat Subscription Management. You can use subscription-manager to register. local | 4.1 kB 00:00:00 (1/2): local/group_gz | 136 kB 00:00:00 (2/2): local/primary_db | 3.9 MB 00:00:00 repo id repo name status local local 4,751 repolist: 4,751 [root@server yum.repos.d]#[root@server yum.repos.d]# vim local.repo [local] name=local baseurl=file:///media enabled=1 gpgcheck=0 [root@server yum.repos.d]# yum clean all Loaded plugins: langpacks, product-id, search-disabled-repos, subscription-manager This system is not registered to Red Hat Subscription Management. You can use subscription-manager to register. Cleaning repos: local Cleaning up everything [root@server yum.repos.d]# yum repolist Loaded plugins: langpacks, product-id, search-disabled-repos, subscription-manager This system is not registered to Red Hat Subscription Management. You can use subscription-manager to register. local | 4.1 kB 00:00:00 (1/2): local/group_gz | 136 kB 00:00:00 (2/2): local/primary_db | 3.9 MB 00:00:00 repo id repo name status local local 4,751 repolist: 4,751 [root@server yum.repos.d]#[root@server yum.repos.d]# vim local.repo [local] name=local baseurl=file:///media enabled=1 gpgcheck=0 [root@server yum.repos.d]# yum clean all Loaded plugins: langpacks, product-id, search-disabled-repos, subscription-manager This system is not registered to Red Hat Subscription Management. You can use subscription-manager to register. Cleaning repos: local Cleaning up everything [root@server yum.repos.d]# yum repolist Loaded plugins: langpacks, product-id, search-disabled-repos, subscription-manager This system is not registered to Red Hat Subscription Management. You can use subscription-manager to register. local | 4.1 kB 00:00:00 (1/2): local/group_gz | 136 kB 00:00:00 (2/2): local/primary_db | 3.9 MB 00:00:00 repo id repo name status local local 4,751 repolist: 4,751 [root@server yum.repos.d]#
2.安装需要软件包,windows的软件包拖入需要进行解压
[root@server ~]# ls anaconda-ks.cfg initial-setup-ks.cfg lnmp.zip tlsweb.csr wordpress-4.7.3-zh_CN.zip [root@server ~]# unzip lnmp.zip Archive: lnmp.zip creating: lnmp/ creating: lnmp/lnmp/ inflating: lnmp/lnmp/alsa-lib-1.1.8-1.el7.x86_64.rpm inflating: lnmp/lnmp/apr-1.4.8-5.el7.x86_64.rpm inflating: lnmp/lnmp/apr-util-1.5.2-6.el7.x86_64.rpm inflating: lnmp/lnmp/atk-2.28.1-1.el7.x86_64.rpm inflating: lnmp/lnmp/autoconf-2.69-11.el7.noarch.rpm inflating: lnmp/lnmp/automake-1.13.4-3.el7.noarch.rpm inflating: lnmp/lnmp/avahi-libs-0.6.31-19.el7.x86_64.rpm inflating: lnmp/lnmp/boost-filesystem-1.53.0-25.el7.x86_64.rpm ...... inflating: lnmp/lnmp/xorg-x11-fonts-Type1-7.5-9.el7.noarch.rpm inflating: lnmp/lnmp/yaml-cpp-0.5.1-6.el7.x86_64.rpm [root@server ~]#[root@server ~]# ls anaconda-ks.cfg initial-setup-ks.cfg lnmp.zip tlsweb.csr wordpress-4.7.3-zh_CN.zip [root@server ~]# unzip lnmp.zip Archive: lnmp.zip creating: lnmp/ creating: lnmp/lnmp/ inflating: lnmp/lnmp/alsa-lib-1.1.8-1.el7.x86_64.rpm inflating: lnmp/lnmp/apr-1.4.8-5.el7.x86_64.rpm inflating: lnmp/lnmp/apr-util-1.5.2-6.el7.x86_64.rpm inflating: lnmp/lnmp/atk-2.28.1-1.el7.x86_64.rpm inflating: lnmp/lnmp/autoconf-2.69-11.el7.noarch.rpm inflating: lnmp/lnmp/automake-1.13.4-3.el7.noarch.rpm inflating: lnmp/lnmp/avahi-libs-0.6.31-19.el7.x86_64.rpm inflating: lnmp/lnmp/boost-filesystem-1.53.0-25.el7.x86_64.rpm ...... inflating: lnmp/lnmp/xorg-x11-fonts-Type1-7.5-9.el7.noarch.rpm inflating: lnmp/lnmp/yaml-cpp-0.5.1-6.el7.x86_64.rpm [root@server ~]#[root@server ~]# ls anaconda-ks.cfg initial-setup-ks.cfg lnmp.zip tlsweb.csr wordpress-4.7.3-zh_CN.zip [root@server ~]# unzip lnmp.zip Archive: lnmp.zip creating: lnmp/ creating: lnmp/lnmp/ inflating: lnmp/lnmp/alsa-lib-1.1.8-1.el7.x86_64.rpm inflating: lnmp/lnmp/apr-1.4.8-5.el7.x86_64.rpm inflating: lnmp/lnmp/apr-util-1.5.2-6.el7.x86_64.rpm inflating: lnmp/lnmp/atk-2.28.1-1.el7.x86_64.rpm inflating: lnmp/lnmp/autoconf-2.69-11.el7.noarch.rpm inflating: lnmp/lnmp/automake-1.13.4-3.el7.noarch.rpm inflating: lnmp/lnmp/avahi-libs-0.6.31-19.el7.x86_64.rpm inflating: lnmp/lnmp/boost-filesystem-1.53.0-25.el7.x86_64.rpm ...... inflating: lnmp/lnmp/xorg-x11-fonts-Type1-7.5-9.el7.noarch.rpm inflating: lnmp/lnmp/yaml-cpp-0.5.1-6.el7.x86_64.rpm [root@server ~]#
3.基于软件包新建一个yum本地仓库
[root@server yum.repos.d]# vim lnmp [lnmp] name=lnmp baseurl=file://root/lnmp/lnmp gpgcheck=0 enabled=1 [root@server yum.repos.d]# yum clean all Loaded plugins: langpacks, product-id, search-disabled-repos, subscription-manager This system is not registered to Red Hat Subscription Management. You can use subscription-manager to register. Cleaning repos: local Cleaning up everything [root@server yum.repos.d]# yum repolist Loaded plugins: langpacks, product-id, search-disabled-repos, subscription-manager This system is not registered to Red Hat Subscription Management. You can use subscription-manager to register. local | 4.1 kB 00:00:00 (1/2): local/group_gz | 136 kB 00:00:00 (2/2): local/primary_db | 3.9 MB 00:00:00 repo id repo name status local local 4,751 repolist: 4,751[root@server yum.repos.d]# vim lnmp [lnmp] name=lnmp baseurl=file://root/lnmp/lnmp gpgcheck=0 enabled=1 [root@server yum.repos.d]# yum clean all Loaded plugins: langpacks, product-id, search-disabled-repos, subscription-manager This system is not registered to Red Hat Subscription Management. You can use subscription-manager to register. Cleaning repos: local Cleaning up everything [root@server yum.repos.d]# yum repolist Loaded plugins: langpacks, product-id, search-disabled-repos, subscription-manager This system is not registered to Red Hat Subscription Management. You can use subscription-manager to register. local | 4.1 kB 00:00:00 (1/2): local/group_gz | 136 kB 00:00:00 (2/2): local/primary_db | 3.9 MB 00:00:00 repo id repo name status local local 4,751 repolist: 4,751[root@server yum.repos.d]# vim lnmp [lnmp] name=lnmp baseurl=file://root/lnmp/lnmp gpgcheck=0 enabled=1 [root@server yum.repos.d]# yum clean all Loaded plugins: langpacks, product-id, search-disabled-repos, subscription-manager This system is not registered to Red Hat Subscription Management. You can use subscription-manager to register. Cleaning repos: local Cleaning up everything [root@server yum.repos.d]# yum repolist Loaded plugins: langpacks, product-id, search-disabled-repos, subscription-manager This system is not registered to Red Hat Subscription Management. You can use subscription-manager to register. local | 4.1 kB 00:00:00 (1/2): local/group_gz | 136 kB 00:00:00 (2/2): local/primary_db | 3.9 MB 00:00:00 repo id repo name status local local 4,751 repolist: 4,751
4.安装软件
yum -y install nginx mariadb-server php php-mysql php-fpmyum -y install nginx mariadb-server php php-mysql php-fpmyum -y install nginx mariadb-server php php-mysql php-fpm
5.解压wordpress.zip
[root@server ~]# unzip wordpress-4.7.3-zh_CN.zip[root@server ~]# unzip wordpress-4.7.3-zh_CN.zip[root@server ~]# unzip wordpress-4.7.3-zh_CN.zip
6.配置nginx
[root@server html]# cat /etc/nginx/conf.d/default.conf server { listen 80; server_name localhost; #charset koi8-r; #access_log /var/log/nginx/host.access.log main; location / { root /usr/share/nginx/html; index index.php index.html index.htm; } #error_page 404 /404.html; # redirect server error pages to the static page /50x.html # error_page 500 502 503 504 /50x.html; location = /50x.html { root /usr/share/nginx/html; } # proxy the PHP scripts to Apache listening on 127.0.0.1:80 # #location ~ \.php$ { # proxy_pass http://127.0.0.1; #} # pass the PHP scripts to FastCGI server listening on 127.0.0.1:9000 # location ~ \.php$ { root /usr/share/nginx/html; fastcgi_pass 127.0.0.1:9000; fastcgi_index index.php; fastcgi_param SCRIPT_FILENAME $document_root$fastcgi_script_name; include fastcgi_params; } # deny access to .htaccess files, if Apache's document root # concurs with nginx's one # #location ~ /\.ht { # deny all; #} }[root@server html]# cat /etc/nginx/conf.d/default.conf server { listen 80; server_name localhost; #charset koi8-r; #access_log /var/log/nginx/host.access.log main; location / { root /usr/share/nginx/html; index index.php index.html index.htm; } #error_page 404 /404.html; # redirect server error pages to the static page /50x.html # error_page 500 502 503 504 /50x.html; location = /50x.html { root /usr/share/nginx/html; } # proxy the PHP scripts to Apache listening on 127.0.0.1:80 # #location ~ \.php$ { # proxy_pass http://127.0.0.1; #} # pass the PHP scripts to FastCGI server listening on 127.0.0.1:9000 # location ~ \.php$ { root /usr/share/nginx/html; fastcgi_pass 127.0.0.1:9000; fastcgi_index index.php; fastcgi_param SCRIPT_FILENAME $document_root$fastcgi_script_name; include fastcgi_params; } # deny access to .htaccess files, if Apache's document root # concurs with nginx's one # #location ~ /\.ht { # deny all; #} }[root@server html]# cat /etc/nginx/conf.d/default.conf server { listen 80; server_name localhost; #charset koi8-r; #access_log /var/log/nginx/host.access.log main; location / { root /usr/share/nginx/html; index index.php index.html index.htm; } #error_page 404 /404.html; # redirect server error pages to the static page /50x.html # error_page 500 502 503 504 /50x.html; location = /50x.html { root /usr/share/nginx/html; } # proxy the PHP scripts to Apache listening on 127.0.0.1:80 # #location ~ \.php$ { # proxy_pass http://127.0.0.1; #} # pass the PHP scripts to FastCGI server listening on 127.0.0.1:9000 # location ~ \.php$ { root /usr/share/nginx/html; fastcgi_pass 127.0.0.1:9000; fastcgi_index index.php; fastcgi_param SCRIPT_FILENAME $document_root$fastcgi_script_name; include fastcgi_params; } # deny access to .htaccess files, if Apache's document root # concurs with nginx's one # #location ~ /\.ht { # deny all; #} }
7.配置数据库初始化
[root@server html]# systemctl start mariadb [root@server html]# mysql_secure_installation NOTE: RUNNING ALL PARTS OF THIS SCRIPT IS RECOMMENDED FOR ALL MariaDB SERVERS IN PRODUCTION USE! PLEASE READ EACH STEP CAREFULLY! In order to log into MariaDB to secure it, we'll need the current password for the root user. If you've just installed MariaDB, and you haven't set the root password yet, the password will be blank, so you should just press enter here. Enter current password for root (enter for none): OK, successfully used password, moving on... Setting the root password ensures that nobody can log into the MariaDB root user without the proper authorisation. Set root password? [Y/n] y New password: Re-enter new password: Password updated successfully! Reloading privilege tables.. ... Success! By default, a MariaDB installation has an anonymous user, allowing anyone to log into MariaDB without having to have a user account created for them. This is intended only for testing, and to make the installation go a bit smoother. You should remove them before moving into a production environment. Remove anonymous users? [Y/n] y ... Success! Normally, root should only be allowed to connect from 'localhost'. This ensures that someone cannot guess at the root password from the network. Disallow root login remotely? [Y/n] n ... skipping. By default, MariaDB comes with a database named 'test' that anyone can access. This is also intended only for testing, and should be removed before moving into a production environment. Remove test database and access to it? [Y/n] y - Dropping test database... ... Success! - Removing privileges on test database... ... Success! Reloading the privilege tables will ensure that all changes made so far will take effect immediately. Reload privilege tables now? [Y/n] y ... Success! Cleaning up... All done! If you've completed all of the above steps, your MariaDB installation should now be secure. Thanks for using MariaDB! mysql -uroot -p000000 -> create database wordpress; -> show databases; -> exit #进入数据库,创建一个WordPress的数据库[root@server html]# systemctl start mariadb [root@server html]# mysql_secure_installation NOTE: RUNNING ALL PARTS OF THIS SCRIPT IS RECOMMENDED FOR ALL MariaDB SERVERS IN PRODUCTION USE! PLEASE READ EACH STEP CAREFULLY! In order to log into MariaDB to secure it, we'll need the current password for the root user. If you've just installed MariaDB, and you haven't set the root password yet, the password will be blank, so you should just press enter here. Enter current password for root (enter for none): OK, successfully used password, moving on... Setting the root password ensures that nobody can log into the MariaDB root user without the proper authorisation. Set root password? [Y/n] y New password: Re-enter new password: Password updated successfully! Reloading privilege tables.. ... Success! By default, a MariaDB installation has an anonymous user, allowing anyone to log into MariaDB without having to have a user account created for them. This is intended only for testing, and to make the installation go a bit smoother. You should remove them before moving into a production environment. Remove anonymous users? [Y/n] y ... Success! Normally, root should only be allowed to connect from 'localhost'. This ensures that someone cannot guess at the root password from the network. Disallow root login remotely? [Y/n] n ... skipping. By default, MariaDB comes with a database named 'test' that anyone can access. This is also intended only for testing, and should be removed before moving into a production environment. Remove test database and access to it? [Y/n] y - Dropping test database... ... Success! - Removing privileges on test database... ... Success! Reloading the privilege tables will ensure that all changes made so far will take effect immediately. Reload privilege tables now? [Y/n] y ... Success! Cleaning up... All done! If you've completed all of the above steps, your MariaDB installation should now be secure. Thanks for using MariaDB! mysql -uroot -p000000 -> create database wordpress; -> show databases; -> exit #进入数据库,创建一个WordPress的数据库[root@server html]# systemctl start mariadb [root@server html]# mysql_secure_installation NOTE: RUNNING ALL PARTS OF THIS SCRIPT IS RECOMMENDED FOR ALL MariaDB SERVERS IN PRODUCTION USE! PLEASE READ EACH STEP CAREFULLY! In order to log into MariaDB to secure it, we'll need the current password for the root user. If you've just installed MariaDB, and you haven't set the root password yet, the password will be blank, so you should just press enter here. Enter current password for root (enter for none): OK, successfully used password, moving on... Setting the root password ensures that nobody can log into the MariaDB root user without the proper authorisation. Set root password? [Y/n] y New password: Re-enter new password: Password updated successfully! Reloading privilege tables.. ... Success! By default, a MariaDB installation has an anonymous user, allowing anyone to log into MariaDB without having to have a user account created for them. This is intended only for testing, and to make the installation go a bit smoother. You should remove them before moving into a production environment. Remove anonymous users? [Y/n] y ... Success! Normally, root should only be allowed to connect from 'localhost'. This ensures that someone cannot guess at the root password from the network. Disallow root login remotely? [Y/n] n ... skipping. By default, MariaDB comes with a database named 'test' that anyone can access. This is also intended only for testing, and should be removed before moving into a production environment. Remove test database and access to it? [Y/n] y - Dropping test database... ... Success! - Removing privileges on test database... ... Success! Reloading the privilege tables will ensure that all changes made so far will take effect immediately. Reload privilege tables now? [Y/n] y ... Success! Cleaning up... All done! If you've completed all of the above steps, your MariaDB installation should now be secure. Thanks for using MariaDB! mysql -uroot -p000000 -> create database wordpress; -> show databases; -> exit #进入数据库,创建一个WordPress的数据库
8.将wordpress的页面文件导入
[root@server html]#semanage fcontext -a -t httpd_sys_content_t '/root/wordpress/(/.*)?' [root@server html]# mv /root/wordpress/* . [root@server html]# ll -Z -rwxrwxrwx. root root system_u:object_r:httpd_sys_content_t:s0 50x.html -rwxrwxrwx. root root system_u:object_r:httpd_sys_content_t:s0 index.html -rw-r--r--. root root system_u:object_r:httpd_sys_content_t:s0 index.php -rw-r--r--. root root system_u:object_r:httpd_sys_content_t:s0 license.txt -rw-r--r--. root root system_u:object_r:httpd_sys_content_t:s0 readme.html -rw-r--r--. root root system_u:object_r:httpd_sys_content_t:s0 wp-activate.php drwxr-xr-x. root root system_u:object_r:httpd_sys_content_t:s0 wp-admin -rw-r--r--. root root system_u:object_r:httpd_sys_content_t:s0 wp-blog-header.php -rw-r--r--. root root system_u:object_r:httpd_sys_content_t:s0 wp-comments-post.php -rw-r--r--. root root system_u:object_r:httpd_sys_content_t:s0 wp-config-sample.php drwxr-xr-x. root root system_u:object_r:httpd_sys_content_t:s0 wp-content -rw-r--r--. root root system_u:object_r:httpd_sys_content_t:s0 wp-cron.php drwxr-xr-x. root root system_u:object_r:httpd_sys_content_t:s0 wp-includes -rw-r--r--. root root system_u:object_r:httpd_sys_content_t:s0 wp-links-opml.php -rw-r--r--. root root system_u:object_r:httpd_sys_content_t:s0 wp-load.php -rw-r--r--. root root system_u:object_r:httpd_sys_content_t:s0 wp-login.php -rw-r--r--. root root system_u:object_r:httpd_sys_content_t:s0 wp-mail.php -rw-r--r--. root root system_u:object_r:httpd_sys_content_t:s0 wp-settings.php -rw-r--r--. root root system_u:object_r:httpd_sys_content_t:s0 wp-signup.php -rw-r--r--. root root system_u:object_r:httpd_sys_content_t:s0 wp-trackback.php -rw-r--r--. root root system_u:object_r:httpd_sys_content_t:s0 xmlrpc.php [root@server html]# chmod -R 777 . [root@server html]# ll total 192 -rwxrwxrwx. 1 root root 494 Aug 13 2019 50x.html -rwxrwxrwx. 1 root root 612 Aug 13 2019 index.html -rwxrwxrwx. 1 root root 418 Sep 25 2013 index.php -rwxrwxrwx. 1 root root 19935 Jan 3 2017 license.txt -rwxrwxrwx. 1 root root 6956 Mar 7 2017 readme.html -rwxrwxrwx. 1 root root 5447 Sep 28 2016 wp-activate.php drwxrwxrwx. 9 root root 4096 Mar 7 2017 wp-admin -rwxrwxrwx. 1 root root 364 Dec 19 2015 wp-blog-header.php -rwxrwxrwx. 1 root root 1627 Aug 29 2016 wp-comments-post.php -rwxrwxrwx. 1 root root 2930 Mar 7 2017 wp-config-sample.php drwxrwxrwx. 5 root root 69 Mar 7 2017 wp-content -rwxrwxrwx. 1 root root 3286 May 25 2015 wp-cron.php drwxrwxrwx. 18 root root 8192 Mar 7 2017 wp-includes -rwxrwxrwx. 1 root root 2422 Nov 21 2016 wp-links-opml.php -rwxrwxrwx. 1 root root 3301 Oct 25 2016 wp-load.php -rwxrwxrwx. 1 root root 33939 Nov 21 2016 wp-login.php -rwxrwxrwx. 1 root root 8048 Jan 11 2017 wp-mail.php -rwxrwxrwx. 1 root root 16250 Nov 29 2016 wp-settings.php -rwxrwxrwx. 1 root root 29896 Oct 19 2016 wp-signup.php -rwxrwxrwx. 1 root root 4513 Oct 15 2016 wp-trackback.php -rwxrwxrwx. 1 root root 3065 Sep 1 2016 xmlrpc.php [root@server html]#[root@server html]#semanage fcontext -a -t httpd_sys_content_t '/root/wordpress/(/.*)?' [root@server html]# mv /root/wordpress/* . [root@server html]# ll -Z -rwxrwxrwx. root root system_u:object_r:httpd_sys_content_t:s0 50x.html -rwxrwxrwx. root root system_u:object_r:httpd_sys_content_t:s0 index.html -rw-r--r--. root root system_u:object_r:httpd_sys_content_t:s0 index.php -rw-r--r--. root root system_u:object_r:httpd_sys_content_t:s0 license.txt -rw-r--r--. root root system_u:object_r:httpd_sys_content_t:s0 readme.html -rw-r--r--. root root system_u:object_r:httpd_sys_content_t:s0 wp-activate.php drwxr-xr-x. root root system_u:object_r:httpd_sys_content_t:s0 wp-admin -rw-r--r--. root root system_u:object_r:httpd_sys_content_t:s0 wp-blog-header.php -rw-r--r--. root root system_u:object_r:httpd_sys_content_t:s0 wp-comments-post.php -rw-r--r--. root root system_u:object_r:httpd_sys_content_t:s0 wp-config-sample.php drwxr-xr-x. root root system_u:object_r:httpd_sys_content_t:s0 wp-content -rw-r--r--. root root system_u:object_r:httpd_sys_content_t:s0 wp-cron.php drwxr-xr-x. root root system_u:object_r:httpd_sys_content_t:s0 wp-includes -rw-r--r--. root root system_u:object_r:httpd_sys_content_t:s0 wp-links-opml.php -rw-r--r--. root root system_u:object_r:httpd_sys_content_t:s0 wp-load.php -rw-r--r--. root root system_u:object_r:httpd_sys_content_t:s0 wp-login.php -rw-r--r--. root root system_u:object_r:httpd_sys_content_t:s0 wp-mail.php -rw-r--r--. root root system_u:object_r:httpd_sys_content_t:s0 wp-settings.php -rw-r--r--. root root system_u:object_r:httpd_sys_content_t:s0 wp-signup.php -rw-r--r--. root root system_u:object_r:httpd_sys_content_t:s0 wp-trackback.php -rw-r--r--. root root system_u:object_r:httpd_sys_content_t:s0 xmlrpc.php [root@server html]# chmod -R 777 . [root@server html]# ll total 192 -rwxrwxrwx. 1 root root 494 Aug 13 2019 50x.html -rwxrwxrwx. 1 root root 612 Aug 13 2019 index.html -rwxrwxrwx. 1 root root 418 Sep 25 2013 index.php -rwxrwxrwx. 1 root root 19935 Jan 3 2017 license.txt -rwxrwxrwx. 1 root root 6956 Mar 7 2017 readme.html -rwxrwxrwx. 1 root root 5447 Sep 28 2016 wp-activate.php drwxrwxrwx. 9 root root 4096 Mar 7 2017 wp-admin -rwxrwxrwx. 1 root root 364 Dec 19 2015 wp-blog-header.php -rwxrwxrwx. 1 root root 1627 Aug 29 2016 wp-comments-post.php -rwxrwxrwx. 1 root root 2930 Mar 7 2017 wp-config-sample.php drwxrwxrwx. 5 root root 69 Mar 7 2017 wp-content -rwxrwxrwx. 1 root root 3286 May 25 2015 wp-cron.php drwxrwxrwx. 18 root root 8192 Mar 7 2017 wp-includes -rwxrwxrwx. 1 root root 2422 Nov 21 2016 wp-links-opml.php -rwxrwxrwx. 1 root root 3301 Oct 25 2016 wp-load.php -rwxrwxrwx. 1 root root 33939 Nov 21 2016 wp-login.php -rwxrwxrwx. 1 root root 8048 Jan 11 2017 wp-mail.php -rwxrwxrwx. 1 root root 16250 Nov 29 2016 wp-settings.php -rwxrwxrwx. 1 root root 29896 Oct 19 2016 wp-signup.php -rwxrwxrwx. 1 root root 4513 Oct 15 2016 wp-trackback.php -rwxrwxrwx. 1 root root 3065 Sep 1 2016 xmlrpc.php [root@server html]#[root@server html]#semanage fcontext -a -t httpd_sys_content_t '/root/wordpress/(/.*)?' [root@server html]# mv /root/wordpress/* . [root@server html]# ll -Z -rwxrwxrwx. root root system_u:object_r:httpd_sys_content_t:s0 50x.html -rwxrwxrwx. root root system_u:object_r:httpd_sys_content_t:s0 index.html -rw-r--r--. root root system_u:object_r:httpd_sys_content_t:s0 index.php -rw-r--r--. root root system_u:object_r:httpd_sys_content_t:s0 license.txt -rw-r--r--. root root system_u:object_r:httpd_sys_content_t:s0 readme.html -rw-r--r--. root root system_u:object_r:httpd_sys_content_t:s0 wp-activate.php drwxr-xr-x. root root system_u:object_r:httpd_sys_content_t:s0 wp-admin -rw-r--r--. root root system_u:object_r:httpd_sys_content_t:s0 wp-blog-header.php -rw-r--r--. root root system_u:object_r:httpd_sys_content_t:s0 wp-comments-post.php -rw-r--r--. root root system_u:object_r:httpd_sys_content_t:s0 wp-config-sample.php drwxr-xr-x. root root system_u:object_r:httpd_sys_content_t:s0 wp-content -rw-r--r--. root root system_u:object_r:httpd_sys_content_t:s0 wp-cron.php drwxr-xr-x. root root system_u:object_r:httpd_sys_content_t:s0 wp-includes -rw-r--r--. root root system_u:object_r:httpd_sys_content_t:s0 wp-links-opml.php -rw-r--r--. root root system_u:object_r:httpd_sys_content_t:s0 wp-load.php -rw-r--r--. root root system_u:object_r:httpd_sys_content_t:s0 wp-login.php -rw-r--r--. root root system_u:object_r:httpd_sys_content_t:s0 wp-mail.php -rw-r--r--. root root system_u:object_r:httpd_sys_content_t:s0 wp-settings.php -rw-r--r--. root root system_u:object_r:httpd_sys_content_t:s0 wp-signup.php -rw-r--r--. root root system_u:object_r:httpd_sys_content_t:s0 wp-trackback.php -rw-r--r--. root root system_u:object_r:httpd_sys_content_t:s0 xmlrpc.php [root@server html]# chmod -R 777 . [root@server html]# ll total 192 -rwxrwxrwx. 1 root root 494 Aug 13 2019 50x.html -rwxrwxrwx. 1 root root 612 Aug 13 2019 index.html -rwxrwxrwx. 1 root root 418 Sep 25 2013 index.php -rwxrwxrwx. 1 root root 19935 Jan 3 2017 license.txt -rwxrwxrwx. 1 root root 6956 Mar 7 2017 readme.html -rwxrwxrwx. 1 root root 5447 Sep 28 2016 wp-activate.php drwxrwxrwx. 9 root root 4096 Mar 7 2017 wp-admin -rwxrwxrwx. 1 root root 364 Dec 19 2015 wp-blog-header.php -rwxrwxrwx. 1 root root 1627 Aug 29 2016 wp-comments-post.php -rwxrwxrwx. 1 root root 2930 Mar 7 2017 wp-config-sample.php drwxrwxrwx. 5 root root 69 Mar 7 2017 wp-content -rwxrwxrwx. 1 root root 3286 May 25 2015 wp-cron.php drwxrwxrwx. 18 root root 8192 Mar 7 2017 wp-includes -rwxrwxrwx. 1 root root 2422 Nov 21 2016 wp-links-opml.php -rwxrwxrwx. 1 root root 3301 Oct 25 2016 wp-load.php -rwxrwxrwx. 1 root root 33939 Nov 21 2016 wp-login.php -rwxrwxrwx. 1 root root 8048 Jan 11 2017 wp-mail.php -rwxrwxrwx. 1 root root 16250 Nov 29 2016 wp-settings.php -rwxrwxrwx. 1 root root 29896 Oct 19 2016 wp-signup.php -rwxrwxrwx. 1 root root 4513 Oct 15 2016 wp-trackback.php -rwxrwxrwx. 1 root root 3065 Sep 1 2016 xmlrpc.php [root@server html]#
10.配置权限(三步)
(1)文件权限
chmod -R 777 ./chmod -R 777 ./chmod -R 777 ./
(2)防火墙权限
firewall-cmd --permanent --add-service=http firewall-cmd --permanent --add-service=mysql firewall-cmd --reloadfirewall-cmd --permanent --add-service=http firewall-cmd --permanent --add-service=mysql firewall-cmd --reloadfirewall-cmd --permanent --add-service=http firewall-cmd --permanent --add-service=mysql firewall-cmd --reload
(3)selinux文件的上下文
semanage fcontext -a -t httpd_sys_content_t '/usr/share/nginx/html/(/.*)?' restorecon -RFv .semanage fcontext -a -t httpd_sys_content_t '/usr/share/nginx/html/(/.*)?' restorecon -RFv .semanage fcontext -a -t httpd_sys_content_t '/usr/share/nginx/html/(/.*)?' restorecon -RFv .
11.开启服务并设置开机自启
systemctl enable php-fpm systemctl enable mariadb.service systemctl enable nginx systemctl start php-fpm systemctl start mariadb.service systemctl start nginxsystemctl enable php-fpm systemctl enable mariadb.service systemctl enable nginx systemctl start php-fpm systemctl start mariadb.service systemctl start nginxsystemctl enable php-fpm systemctl enable mariadb.service systemctl enable nginx systemctl start php-fpm systemctl start mariadb.service systemctl start nginx
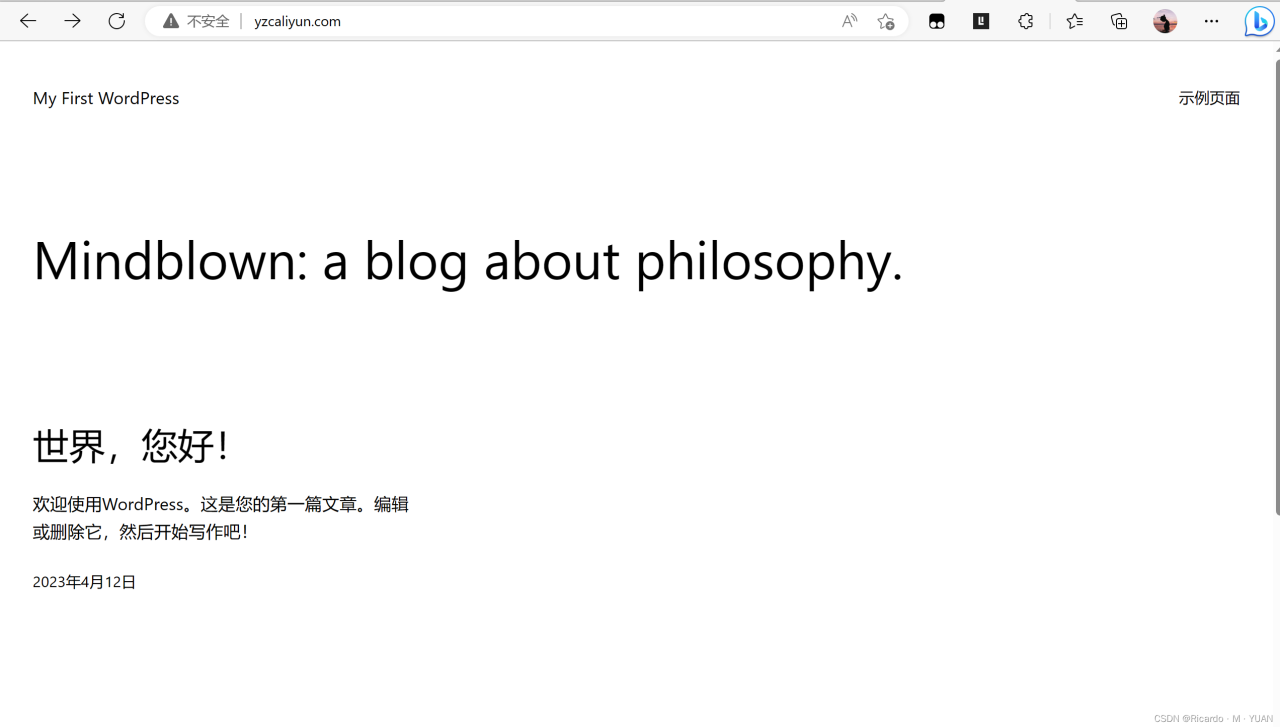
12.访问http://192.168.10.10

原文链接:https://www.cnblogs.com/humlogs/p/17916055.html
© 版权声明
声明📢本站内容均来自互联网,归原创作者所有,如有侵权必删除。
本站文章皆由CC-4.0协议发布,如无来源则为原创,转载请注明出处。
THE END