RIP协议
1. 概述
RIP,Routing Information Protocol,路由信息协议
RIP采用距离矢量算法来计算路由。
RIP有两个版本,RIPv1和RIPv2。RIPv1已经不用,如果使用都是RIPv2。“v”是version 英 [ˈvɜːʃn] 版本的缩写。
RIPv2支持无类域间路由和可变长子网掩码。
无类域间路由,Classless Inter-Domain Routing, CIDR
可变长子网掩码,Variable Length Subnet Mask, VLSM
RIP只适用于小型的同构网络,是以跳数表示距离(每经过一个路由器则跳数加1),允许的最大跳数为15,因此任何超过15个中间站点的目的地均被表示为不可达。
思考:什么是“同构网络”
RIP定期更新路由表,每隔30秒广播一次路由信息。
2. 思科路由器中配置RIP路由常用的命令:
华为路由器中也可以实现相同功能,但命令不同
| 命令 | 说明 |
| router rip | 指定使用RIP协议 |
| version {1|2} | 指定RIP协议版本 |
| network network-addr | 指定与该路由器直接相连的网络 |
| neighbor ip-addr | 说明邻接路由器,以使他们能够自动更新路由 |
| passive interface 接口 | 阻止在指定的接口发送路由更新信息 |
| show ip route | 查看路由表信息 |
| show router rip | 查看RIP协议路由信息 |
如何配置RIP_2台路由器 模拟器使用Cisco Packet Tracer Student
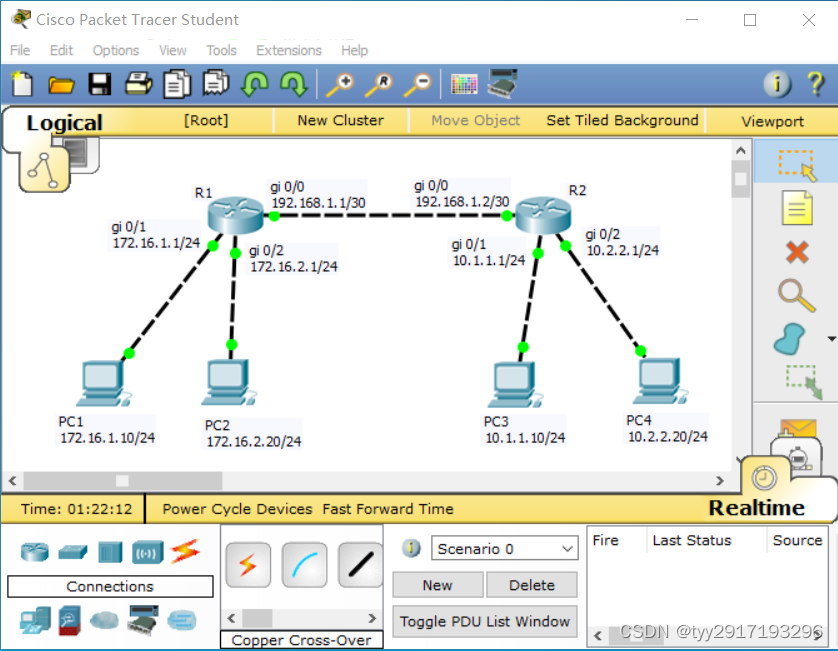
下图和上图一样,但使用EVE-NG模拟器进行绘制。还可以模拟思科设备的模拟器有GNS3。
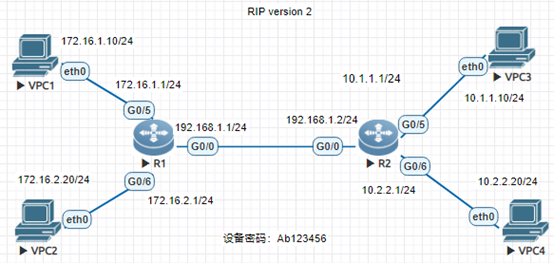
配置说明
R1 Enable //从用户模式进入特权模式
configure terminal //从特权模式进入配置模式
no logging on no ip domain-lookup hostname R1 //给该设备起名,名字为R1
interface GigabitEthernet 0/0 //进入千兆口,0槽0口
no shutdown //开启该端口
ip address 192.168.1.1 255.255.255.252 //给这个三层口配置IP地址,路由器的gigabitethernet是三层口。
exit //退出0/0口
interface GigabitEthernet 0/1 //进入千兆口,0槽1口
no shutdown //开启该端口
ip address 172.16.1.1 255.255.255.0 //给这个三层口配置IP地址,路由器的gigabitethernet是三层口。 Exit //退出0/1口
interface GigabitEthernet 0/2 //进入千兆口,0槽2口
no shutdown //开启该端口
ip address 172.16.2.1 255.255.255.0 //给这个三层口配置IP地址,路由器的gigabitethernet是三层口。
Exit /退出0/2口
router rip //路由器使用RIP协议,router后面的可选项还有bgp, eigrp, ospf
version 2 //指定使用RIP的第2版本
network 172.16.1.0 //指定与R1直连的网段
network 172.16.2.0 //指定与R1直连的网段
network 192.168.1.0 //指定与R1直连的网段
no auto-summary exit exit write copy running-config startup-config
配置脚本
R1 enable configure terminal no logging on no ip domain-lookup hostname R1 interface GigabitEthernet 0/0 no shutdown ip address 192.168.1.1 255.255.255.252 exit interface GigabitEthernet 0/1 no shutdown ip address 172.16.1.1 255.255.255.0 exit interface GigabitEthernet 0/2 no shutdown ip address 172.16.2.1 255.255.255.0 exit router rip version 2 network 172.16.1.0 network 172.16.2.0 network 192.168.1.0 no auto-summary exit exit write copy running-config startup-config R2 enable configure terminal no logging on no ip domain-lookup hostname R2 interface GigabitEthernet 0/0 no shutdown ip address 192.168.1.2 255.255.255.252 exit interface GigabitEthernet 0/1 no shutdown ip address 10.1.1.1 255.255.255.0 exit interface GigabitEthernet 0/2 no shutdown ip address 10.2.2.1 255.255.255.0 exit router rip version 2 network 10.1.1.0 network 10.2.2.0 network 192.168.1.0 no auto-summary exit exit write copy running-config startup-config
配置验证
PC1要能ping通PC3和PC4
PC2要能ping通PC3和PC4
L-local,本地路由信息,上图中,172.16.1.1/32就是L,上图是R1的路由信息,172.16.1.1/32这个IP地址就是在R1的gigabitethernet 0/1上面,因此是R1的本地路由信息。
C-connected直连路由信息,上图中,172.16.1.0/24这个网段是R1的gi0/1口连接的,因此,R1的直连路由就包括172.16.1.0/24这个网段。
R-rip,路由器R1从其gigabitethernet0/0口收到来自192.168.1.2发给它的关于10.1.1.0/24这个网段的信息。
在本案例中,如果R1和R2没有配置RIP,PC1是否能ping通PC4,为什么?
R1只能获得172.16.1.0/24、172.16.2.0/24,192.168.1.0/30网段的信息,无法获得10.1.1.0/24和10.2.2.0/24网段的信息。同理R2无法获得172.16.1.0/24、172.16.2.0/24网段的信息。要么配静态路由,要么配动态路由。
原文链接:https://blog.csdn.net/tyy2917193296/article/details/134996626?ops_request_misc=%257B%2522request%255Fid%2522%253A%2522171828104516800213084155%2522%252C%2522scm%2522%253A%252220140713.130102334.pc%255Fblog.%2522%257D&request_id=171828104516800213084155&biz_id=0&utm_medium=distribute.pc_search_result.none-task-blog-2~blog~first_rank_ecpm_v1~times_rank-5-134996626-null-null.nonecase&utm_term=%E8%B7%AF%E7%94%B1%E5%99%A8%E3%80%81%E5%8D%83%E5%85%86


