nginx 初识
安装启动nginx
docker run -p 80:80 --name nginx -d nginx:1.10 docker run -p 80:80 --name nginx \ -v /mydata/nginx/html:/usr/share/nginx/html \ -v /mydata/nginx/logs:/var/log/nginx \ -v /mydata/nginx/conf/:/etc/nginx \ -d nginx:1.10 docker ps -a docker update nginx --restart==always --设置开机自启 docker start nginx --启动docker run -p 80:80 --name nginx -d nginx:1.10 docker run -p 80:80 --name nginx \ -v /mydata/nginx/html:/usr/share/nginx/html \ -v /mydata/nginx/logs:/var/log/nginx \ -v /mydata/nginx/conf/:/etc/nginx \ -d nginx:1.10 docker ps -a docker update nginx --restart==always --设置开机自启 docker start nginx --启动docker run -p 80:80 --name nginx -d nginx:1.10 docker run -p 80:80 --name nginx \ -v /mydata/nginx/html:/usr/share/nginx/html \ -v /mydata/nginx/logs:/var/log/nginx \ -v /mydata/nginx/conf/:/etc/nginx \ -d nginx:1.10 docker ps -a docker update nginx --restart==always --设置开机自启 docker start nginx --启动
修改nginx配置
cd /mydate/nginx cd conf cd /mydate/nginx vi nginx.confcd /mydate/nginx cd conf cd /mydate/nginx vi nginx.confcd /mydate/nginx cd conf cd /mydate/nginx vi nginx.conf
nginx.conf:
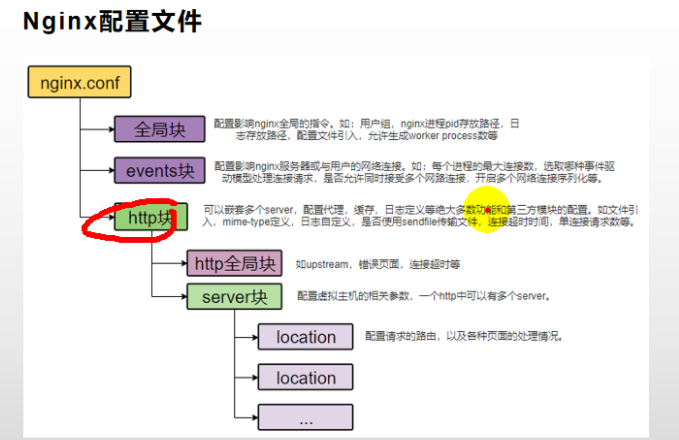
全局块:配置影响nginx全局的指令。如:用户组,nginx进程pid存放路径,日志存放路径,配置文件引入,允许生成worker process故障等
events块:配置影响 Nginx 服务器与用户的网络连接,常用的设置包括是否开启对多 work process下的网络连接进行序列化,是否允许同时接收多个网络连接,选取哪种事件驱动模型来处理连接请求,每个 word process 可以同时支持的最大连接数等。
http块:
http全局块:配置的指令包括文件引入、MIME-TYPE 定义、日志自定义、连接超时时间、单链接请求数上限等。错误页面等
server块:这块和虚拟主机有密切关系,虚拟主机从用户角度看,和一台独立的硬件主机是完全一样的。每个 http 块可以包括多个 server 块,而每个 server 块就相当于一个虚拟主机。
使用
1.本机设置域名解析 反向代理(server块)
本机正向代理
修改本机host文件 ,添加一行192.168.56.10 gulimall.com
192.168.56.10 gulimall.com192.168.56.10 gulimall.com192.168.56.10 gulimall.com
这行的作用是通过本机host解析将请求gulimall.com转为192.168.56.10
后期服务注册公网域名就由公网DNS解析
192.168.56.10为我虚拟机配置
虚拟机server解析在/mydata/nginx/cof/conf.d 。新增一个配置
由于默认域名都是发送到80端口,nginx启动后我们发送gulimall.com
经过本地host解析变为192.168.56.10:80.
被虚拟机192.168.56.10上监听80端口的gulimall.com捕获。
再将请求转为http://192.168.56.1:10000。最终实现正向和反向代理
server { listen 80; server_name gulimall.com; #charset koi8-r; #access_log /var/log/nginx/log/host.access.log main; location / { #又转回到本机 proxy_pass http://192.168.56.1:10000; } #error_page 404 /404.html; # redirect server error pages to the static page /50x.html # error_page 500 502 503 504 /50x.html; location = /50x.html { root /usr/share/nginx/html; } # proxy the PHP scripts to Apache listening on 127.0.0.1:80 # #location ~ \.php$ { # proxy_pass http://127.0.0.1; #} # pass the PHP scripts to FastCGI server listening on 127.0.0.1:9000 # #location ~ \.php$ { # root html; # fastcgi_pass 127.0.0.1:9000; # fastcgi_index index.php; # fastcgi_param SCRIPT_FILENAME /scripts$fastcgi_script_name; # include fastcgi_params; #} # deny access to .htaccess files, if Apache's document root # concurs with nginx's one # #location ~ /\.ht { # deny all; #}server { listen 80; server_name gulimall.com; #charset koi8-r; #access_log /var/log/nginx/log/host.access.log main; location / { #又转回到本机 proxy_pass http://192.168.56.1:10000; } #error_page 404 /404.html; # redirect server error pages to the static page /50x.html # error_page 500 502 503 504 /50x.html; location = /50x.html { root /usr/share/nginx/html; } # proxy the PHP scripts to Apache listening on 127.0.0.1:80 # #location ~ \.php$ { # proxy_pass http://127.0.0.1; #} # pass the PHP scripts to FastCGI server listening on 127.0.0.1:9000 # #location ~ \.php$ { # root html; # fastcgi_pass 127.0.0.1:9000; # fastcgi_index index.php; # fastcgi_param SCRIPT_FILENAME /scripts$fastcgi_script_name; # include fastcgi_params; #} # deny access to .htaccess files, if Apache's document root # concurs with nginx's one # #location ~ /\.ht { # deny all; #}server { listen 80; server_name gulimall.com; #charset koi8-r; #access_log /var/log/nginx/log/host.access.log main; location / { #又转回到本机 proxy_pass http://192.168.56.1:10000; } #error_page 404 /404.html; # redirect server error pages to the static page /50x.html # error_page 500 502 503 504 /50x.html; location = /50x.html { root /usr/share/nginx/html; } # proxy the PHP scripts to Apache listening on 127.0.0.1:80 # #location ~ \.php$ { # proxy_pass http://127.0.0.1; #} # pass the PHP scripts to FastCGI server listening on 127.0.0.1:9000 # #location ~ \.php$ { # root html; # fastcgi_pass 127.0.0.1:9000; # fastcgi_index index.php; # fastcgi_param SCRIPT_FILENAME /scripts$fastcgi_script_name; # include fastcgi_params; #} # deny access to .htaccess files, if Apache's document root # concurs with nginx's one # #location ~ /\.ht { # deny all; #}
2.负载均衡
先修改总的nginx配置
/mydata/nginx/conf vi nginx.conf/mydata/nginx/conf vi nginx.conf/mydata/nginx/conf vi nginx.conf
添加网关配置
upstream gulimall{ # 88是我本机网关 server 192.168.56.1:88; }upstream gulimall{ # 88是我本机网关 server 192.168.56.1:88; }upstream gulimall{ # 88是我本机网关 server 192.168.56.1:88; }
具体配置
user nginx; worker_processes 1; pid /var/run/nginx.pid; events { worker_connections 1024; } http { include /etc/nginx/mime.types; default_type application/octet-stream; log_format main '$remote_addr - $remote_user [$time_local] "$request" ' '$status $body_bytes_sent "$http_referer" ' '"$http_user_agent" "$http_x_forwarded_for"'; access_log /var/log/nginx/access.log main; sendfile on; #tcp_nopush on; keepalive_timeout 65; #gzip on; upstream gulimall{ # 88是网关,如果有多个就继续写多个server标签 如 server 192.xx.xxx.xx server 192.168.56.1:88; } include /etc/nginx/conf.d/*.conf; }user nginx; worker_processes 1; pid /var/run/nginx.pid; events { worker_connections 1024; } http { include /etc/nginx/mime.types; default_type application/octet-stream; log_format main '$remote_addr - $remote_user [$time_local] "$request" ' '$status $body_bytes_sent "$http_referer" ' '"$http_user_agent" "$http_x_forwarded_for"'; access_log /var/log/nginx/access.log main; sendfile on; #tcp_nopush on; keepalive_timeout 65; #gzip on; upstream gulimall{ # 88是网关,如果有多个就继续写多个server标签 如 server 192.xx.xxx.xx server 192.168.56.1:88; } include /etc/nginx/conf.d/*.conf; }user nginx; worker_processes 1; pid /var/run/nginx.pid; events { worker_connections 1024; } http { include /etc/nginx/mime.types; default_type application/octet-stream; log_format main '$remote_addr - $remote_user [$time_local] "$request" ' '$status $body_bytes_sent "$http_referer" ' '"$http_user_agent" "$http_x_forwarded_for"'; access_log /var/log/nginx/access.log main; sendfile on; #tcp_nopush on; keepalive_timeout 65; #gzip on; upstream gulimall{ # 88是网关,如果有多个就继续写多个server标签 如 server 192.xx.xxx.xx server 192.168.56.1:88; } include /etc/nginx/conf.d/*.conf; }
然后修改/mydata/nginx/cof/conf.d下的 *.conf
server { listen 80; server_name gulimall.com; #charset koi8-r; #access_log /var/log/nginx/log/host.access.log main; location / { proxy_pass http://gulimall; proxy_set_header Host $host; }server { listen 80; server_name gulimall.com; #charset koi8-r; #access_log /var/log/nginx/log/host.access.log main; location / { proxy_pass http://gulimall; proxy_set_header Host $host; }server { listen 80; server_name gulimall.com; #charset koi8-r; #access_log /var/log/nginx/log/host.access.log main; location / { proxy_pass http://gulimall; proxy_set_header Host $host; }
将反向代理指向网关
坑:nginx转发给网关的时候会丢掉host,所以网关解析会解析不到
将丢失的请求头再次发送 proxy_set_header Host $host;
proxy_set_header Host $host;proxy_set_header Host $host;proxy_set_header Host $host;
网关加上host分配
- id: gulimall_host_route uri: lb://gulimall-product predicates: - Host=**.gulimall.com- id: gulimall_host_route uri: lb://gulimall-product predicates: - Host=**.gulimall.com- id: gulimall_host_route uri: lb://gulimall-product predicates: - Host=**.gulimall.com
流程总结:先DNS域名解析ip,然后向ip发送请求,也就是nginx。nginx将请求转为gulimall server组,并带上host请求头。gulimall server组存放相关网关地址,网关接收到请求和请求头,根据网关配置和断言判断确切url进行请求。
all-product predicates: - Host=**.gulimall.comall-product predicates: - Host=**.gulimall.comall-product predicates: - Host=**.gulimall.com
原文链接:https://blog.csdn.net/qq_41940067/article/details/115229462


