群辉NAS:J1900系统盘安装SATA固态硬盘方案
设备介绍:
DSM版本:918+
主板CPU:蜗牛星际J1900板
内存:8G DDR3
固态:移速SATA固态(msata在win微桌面识别,群晖安装时候识别不到)
方式:SATA固态安装在硬盘盒上,左边左边第一个位置。其他盘取出
【1】修改引导盘配置文件:
插在电脑上(win10为例),注意有弹出格式化提示,不要格式化。linux系统盘,win不识别正常。打开三个盘里面正常那个盘
打开 boot / grub.cfg 用记事本编辑
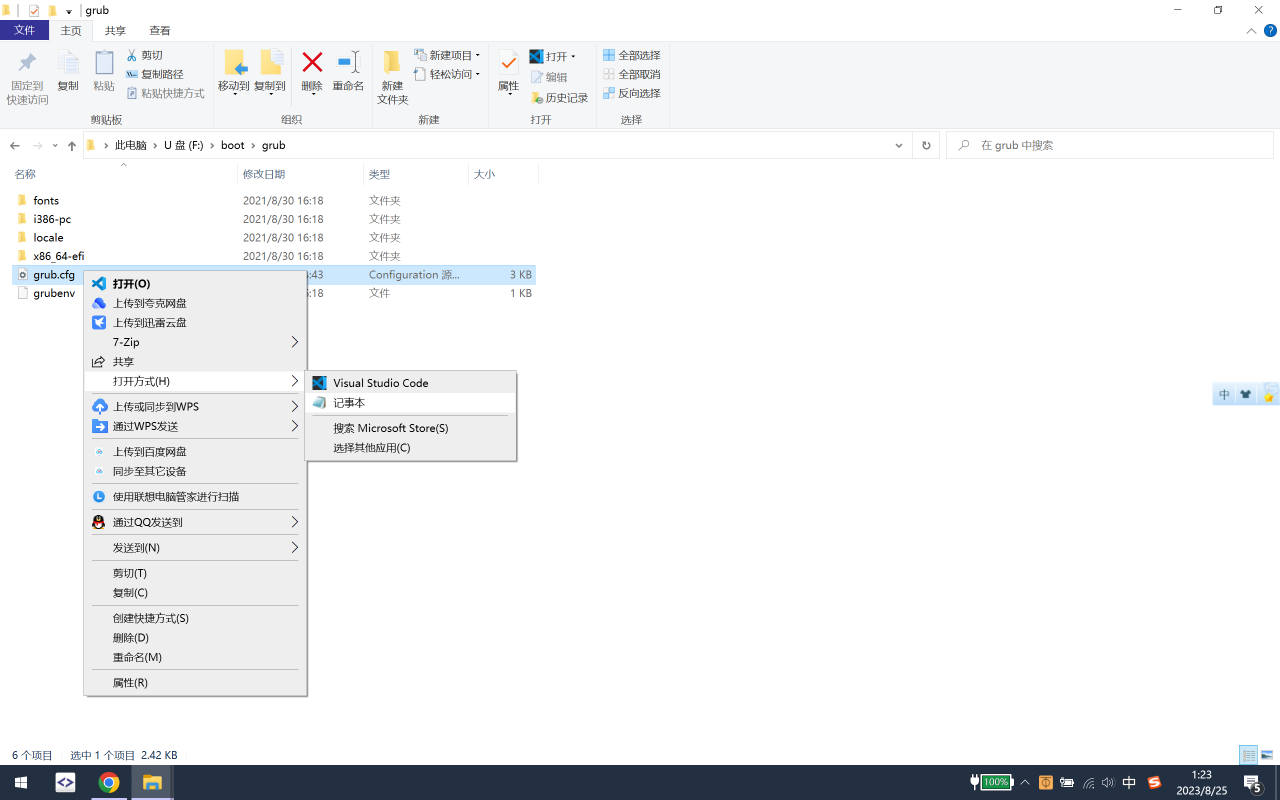
核心点是这行,总的在两处
loglevel=15 DiskIdxMap=00 SataPortMap=1 SasIdxMap=0
# # ### <span class="token operator">!</span><span class="token operator">!</span><span class="token operator">!</span> <span class="token constant">WARNING</span> <span class="token operator">-</span> <span class="token constant">READ</span> <span class="token constant">ME</span> <span class="token operator">!</span><span class="token operator">!</span><span class="token operator">!</span> ### # # <span class="token constant">DO</span> <span class="token constant">NOT</span> edit <span class="token keyword">this</span> file<span class="token punctuation">.</span> This file has been generated automatically by the loader generator<span class="token punctuation">.</span> # If you were asked to use a pre<span class="token operator">-</span>made image and asked by someone to edit <span class="token keyword">this</span> file <span class="token constant">DO</span> <span class="token constant">NOT</span> <span class="token keyword">do</span> it<span class="token punctuation">.</span> The only # supported method <span class="token keyword">of</span> obtaining the loader image is generating it using the loader generator provided<span class="token punctuation">.</span> # terminal_output console <span class="token keyword">if</span> serial <span class="token operator">--</span>unit<span class="token operator">=</span><span class="token number">0</span> <span class="token operator">--</span>speed<span class="token operator">=</span><span class="token number">115200</span><span class="token punctuation">;</span> then terminal_input <span class="token operator">--</span>append serial_com0 terminal_output <span class="token operator">--</span>append serial_com0 fi <span class="token keyword">set</span> <span class="token keyword">default</span><span class="token operator">=</span><span class="token string">"0"</span> <span class="token keyword">set</span> timeout<span class="token operator">=</span><span class="token string">"5"</span> <span class="token keyword">set</span> timeout_style<span class="token operator">=</span><span class="token string">"menu"</span> <span class="token keyword">if</span> <span class="token punctuation">[</span> <span class="token operator">-</span>s $prefix<span class="token operator">/</span>grubenv <span class="token punctuation">]</span><span class="token punctuation">;</span> then load_env <span class="token operator">--</span>file $prefix<span class="token operator">/</span>grubenv <span class="token operator">--</span>skip<span class="token operator">-</span>sig <span class="token keyword">set</span> has_env<span class="token operator">=</span><span class="token string">"1"</span> <span class="token keyword">if</span> <span class="token punctuation">[</span> <span class="token operator">-</span>n <span class="token string">"${saved_entry}"</span> <span class="token punctuation">]</span><span class="token punctuation">;</span> then <span class="token keyword">set</span> <span class="token keyword">default</span><span class="token operator">=</span><span class="token string">"${saved_entry}"</span> fi <span class="token keyword">else</span> <span class="token keyword">set</span> has_env<span class="token operator">=</span><span class="token string">"0"</span> echo <span class="token string">"WARN: failed to load env. Default choice will NOT be saved!"</span> fi <span class="token keyword">function</span> savedefault <span class="token punctuation">{<!-- --></span> saved_entry<span class="token operator">=</span><span class="token string">"${chosen}"</span> save_env <span class="token operator">--</span>file $prefix<span class="token operator">/</span>grubenv saved_entry <span class="token punctuation">}</span> insmod usb_keyboard insmod part_msdos insmod ext2 insmod fat insmod linux insmod gzio <span class="token keyword">set</span> gfxmode<span class="token operator">=</span>auto insmod vbe insmod vga # <span class="token constant">UEFI</span> insmod efi_gop insmod efi_uga insmod font <span class="token keyword">if</span> loadfont $<span class="token punctuation">{<!-- --></span>prefix<span class="token punctuation">}</span><span class="token operator">/</span>unicode<span class="token punctuation">.</span>pf2 then insmod gfxterm <span class="token keyword">set</span> gfxmode<span class="token operator">=</span>auto <span class="token keyword">set</span> gfxpayload<span class="token operator">=</span>keep terminal_output gfxterm fi menuentry <span class="token string">'Yet Another Jun`s Mod x RedPill DS918+ v7.X (USB, Verbose)'</span> <span class="token punctuation">{<!-- --></span> savedefault <span class="token keyword">set</span> root<span class="token operator">=</span><span class="token punctuation">(</span>hd0<span class="token punctuation">,</span><span class="token number">2</span><span class="token punctuation">)</span> echo Loading Linux<span class="token operator">...</span> linux <span class="token operator">/</span>bzImage HddHotplug<span class="token operator">=</span><span class="token number">0</span> withefi console<span class="token operator">=</span>ttyS0<span class="token punctuation">,</span>115200n8 netif_num<span class="token operator">=</span><span class="token number">2</span> syno_hdd_detect<span class="token operator">=</span><span class="token number">0</span> syno_port_thaw<span class="token operator">=</span><span class="token number">1</span> vender_format_version<span class="token operator">=</span><span class="token number">2</span> mac2<span class="token operator">=</span>001132C516EC earlyprintk mac1<span class="token operator">=</span>001132C516EB syno_hdd_powerup_seq<span class="token operator">=</span><span class="token number">1</span> pid<span class="token operator">=</span><span class="token number">0x1234</span> log_buf_len<span class="token operator">=</span>32M syno_hw_version<span class="token operator">=</span><span class="token constant">DS918</span><span class="token operator">+</span> vid<span class="token operator">=</span><span class="token number">0xABCD</span> earlycon<span class="token operator">=</span>uart8250<span class="token punctuation">,</span>io<span class="token punctuation">,</span><span class="token number">0x3f8</span><span class="token punctuation">,</span>115200n8 sn<span class="token operator">=</span>19C0PDN294509 elevator<span class="token operator">=</span>elevator root<span class="token operator">=</span><span class="token operator">/</span>dev<span class="token operator">/</span>md0 loglevel<span class="token operator">=</span><span class="token number">15</span> DiskIdxMap<span class="token operator">=</span><span class="token number">00</span> SataPortMap<span class="token operator">=</span><span class="token number">1</span> SasIdxMap<span class="token operator">=</span><span class="token number">0</span> echo Starting kernel <span class="token keyword">with</span> <span class="token constant">USB</span> boot Now it<span class="token template-string"><span class="token template-punctuation string">`</span><span class="token string">s OK! } menuentry 'Yet Another Jun</span><span class="token template-punctuation string">`</span></span>s Mod x RedPill <span class="token constant">DS918</span><span class="token operator">+</span> v7<span class="token punctuation">.</span><span class="token constant">X</span><span class="token punctuation">(</span><span class="token constant">SATA</span><span class="token punctuation">,</span> Verbose<span class="token punctuation">)</span>' <span class="token punctuation">{<!-- --></span> savedefault <span class="token keyword">set</span> root<span class="token operator">=</span><span class="token punctuation">(</span>hd0<span class="token punctuation">,</span><span class="token number">2</span><span class="token punctuation">)</span> echo Loading Linux<span class="token operator">...</span> linux <span class="token operator">/</span>bzImage HddHotplug<span class="token operator">=</span><span class="token number">0</span> withefi console<span class="token operator">=</span>ttyS0<span class="token punctuation">,</span>115200n8 synoboot_satadom<span class="token operator">=</span><span class="token number">2</span> netif_num<span class="token operator">=</span><span class="token number">2</span> syno_hdd_detect<span class="token operator">=</span><span class="token number">0</span> syno_port_thaw<span class="token operator">=</span><span class="token number">1</span> vender_format_version<span class="token operator">=</span><span class="token number">2</span> mac2<span class="token operator">=</span>001132C518DE earlyprintk mac1<span class="token operator">=</span>001132C518DF syno_hdd_powerup_seq<span class="token operator">=</span><span class="token number">1</span> pid<span class="token operator">=</span><span class="token number">0x1234</span> log_buf_len<span class="token operator">=</span>32M syno_hw_version<span class="token operator">=</span><span class="token constant">DS918</span><span class="token operator">+</span> vid<span class="token operator">=</span><span class="token number">0xABCD</span> earlycon<span class="token operator">=</span>uart8250<span class="token punctuation">,</span>io<span class="token punctuation">,</span><span class="token number">0x3f8</span><span class="token punctuation">,</span>115200n8 sn<span class="token operator">=</span>19C0PDN544809 elevator<span class="token operator">=</span>elevator root<span class="token operator">=</span><span class="token operator">/</span>dev<span class="token operator">/</span>md0 loglevel<span class="token operator">=</span><span class="token number">15</span> DiskIdxMap<span class="token operator">=</span><span class="token number">00</span> SataPortMap<span class="token operator">=</span><span class="token number">1</span> SasIdxMap<span class="token operator">=</span><span class="token number">0</span> echo Starting kernel <span class="token keyword">with</span> <span class="token constant">SATA</span> boot echo <span class="token constant">WARNING</span><span class="token operator">:</span> <span class="token constant">SATA</span> boot support on <span class="token keyword">this</span> platform is experimental<span class="token operator">!</span> <span class="token punctuation">}</span># # ### <span class="token operator">!</span><span class="token operator">!</span><span class="token operator">!</span> <span class="token constant">WARNING</span> <span class="token operator">-</span> <span class="token constant">READ</span> <span class="token constant">ME</span> <span class="token operator">!</span><span class="token operator">!</span><span class="token operator">!</span> ### # # <span class="token constant">DO</span> <span class="token constant">NOT</span> edit <span class="token keyword">this</span> file<span class="token punctuation">.</span> This file has been generated automatically by the loader generator<span class="token punctuation">.</span> # If you were asked to use a pre<span class="token operator">-</span>made image and asked by someone to edit <span class="token keyword">this</span> file <span class="token constant">DO</span> <span class="token constant">NOT</span> <span class="token keyword">do</span> it<span class="token punctuation">.</span> The only # supported method <span class="token keyword">of</span> obtaining the loader image is generating it using the loader generator provided<span class="token punctuation">.</span> # terminal_output console <span class="token keyword">if</span> serial <span class="token operator">--</span>unit<span class="token operator">=</span><span class="token number">0</span> <span class="token operator">--</span>speed<span class="token operator">=</span><span class="token number">115200</span><span class="token punctuation">;</span> then terminal_input <span class="token operator">--</span>append serial_com0 terminal_output <span class="token operator">--</span>append serial_com0 fi <span class="token keyword">set</span> <span class="token keyword">default</span><span class="token operator">=</span><span class="token string">"0"</span> <span class="token keyword">set</span> timeout<span class="token operator">=</span><span class="token string">"5"</span> <span class="token keyword">set</span> timeout_style<span class="token operator">=</span><span class="token string">"menu"</span> <span class="token keyword">if</span> <span class="token punctuation">[</span> <span class="token operator">-</span>s $prefix<span class="token operator">/</span>grubenv <span class="token punctuation">]</span><span class="token punctuation">;</span> then load_env <span class="token operator">--</span>file $prefix<span class="token operator">/</span>grubenv <span class="token operator">--</span>skip<span class="token operator">-</span>sig <span class="token keyword">set</span> has_env<span class="token operator">=</span><span class="token string">"1"</span> <span class="token keyword">if</span> <span class="token punctuation">[</span> <span class="token operator">-</span>n <span class="token string">"${saved_entry}"</span> <span class="token punctuation">]</span><span class="token punctuation">;</span> then <span class="token keyword">set</span> <span class="token keyword">default</span><span class="token operator">=</span><span class="token string">"${saved_entry}"</span> fi <span class="token keyword">else</span> <span class="token keyword">set</span> has_env<span class="token operator">=</span><span class="token string">"0"</span> echo <span class="token string">"WARN: failed to load env. Default choice will NOT be saved!"</span> fi <span class="token keyword">function</span> savedefault <span class="token punctuation">{<!-- --></span> saved_entry<span class="token operator">=</span><span class="token string">"${chosen}"</span> save_env <span class="token operator">--</span>file $prefix<span class="token operator">/</span>grubenv saved_entry <span class="token punctuation">}</span> insmod usb_keyboard insmod part_msdos insmod ext2 insmod fat insmod linux insmod gzio <span class="token keyword">set</span> gfxmode<span class="token operator">=</span>auto insmod vbe insmod vga # <span class="token constant">UEFI</span> insmod efi_gop insmod efi_uga insmod font <span class="token keyword">if</span> loadfont $<span class="token punctuation">{<!-- --></span>prefix<span class="token punctuation">}</span><span class="token operator">/</span>unicode<span class="token punctuation">.</span>pf2 then insmod gfxterm <span class="token keyword">set</span> gfxmode<span class="token operator">=</span>auto <span class="token keyword">set</span> gfxpayload<span class="token operator">=</span>keep terminal_output gfxterm fi menuentry <span class="token string">'Yet Another Jun`s Mod x RedPill DS918+ v7.X (USB, Verbose)'</span> <span class="token punctuation">{<!-- --></span> savedefault <span class="token keyword">set</span> root<span class="token operator">=</span><span class="token punctuation">(</span>hd0<span class="token punctuation">,</span><span class="token number">2</span><span class="token punctuation">)</span> echo Loading Linux<span class="token operator">...</span> linux <span class="token operator">/</span>bzImage HddHotplug<span class="token operator">=</span><span class="token number">0</span> withefi console<span class="token operator">=</span>ttyS0<span class="token punctuation">,</span>115200n8 netif_num<span class="token operator">=</span><span class="token number">2</span> syno_hdd_detect<span class="token operator">=</span><span class="token number">0</span> syno_port_thaw<span class="token operator">=</span><span class="token number">1</span> vender_format_version<span class="token operator">=</span><span class="token number">2</span> mac2<span class="token operator">=</span>001132C516EC earlyprintk mac1<span class="token operator">=</span>001132C516EB syno_hdd_powerup_seq<span class="token operator">=</span><span class="token number">1</span> pid<span class="token operator">=</span><span class="token number">0x1234</span> log_buf_len<span class="token operator">=</span>32M syno_hw_version<span class="token operator">=</span><span class="token constant">DS918</span><span class="token operator">+</span> vid<span class="token operator">=</span><span class="token number">0xABCD</span> earlycon<span class="token operator">=</span>uart8250<span class="token punctuation">,</span>io<span class="token punctuation">,</span><span class="token number">0x3f8</span><span class="token punctuation">,</span>115200n8 sn<span class="token operator">=</span>19C0PDN294509 elevator<span class="token operator">=</span>elevator root<span class="token operator">=</span><span class="token operator">/</span>dev<span class="token operator">/</span>md0 loglevel<span class="token operator">=</span><span class="token number">15</span> DiskIdxMap<span class="token operator">=</span><span class="token number">00</span> SataPortMap<span class="token operator">=</span><span class="token number">1</span> SasIdxMap<span class="token operator">=</span><span class="token number">0</span> echo Starting kernel <span class="token keyword">with</span> <span class="token constant">USB</span> boot Now it<span class="token template-string"><span class="token template-punctuation string">`</span><span class="token string">s OK! } menuentry 'Yet Another Jun</span><span class="token template-punctuation string">`</span></span>s Mod x RedPill <span class="token constant">DS918</span><span class="token operator">+</span> v7<span class="token punctuation">.</span><span class="token constant">X</span><span class="token punctuation">(</span><span class="token constant">SATA</span><span class="token punctuation">,</span> Verbose<span class="token punctuation">)</span>' <span class="token punctuation">{<!-- --></span> savedefault <span class="token keyword">set</span> root<span class="token operator">=</span><span class="token punctuation">(</span>hd0<span class="token punctuation">,</span><span class="token number">2</span><span class="token punctuation">)</span> echo Loading Linux<span class="token operator">...</span> linux <span class="token operator">/</span>bzImage HddHotplug<span class="token operator">=</span><span class="token number">0</span> withefi console<span class="token operator">=</span>ttyS0<span class="token punctuation">,</span>115200n8 synoboot_satadom<span class="token operator">=</span><span class="token number">2</span> netif_num<span class="token operator">=</span><span class="token number">2</span> syno_hdd_detect<span class="token operator">=</span><span class="token number">0</span> syno_port_thaw<span class="token operator">=</span><span class="token number">1</span> vender_format_version<span class="token operator">=</span><span class="token number">2</span> mac2<span class="token operator">=</span>001132C518DE earlyprintk mac1<span class="token operator">=</span>001132C518DF syno_hdd_powerup_seq<span class="token operator">=</span><span class="token number">1</span> pid<span class="token operator">=</span><span class="token number">0x1234</span> log_buf_len<span class="token operator">=</span>32M syno_hw_version<span class="token operator">=</span><span class="token constant">DS918</span><span class="token operator">+</span> vid<span class="token operator">=</span><span class="token number">0xABCD</span> earlycon<span class="token operator">=</span>uart8250<span class="token punctuation">,</span>io<span class="token punctuation">,</span><span class="token number">0x3f8</span><span class="token punctuation">,</span>115200n8 sn<span class="token operator">=</span>19C0PDN544809 elevator<span class="token operator">=</span>elevator root<span class="token operator">=</span><span class="token operator">/</span>dev<span class="token operator">/</span>md0 loglevel<span class="token operator">=</span><span class="token number">15</span> DiskIdxMap<span class="token operator">=</span><span class="token number">00</span> SataPortMap<span class="token operator">=</span><span class="token number">1</span> SasIdxMap<span class="token operator">=</span><span class="token number">0</span> echo Starting kernel <span class="token keyword">with</span> <span class="token constant">SATA</span> boot echo <span class="token constant">WARNING</span><span class="token operator">:</span> <span class="token constant">SATA</span> boot support on <span class="token keyword">this</span> platform is experimental<span class="token operator">!</span> <span class="token punctuation">}</span># # ### !!! WARNING - READ ME !!! ### # # DO NOT edit this file. This file has been generated automatically by the loader generator. # If you were asked to use a pre-made image and asked by someone to edit this file DO NOT do it. The only # supported method of obtaining the loader image is generating it using the loader generator provided. # terminal_output console if serial --unit=0 --speed=115200; then terminal_input --append serial_com0 terminal_output --append serial_com0 fi set default="0" set timeout="5" set timeout_style="menu" if [ -s $prefix/grubenv ]; then load_env --file $prefix/grubenv --skip-sig set has_env="1" if [ -n "${saved_entry}" ]; then set default="${saved_entry}" fi else set has_env="0" echo "WARN: failed to load env. Default choice will NOT be saved!" fi function savedefault { saved_entry="${chosen}" save_env --file $prefix/grubenv saved_entry } insmod usb_keyboard insmod part_msdos insmod ext2 insmod fat insmod linux insmod gzio set gfxmode=auto insmod vbe insmod vga # UEFI insmod efi_gop insmod efi_uga insmod font if loadfont ${prefix}/unicode.pf2 then insmod gfxterm set gfxmode=auto set gfxpayload=keep terminal_output gfxterm fi menuentry 'Yet Another Jun`s Mod x RedPill DS918+ v7.X (USB, Verbose)' { savedefault set root=(hd0,2) echo Loading Linux... linux /bzImage HddHotplug=0 withefi console=ttyS0,115200n8 netif_num=2 syno_hdd_detect=0 syno_port_thaw=1 vender_format_version=2 mac2=001132C516EC earlyprintk mac1=001132C516EB syno_hdd_powerup_seq=1 pid=0x1234 log_buf_len=32M syno_hw_version=DS918+ vid=0xABCD earlycon=uart8250,io,0x3f8,115200n8 sn=19C0PDN294509 elevator=elevator root=/dev/md0 loglevel=15 DiskIdxMap=00 SataPortMap=1 SasIdxMap=0 echo Starting kernel with USB boot Now it`s OK! } menuentry 'Yet Another Jun`s Mod x RedPill DS918+ v7.X(SATA, Verbose)' { savedefault set root=(hd0,2) echo Loading Linux... linux /bzImage HddHotplug=0 withefi console=ttyS0,115200n8 synoboot_satadom=2 netif_num=2 syno_hdd_detect=0 syno_port_thaw=1 vender_format_version=2 mac2=001132C518DE earlyprintk mac1=001132C518DF syno_hdd_powerup_seq=1 pid=0x1234 log_buf_len=32M syno_hw_version=DS918+ vid=0xABCD earlycon=uart8250,io,0x3f8,115200n8 sn=19C0PDN544809 elevator=elevator root=/dev/md0 loglevel=15 DiskIdxMap=00 SataPortMap=1 SasIdxMap=0 echo Starting kernel with SATA boot echo WARNING: SATA boot support on this platform is experimental! }
保存,退出。
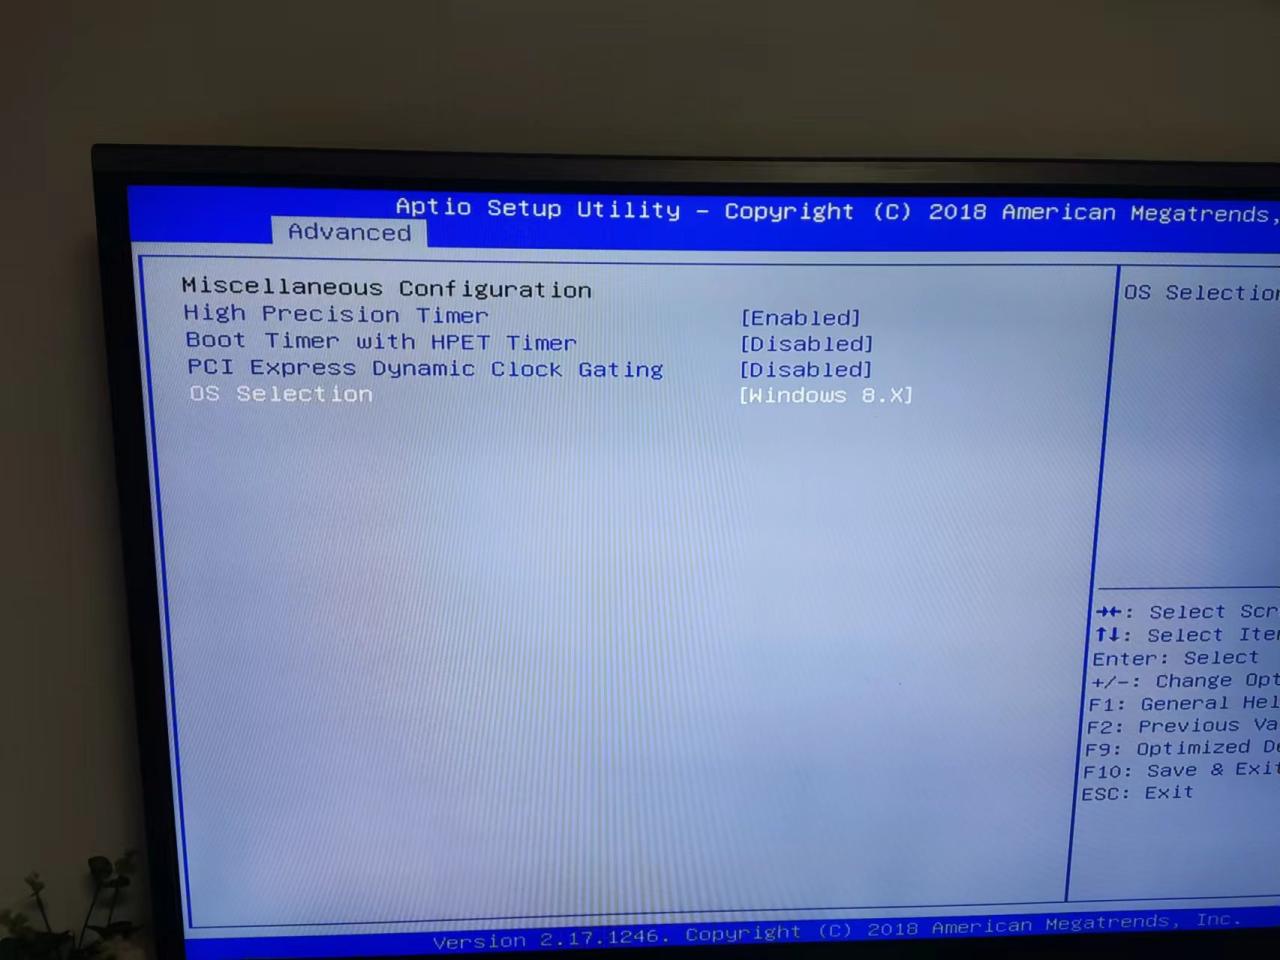
【2】bios 设置 windows8.x,(其实实测 windows7 也能刷,看教程要设置 8.x)
- 2.1 U盘启动盘,插主机箱后面 【黑色】 的usb上面。切记,一定是后面的黑色sub上,主板上的进不来bios,可以平时启动用
- 2.2 开机点按 F11 进bios页面。位置:Advanced->Miscellaneous Configuration->OS Selection
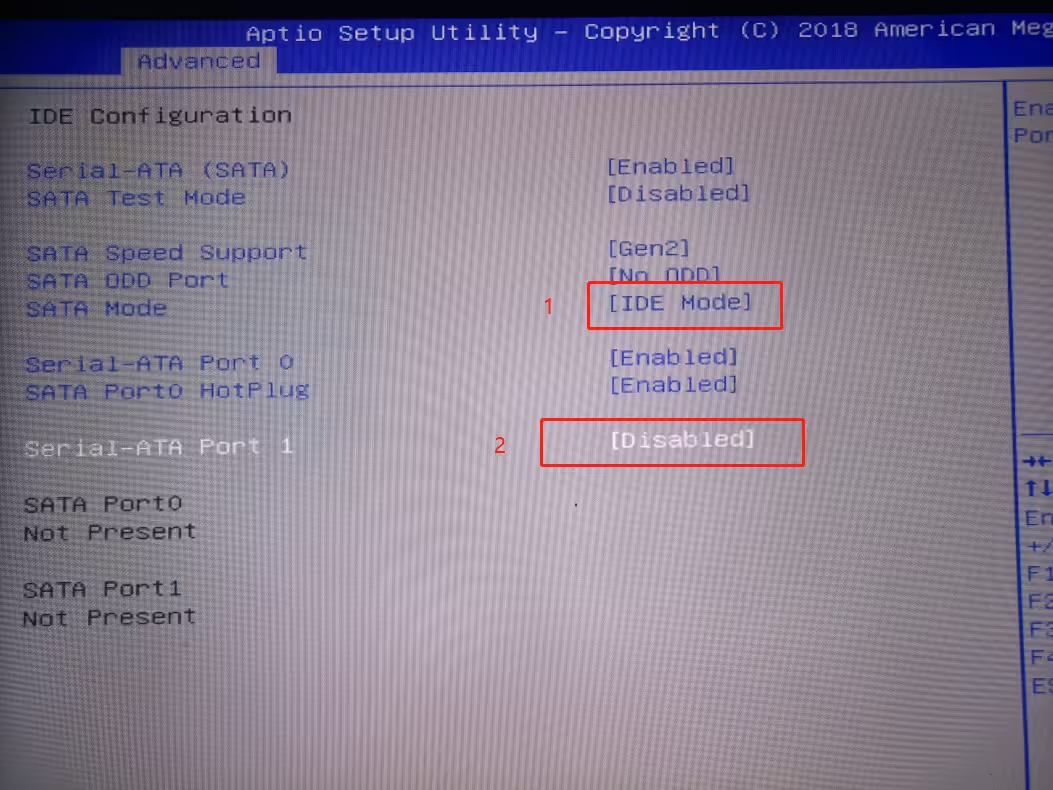
【3】设置 SATA Mode 为 AHCI。Port 1 设置 Enabled
【4】选择本地pat
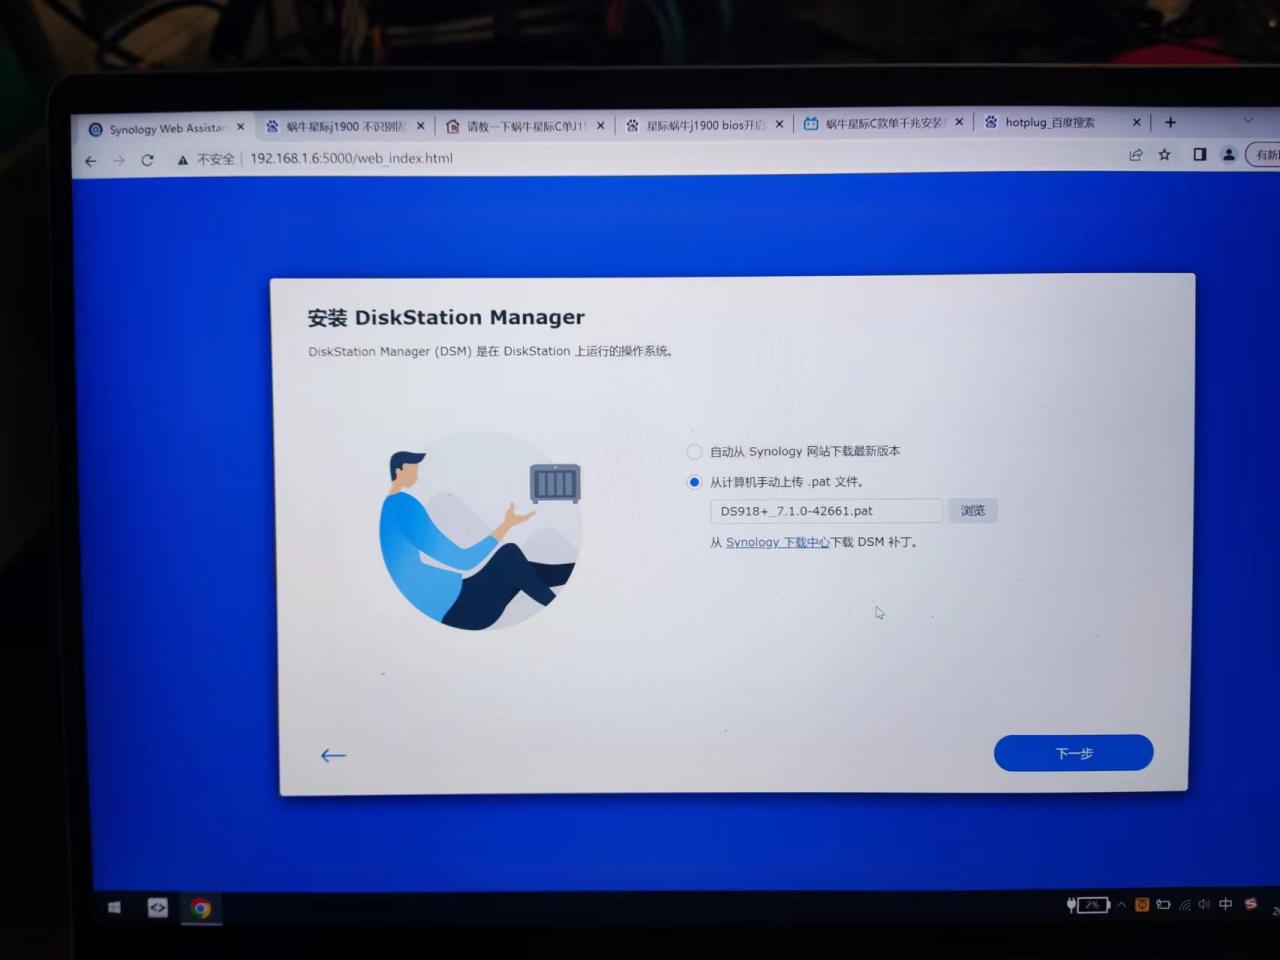
下一步:
等待完成100%,会有倒计时10分钟(其实用不到那么久,差不多五分钟就好了)

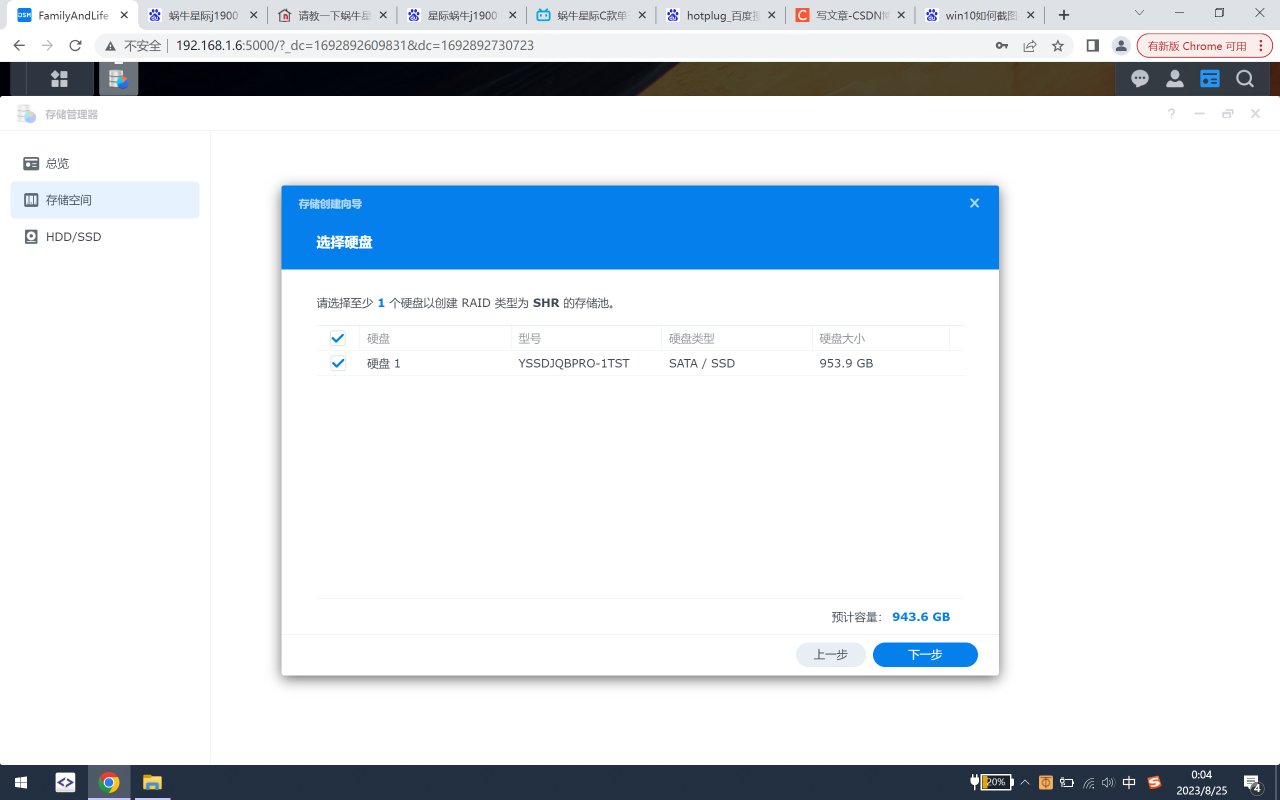
【5】设置新的储存空间
储存管理器 – 新增储存池 – 新建空间
参考文档:https://www.bilibili.com/read/cv18749043/
虽然不太一样,有一定参考意义。有些和我实际安装有出入
原文链接:https://blog.csdn.net/weixin_44461275/article/details/132485645?ops_request_misc=%257B%2522request%255Fid%2522%253A%2522171836984016800226533420%2522%252C%2522scm%2522%253A%252220140713.130102334.pc%255Fblog.%2522%257D&request_id=171836984016800226533420&biz_id=0&utm_medium=distribute.pc_search_result.none-task-blog-2~blog~first_rank_ecpm_v1~times_rank-22-132485645-null-null.nonecase&utm_term=NAS%E7%A1%AC%E7%9B%98


